Husqvarna AUTOMOWER 430XH Owner Manual - Page 25
Overview Timer settings > Overview > Reset
 |
View all Husqvarna AUTOMOWER 430XH manuals
Add to My Manuals
Save this manual to your list of manuals |
Page 25 highlights
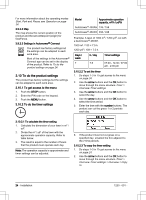
3. Use the arrow buttons and the OK button to copy the timer setting. You can copy the timer settings day to day or for the full week. 3.10.2.4 To reset the timer setting You can remove all timer settings and use the factory setting. The factory timer setting lets the product to operate all hours of each day of the week. Refer to To do the timer settings on page 24. 1. Do steps 1-3 in To do the basic settings on page 23. 2. Use the arrow buttons and the OK button to move through the menu structure Timer > Overview Timer settings > Overview > Reset timer. a) Push the arrow buttons to select Current day to only set the current day to factory settings. b) Push the arrow buttons to select All week to reset all timer settings to factory settings. 3. Push the OK button. 3.10.3 Cutting height The cutting height can be varied from MIN (2 cm / 0.8 in.) to MAX (6 cm / 2.5 in.). Note: The height adjustment setting is shown in the display of the product as a scale/numerical value. CAUTION: During the first weeks after a new installation, the cutting height must be set to MAX to avoid damaging the loop wire. After this, the cutting height can be lowered step by step every week until the desired cutting height has been reached. 3.10.3.1 To set the cutting height 1. Do steps 1-3 in To get access to the menu on page 24. 2. Use the arrow buttons and the OK button to move through the menu structure Cutting height. 3. Use the arrow buttons to set the cutting height. 4. Push the OK button. 3.10.4 Security level There are 3 security levels for the product Low, Medium and High or you can select your settings in Custom. Function Low Medium High Alarm X PIN-code X X Time lock X X X • Alarm - An alarm goes off if the PIN-code is not entered within 10 seconds after the STOP button is pushed. The alarm also goes off when the product is lifted. The alarm stops when the PIN-code is entered. • PIN-code - The correct PIN-code must be entered to get access to the Menu structure of the product. If the incorrect PIN-code is entered 5 times, the product is locked for a time. The lock is extended for each new incorrect try. • Time lock - The product locks if the PINcode has not been entered in 30 days. Enter the PIN-code to get access to the product. 3.10.4.1 To set the security level Select 1 of 3 security levels for your product. 1. Do steps 1-3 in To get access to the menu on page 24. 2. Use the arrow buttons and the OK button to move through the menu structure Settings > Security > Security level. 3. Use the arrow buttons and the OK button to select the level of security. 1230 - 001 - Installation - 25
-
 1
1 -
2
-
3
-
4
-
5
-
6
-
7
-
8
-
9
-
10
-
11
-
12
-
13
-
14
-
15
-
16
-
17
-
18
-
19
-
 20
20 -
 21
21 -
 22
22 -
 23
23 -
 24
24 -
 25
25 -
 26
26 -
 27
27 -
 28
28 -
 29
29 -
 30
30 -
31
-
32
-
33
-
34
-
35
-
36
-
37
-
38
-
39
-
40
-
41
-
42
-
43
-
44
-
45
-
46
-
47
-
48
-
49
-
50
-
51
-
52
-
53
-
54
-
55
-
56
-
57
-
58
-
59
-
60
 |
 |
