IBM 6648 User Guide - Page 24
Any printer or parallel device to the parallel port connector.
 |
UPC - 087944583387
View all IBM 6648 manuals
Add to My Manuals
Save this manual to your list of manuals |
Page 24 highlights
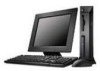
To set up your computer, use the previous illustrations and the following steps to connect the cables to your computer. 1. If your computer is the desktop model, check the position of the voltage-selection switch. Use a ballpoint pen to slide the switch, if necessary. v If the voltage supply range is 90-137 V ac, set the voltage switch to 115 V. v If the voltage supply range is 180-265 V ac, set the voltage switch to 230 V. Voltage Switch 115 2. Connect the monitor cable to the monitor (if it is not already attached), then to the monitor connector and tighten the attachment screws. Note: If your computer comes with an accelerated graphics port (AGP) adapter, the monitor connector on the system board will be disabled. Connect the monitor to the AGP monitor connector. 3. Connect the keyboard cable to the purple keyboard connector. Connect the mouse cable to the green mouse connector. Note: If your computer comes with Windows NT and a ScrollPoint™ II mouse, the first time you start up your computer, your mouse will function, but your mouse will not have its ScrollPoint function. You must shut down and restart the computer to enable the ScrollPoint function. 4. Connect any additional devices you have. v Any printer or parallel device to the parallel port connector. v Any serial device or external modem in the serial connector. v Any universal serial bus (USB) devices. v Any optional devices, such as speakers, microphones, or headphones, for models with an audio device. v If there is a label covering the power connector, remove it. Connect the power cords to the computer, monitor, and other devices first, and then plug the cords into properly grounded electrical outlets. v If your computer comes with an Ethernet adapter, connect the Ethernet cable. 10 User Guide
-
 1
1 -
2
-
3
-
4
-
5
-
6
-
7
-
8
-
9
-
10
-
11
-
12
-
13
-
14
-
15
-
16
-
17
-
18
-
 19
19 -
 20
20 -
 21
21 -
 22
22 -
 23
23 -
 24
24 -
 25
25 -
 26
26 -
 27
27 -
 28
28 -
 29
29 -
30
-
31
-
32
-
33
-
34
-
35
-
36
-
37
-
38
-
39
-
40
-
41
-
42
-
43
-
44
-
45
-
46
-
47
-
48
-
49
-
50
-
51
-
52
-
53
-
54
-
55
-
56
-
57
-
58
-
59
-
60
-
61
-
62
-
63
-
64
-
65
-
66
-
67
-
68
-
69
-
70
-
71
-
72
-
73
-
74
-
75
-
76
-
77
-
78
-
79
-
80
-
81
-
82
-
83
-
84
-
85
-
86
-
87
-
88
-
89
-
90
-
91
-
92
-
93
-
94
-
95
-
96
-
97
-
98
-
99
-
100
-
101
-
102
-
103
-
104
-
105
-
106
-
107
-
108
-
109
-
110
-
111
-
112
-
113
-
114
-
115
-
116
-
117
-
118
-
119
-
120
-
121
-
122
-
123
-
124
-
125
-
126
-
127
-
128
-
129
-
130
-
131
-
132
-
133
-
134
-
135
-
136
-
137
-
138
-
139
-
140
-
141
-
142
-
143
-
144
-
145
-
146
-
147
-
148
-
149
-
150
 |
 |
