IBM 72335LU User Guide - Page 56
Hot-adding, DIMMs
 |
UPC - 883436081535
View all IBM 72335LU manuals
Add to My Manuals
Save this manual to your list of manuals |
Page 56 highlights
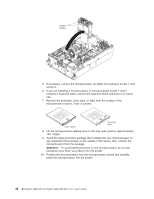
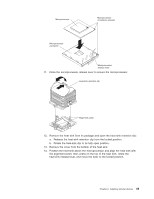
If there is a gap between the DIMM and the retaining clips, the DIMM has not been correctly inserted; open the retaining clips, remove the DIMM, and then reinsert it. 10. Replace the memory card: a. Insert the memory card into the memory-card connector. b. Press the memory card into the connector and close the small retention lever. c. Wait 2 seconds and close the large retention lever. d. Slide the orange release latch to the locked position. If you have other devices to install or remove, do so now. Otherwise, go to "Completing the installation" on page 50. Hot-adding DIMMs The following notes describe information that you must consider when you hot-add DIMMs and memory cards: v The server must contain a minimum of 4 GB of memory. v You must enable hot-add memory in the Configuration/Setup Utility program: 1. Turn on the server. 2. When the prompt Press F1 for Configuration/Setup is displayed, press F1. 3. From the Configuration/Setup Utility main menu, select Advanced Setup. 4. Select Memory Settings. 5. Enable the hot-add setting from within this window. 6. Save the settings and exit the Configuration/Setup Utility program. v The operating system must support the hot-add feature. v If a single memory card is installed in memory-card connector 1, you can hot-add a memory card only in memory-card connector 2. v If a single memory card is installed in memory-card connector 3, you can hot-add a memory card only in memory-card connector 4. v If two memory cards are installed in memory-card connectors 1 and 3, you can hot-add two memory cards only in memory-card connectors 2 and 4. To hot-add DIMMs and memory cards, complete the following steps: 1. Read the safety information that begins on page v and "Installation guidelines" on page 26. Attention: Static electricity that is released to internal server components when the server is powered-on might cause the server to halt, which might result in the loss of data. To avoid this potential problem, always use an electrostatic-discharge wrist strap or other grounding system when you work inside the server with the power on. 2. Remove the server cover (see "Removing the cover and bezel" on page 28). 3. Place a memory card on a flat, static-protective surface, with the DIMM connectors facing up. Attention: To avoid breaking the DIMM retaining clips or damaging the DIMM connectors, open and close the clips gently. 4. Open the retaining clip on each end of the DIMM connector. 5. Touch the static-protective package that contains the DIMM to any unpainted metal surface on the outside of the server; then, remove the DIMM from the package. 6. Turn the DIMM so that the DIMM keys align correctly with the slot. 44 IBM System x3850 M2 and System x3950 M2 Type 7141: User's Guide
-
 1
1 -
2
-
3
-
4
-
5
-
6
-
7
-
8
-
9
-
10
-
11
-
12
-
13
-
14
-
15
-
16
-
17
-
18
-
19
-
20
-
21
-
22
-
23
-
24
-
25
-
26
-
27
-
28
-
29
-
30
-
31
-
32
-
33
-
34
-
35
-
36
-
37
-
38
-
39
-
40
-
41
-
42
-
43
-
44
-
45
-
46
-
47
-
48
-
49
-
50
-
 51
51 -
 52
52 -
 53
53 -
 54
54 -
 55
55 -
 56
56 -
 57
57 -
 58
58 -
 59
59 -
 60
60 -
 61
61 -
62
-
63
-
64
-
65
-
66
-
67
-
68
-
69
-
70
-
71
-
72
-
73
-
74
-
75
-
76
-
77
-
78
-
79
-
80
-
81
-
82
-
83
-
84
-
85
-
86
-
87
-
88
-
89
-
90
-
91
-
92
-
93
-
94
-
95
-
96
 |
 |
