IBM 72335LU User Guide - Page 57
Installing, microprocessor - xeon
 |
UPC - 883436081535
View all IBM 72335LU manuals
Add to My Manuals
Save this manual to your list of manuals |
Page 57 highlights
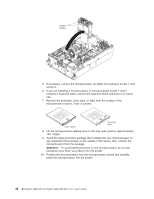
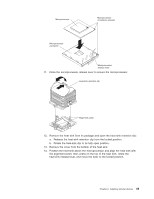
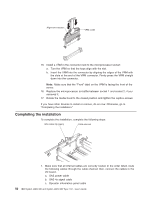
7. Insert the DIMM into the connector by aligning the edges of the DIMM with the slots at the ends of the DIMM connector. Firmly press one end of the DIMM into the connector; then, press the other end into the connector. The retaining clips snap into the locked position when the DIMM is seated in the connector. If there is a gap between the DIMM and the retaining clips, the DIMM has not been correctly inserted; open the retaining clips, remove the DIMM, and then reinsert it. Release latch 8. Open the memory-card retention levers on the top of the memory card. Attention: When you move the memory card, do not allow it to touch any components or structures inside the server. 9. Insert the memory card into the memory-card connector. 10. Press the memory card into the connector and close the small retention lever. 11. Wait 2 seconds and close the large retention lever. 12. Slide the orange release latch to the locked position. If you have other devices to install or remove, do so now. Otherwise, go to "Completing the installation" on page 50. Installing a microprocessor The following notes describe the type of microprocessor that the server supports and other information that you must consider when you install a microprocessor: v For a list of supported optional devices for the server, see http://www.ibm.com/ servers/eserver/serverproven/compat/us/. v The server supports up to four Intel Xeon microprocessors. If you are installing two or more microprocessors, they must be the same cache size and type, and the same clock speed. v The server can operate as a symmetric multiprocessing (SMP) server. With SMP, certain operating systems and application programs can distribute the processing Chapter 2. Installing optional devices 45
-
 1
1 -
2
-
3
-
4
-
5
-
6
-
7
-
8
-
9
-
10
-
11
-
12
-
13
-
14
-
15
-
16
-
17
-
18
-
19
-
20
-
21
-
22
-
23
-
24
-
25
-
26
-
27
-
28
-
29
-
30
-
31
-
32
-
33
-
34
-
35
-
36
-
37
-
38
-
39
-
40
-
41
-
42
-
43
-
44
-
45
-
46
-
47
-
48
-
49
-
50
-
51
-
 52
52 -
 53
53 -
 54
54 -
 55
55 -
 56
56 -
 57
57 -
 58
58 -
 59
59 -
 60
60 -
 61
61 -
 62
62 -
63
-
64
-
65
-
66
-
67
-
68
-
69
-
70
-
71
-
72
-
73
-
74
-
75
-
76
-
77
-
78
-
79
-
80
-
81
-
82
-
83
-
84
-
85
-
86
-
87
-
88
-
89
-
90
-
91
-
92
-
93
-
94
-
95
-
96
 |
 |
