Icom IC-2820H Instruction Manual - Page 36
Setting A Frequency - manual
 |
View all Icom IC-2820H manuals
Add to My Manuals
Save this manual to your list of manuals |
Page 36 highlights
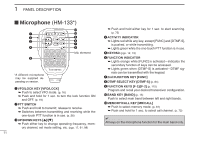
2 SETTING A FREQUENCY ■ Preparation D Turning power ON/OFF [PWR] D Operating frequency band selection In the default condition, or after resetting the CPU, 2 m band is assigned to the left band, 70 cm band is assigned to the right band. However, the 2 m band can also be assigned into the right, and 70 cm band can also be assigned into the left band. ➥ Push and hold [PWR] for 1 sec. to turn power ON and OFF. D MAIN band The IC-2820H can receive 144 MHz and 440(430) MHz band signals simultaneously. To change or activate any of the functions or to change frequency via the microphone, you must designate one band as the main band. The transceiver transmits a signal on the main band only. [MAIN•BAND] ➥ Push the desired band's [MAIN•BAND] to select the main band. • "Q" indicates the main band. ➥ Push [BAND] to toggle the main band between BAND left and right bands. 15 [MAIN•BAND] [DIAL] Frequency band initial is displayed. q Push and hold the desired band's [MAIN•BAND] for 1 sec. • Frequency band initial appears. wRotate the same band's [DIAL] to select the desired fre- quency band. • Pushing [Y]/[Z] on the microphone also selects the band. ePush the [MAIN•BAND] to return to frequency indication in the selected frequency band. Note that in this manual, sections beginning with a microphone icon (as at left), designate operation via the HM-133 microphone.
-
 1
1 -
2
-
3
-
4
-
5
-
6
-
7
-
8
-
9
-
10
-
11
-
12
-
13
-
14
-
15
-
16
-
17
-
18
-
19
-
20
-
21
-
22
-
23
-
24
-
25
-
26
-
27
-
28
-
29
-
30
-
 31
31 -
 32
32 -
 33
33 -
 34
34 -
 35
35 -
 36
36 -
 37
37 -
 38
38 -
 39
39 -
 40
40 -
 41
41 -
42
-
43
-
44
-
45
-
46
-
47
-
48
-
49
-
50
-
51
-
52
-
53
-
54
-
55
-
56
-
57
-
58
-
59
-
60
-
61
-
62
-
63
-
64
-
65
-
66
-
67
-
68
-
69
-
70
-
71
-
72
-
73
-
74
-
75
-
76
-
77
-
78
-
79
-
80
-
81
-
82
-
83
-
84
-
85
-
86
-
87
-
88
-
89
-
90
-
91
-
92
-
93
-
94
-
95
-
96
-
97
-
98
-
99
-
100
-
101
-
102
-
103
-
104
-
105
-
106
-
107
-
108
-
109
-
110
-
111
-
112
-
113
-
114
-
115
-
116
-
117
-
118
-
119
-
120
-
121
-
122
-
123
-
124
-
125
-
126
-
127
-
128
-
129
-
130
-
131
-
132
-
133
-
134
-
135
-
136
-
137
-
138
-
139
-
140
-
141
-
142
-
143
-
144
-
145
-
146
-
147
-
148
-
149
-
150
-
151
-
152
-
153
-
154
-
155
-
156
-
157
-
158
-
159
-
160
-
161
-
162
-
163
-
164
 |
 |
