InSinkErator Invite H990-SS Owners Manual - Page 5
Start Here
 |
View all InSinkErator Invite H990-SS manuals
Add to My Manuals
Save this manual to your list of manuals |
Page 5 highlights
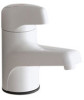
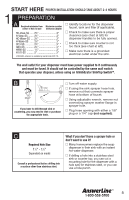
START HERE PROPER INSTALLATION SHOULD TAKE ABOUT 2-4 HOURS 1 PREPARATION A Required minimum from Maximum counter center of hole to wall thickness (depth) HC-View-SS ...... 25⁄8 3" H-View-SS ........ 25⁄8 3" HC-Wave-SS .... 25⁄8 3" H-Wave-SS ...... 23⁄8 3" HC3-SS 21⁄4 3⁄4" * GN3-SS 21⁄2 3⁄4" * H990-SS .......... 11⁄4 3" H770-SS .......... 2 3⁄4" * HC3/GN3, extension is available by special order (EXT-10) I Identify locations for the dispenser faucet, tank and filter (if applicable). I Check to make sure there is proper clearance (see chart at left) for dispenser handles to be fully opened. I Check to make sure counter is not too thick (see chart at left). I Make sure there is a grounded electrical outlet under the sink. The wall outlet for your dispenser must have power supplied to it continuously and must be fused. It should not be controlled by the same wall switch that operates your disposer, unless using an InSinkErator SinkTop SwitchTM. B If you have to drill through sink or countertop, you may need to rent or purchase the appropriate tools. I Turn off water supply. I If using the sink sprayer hose hole, remove nut that connects sprayer hose at bottom of faucet. I Using adjustable wrench, remove nut connecting sprayer washer flange in sprayer hole. I Plug hose opening with either a 1/8" plug or a 1/4" cap (not supplied). C Required Hole Size 11⁄4" - 11⁄2" Dependent on model Consult a professional before drilling into a surface other than stainless steel. What if you don't have a sprayer hole or don't want to use it? I Many homeowners replace the soap dispenser in their sink with an instant hot water dispenser. I If drilling a hole into a stainless steel sink or counter top, you can cut a mounting hole for the dispenser with a hole saw for stainless steel, or you can use a hole punch. 5
-
 1
1 -
 2
2 -
 3
3 -
 4
4 -
 5
5 -
 6
6 -
 7
7 -
 8
8 -
 9
9 -
 10
10 -
 11
11 -
12
-
13
-
14
-
15
-
16
-
17
-
18
-
19
-
20
-
21
-
22
-
23
-
24
-
25
-
26
-
27
-
28
-
29
-
30
-
31
-
32
-
33
-
34
-
35
-
36
-
37
-
38
-
39
-
40
-
41
-
42
-
43
 |
 |
