Intel AFCSASRISER User Guide - Page 102
Installing the Intel® RAID Web Console 2 on Linux or SuSE* Linux Enterprise Server
 |
View all Intel AFCSASRISER manuals
Add to My Manuals
Save this manual to your list of manuals |
Page 102 highlights
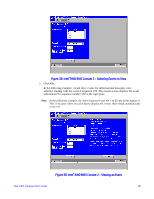
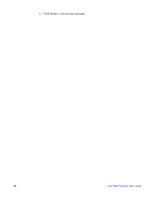
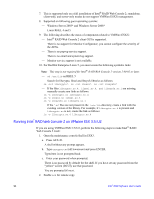
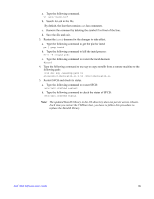
- Select Complete if you are installing the Intel® RAID Web Console 2 on a system. - Select Custom Installation if you want to select or omit individual program components to install. When selected, more custom options are provided. Please read the instructions on the screen carefully to make sure you select the preferred setup type. 8. Click Next to proceed and then click Finish to complete the installation process. Installing the Intel® RAID Web Console 2 on Linux or SuSE* Linux Enterprise Server To install Intel® RAID Web Console 2 on a system running Red Hat* Linux 3.0, 4.0, or 5.0, or SuSE* Linux Enterprise Server 9,10 or 11, complete the following steps: 1. Unzip the file ir3_Linux_RWC2_v....tgz. 2. In the unzipped files, read the readme.txt file and follow the instructions closely, in order to make the installation successful. 3. Run install.sh and follow the instructions that display on the screen. The three setup options are the same as those shown in step 7 of the Microsoft Windows* installation instructions. Intel® RAID Web Console 2 Support and Installation on VMWare This section documents the installation of Intel® RAID Web Console 2 on VMWare Classic (with console operating system) and on the VMWare ESX 3i operating system. Installing Intel® RAID Web Console 2 for VMWare Classic VMWare does not support any graphics components. In order to install the server component of Intel® RAID Web Console 2 (Intel® RAID Web Console 2 without popup and client), run the script file ServerInstall.sh and choose setup type "4". For the noninteractive (silent) mode, run ./ServerInstall.sh -x. In order to manage Intel® RAID Web Console 2 on a VMWare system, install Intel® RAID Web Console 2 Client from a remote system. Uninstalling Intel® RAID Web Console 2 for VMWare To uninstall the Server Component of Intel® RAID Web Console 2 on VMWare, use the Uninstall command in the Program menu or run the script /uninstaller.sh. Note the following points: 1. An Intel® RAID Web Console 2 upgrade is supported in this release. This release can be upgraded by future releases. 90 Intel® RAID Software User's Guide
-
 1
1 -
2
-
3
-
4
-
5
-
6
-
7
-
8
-
9
-
10
-
11
-
12
-
13
-
14
-
15
-
16
-
17
-
18
-
19
-
20
-
21
-
22
-
23
-
24
-
25
-
26
-
27
-
28
-
29
-
30
-
31
-
32
-
33
-
34
-
35
-
36
-
37
-
38
-
39
-
40
-
41
-
42
-
43
-
44
-
45
-
46
-
47
-
48
-
49
-
50
-
51
-
52
-
53
-
54
-
55
-
56
-
57
-
58
-
59
-
60
-
61
-
62
-
63
-
64
-
65
-
66
-
67
-
68
-
69
-
70
-
71
-
72
-
73
-
74
-
75
-
76
-
77
-
78
-
79
-
80
-
81
-
82
-
83
-
84
-
85
-
86
-
87
-
88
-
89
-
90
-
91
-
92
-
93
-
94
-
95
-
96
-
 97
97 -
 98
98 -
 99
99 -
 100
100 -
 101
101 -
 102
102 -
 103
103 -
 104
104 -
 105
105 -
 106
106 -
 107
107 -
108
-
109
-
110
-
111
-
112
-
113
-
114
-
115
-
116
-
117
-
118
-
119
-
120
-
121
-
122
-
123
-
124
-
125
-
126
-
127
-
128
-
129
-
130
-
131
-
132
-
133
-
134
-
135
-
136
-
137
-
138
-
139
-
140
-
141
-
142
-
143
-
144
-
145
-
146
-
147
-
148
-
149
-
150
-
151
-
152
-
153
-
154
-
155
-
156
-
157
-
158
-
159
-
160
-
161
-
162
-
163
-
164
-
165
-
166
-
167
-
168
-
169
-
170
-
171
-
172
-
173
-
174
-
175
-
176
-
177
-
178
-
179
-
180
-
181
-
182
-
183
-
184
-
185
-
186
-
187
-
188
-
189
-
190
-
191
-
192
 |
 |