Intel SE440BX-2 Product Guide - Page 26
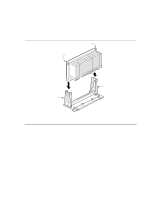
Remove the processor by pressing in on the latches and pulling the processor straight up
 |
UPC - 735858129466
View all Intel SE440BX-2 manuals
Add to My Manuals
Save this manual to your list of manuals |
Page 26 highlights
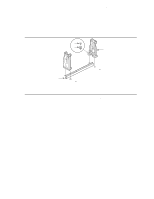
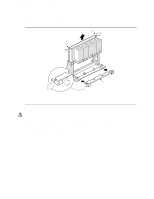
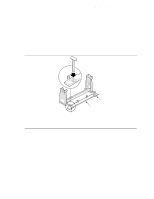
Installing and Replacing Motherboard Components 6. Remove the top bar of the heatsink support from the base as shown in Figure 8. Press in on the latches to release the top bar. B B A A Heatsink support top bar B Latches OM07180 Figure 8. Removing the Heatsink Support Top Bar and the Processor CAUTION Pressing on the motherboard or components while removing the processor can cause damage. If necessary, you can safely press on the motherboard's plastic connectors to gain leverage while removing the processor. 7. Remove the processor by pressing in on the latches and pulling the processor straight up as shown in Figure 8. Place the processor aside. 26
-
 1
1 -
2
-
3
-
4
-
5
-
6
-
7
-
8
-
9
-
10
-
11
-
12
-
13
-
14
-
15
-
16
-
17
-
18
-
19
-
20
-
 21
21 -
 22
22 -
 23
23 -
 24
24 -
 25
25 -
 26
26 -
 27
27 -
 28
28 -
 29
29 -
 30
30 -
 31
31 -
32
-
33
-
34
-
35
-
36
-
37
-
38
-
39
-
40
-
41
-
42
-
43
-
44
-
45
-
46
-
47
-
48
-
49
-
50
-
51
-
52
-
53
-
54
-
55
-
56
-
57
-
58
-
59
-
60
-
61
-
62
-
63
-
64
-
65
-
66
 |
 |

Installing and Replacing Motherboard Components
26
6.
Remove the top bar of the heatsink support from the base as shown in Figure 8.
Press in on the
latches to release the top bar.
B
B
OM07180
A
A
Heatsink support top bar
B
Latches
Figure 8.
Removing the Heatsink Support Top Bar and the Processor
CAUTION
Pressing on the motherboard or components while removing the processor can cause damage.
If
necessary, you can safely press on the motherboard’s plastic connectors to gain leverage while
removing the processor.
7.
Remove the processor by pressing in on the latches and pulling the processor straight up as
shown in Figure 8.
Place the processor aside.