Intel SR1520MLNA User Guide - Page 59
Removing Power Supply
 |
UPC - 735858197434
View all Intel SR1520MLNA manuals
Add to My Manuals
Save this manual to your list of manuals |
Page 59 highlights
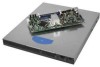
5. Push back on the tab for the cable harness to release the bundle of cables. 6. Lift the cable bundle from the harness. 7. Unplug the AC power cable from the rear of the system. See letter "A" in the following figure. 8. Lift up on the power supply to remove it. See letter "B" in the figure. Note: While lifting the system to remove it, carefully untangle the power supply cables inside the system if necessary. A B AF002524 Figure 31. Removing Power Supply 9. Slide the rear edge of the replacement power supply into place, lining up with the rear of the server system. See letter "A" in the following figure. 10. Set the front of the power supply down, ensuring it sits behind the metal tab in the bottom of the system. See letter "B" in the figure. 11. Plug in the AC power cable at the rear of the system. See letter "C" in the figure. 12. Push the bundle of cables into place between the drive carriers and the wall of the system. 13. Insert the cable bundle into the cable harness and then close the harness over the cables. Intel® Server System SR1520ML User's Guide 39
-
 1
1 -
2
-
3
-
4
-
5
-
6
-
7
-
8
-
9
-
10
-
11
-
12
-
13
-
14
-
15
-
16
-
17
-
18
-
19
-
20
-
21
-
22
-
23
-
24
-
25
-
26
-
27
-
28
-
29
-
30
-
31
-
32
-
33
-
34
-
35
-
36
-
37
-
38
-
39
-
40
-
41
-
42
-
43
-
44
-
45
-
46
-
47
-
48
-
49
-
50
-
51
-
52
-
53
-
 54
54 -
 55
55 -
 56
56 -
 57
57 -
 58
58 -
 59
59 -
 60
60 -
 61
61 -
 62
62 -
 63
63 -
 64
64 -
65
-
66
-
67
-
68
-
69
-
70
-
71
-
72
-
73
-
74
-
75
-
76
-
77
-
78
-
79
-
80
-
81
-
82
-
83
-
84
-
85
-
86
-
87
-
88
-
89
-
90
-
91
-
92
-
93
-
94
-
95
-
96
-
97
-
98
-
99
-
100
-
101
-
102
-
103
-
104
-
105
-
106
-
107
-
108
-
109
-
110
-
111
-
112
-
113
-
114
-
115
-
116
-
117
-
118
-
119
-
120
-
121
-
122
-
123
-
124
-
125
-
126
-
127
-
128
-
129
-
130
-
131
-
132
-
133
-
134
-
135
-
136
-
137
-
138
-
139
-
140
-
141
-
142
-
143
-
144
-
145
-
146
-
147
-
148
-
149
-
150
-
151
-
152
-
153
-
154
-
155
-
156
-
157
-
158
-
159
-
160
 |
 |
