Invacare IN66AHANFR Owners Manual - Page 27
Seat And Back
 |
View all Invacare IN66AHANFR manuals
Add to My Manuals
Save this manual to your list of manuals |
Page 27 highlights
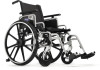
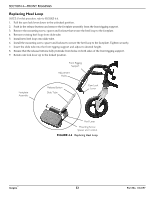
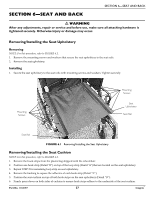
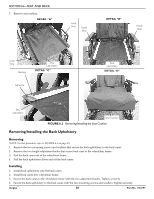
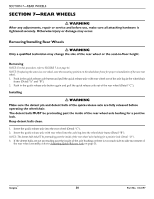
SECTION 6-SEAT AND BACK SECTION 6-SEAT AND BACK ƽ WARNING After any adjustments, repair or service and before use, make sure all attaching hardware is tightened securely. Otherwise injury or damage may occur. Removing/Installing the Seat Upholstery Removing NOTE: For this procedure, refer to FIGURE 6.1. 1. Remove the mounting screws and washers that secure the seat upholstery to the seat rails. 2. Remove the seat upholstery. Installing 1. Secure the seat upholstery to the seat rails with mounting screws and washers. Tighten securely. Mounting Screws Mounting Screws Seat Upholstery Seat Rail Seat Rail FIGURE 6.1 Removing/Installing the Seat Upholstery Removing/Installing the Seat Cushion NOTE: For this procedure, refer to FIGURE 6.2. 1. Remove the hook strips from the plastic bag shipped with the wheelchair. 2. Position one hook strip (Detail "B") on top of the loop strip (Deatil "A")that are located on the seat upholstery. 3. Repeat STEP 2 for remaining loop strip on seat upholstery. 4. Remove the backing to expose the adhesive of each hook strip (Detail "C"). 5. Position the seat cushion on top of both hook strips on the seat upholstery (Detail "D"). 6. Firmly press down on both sides of cushion to ensure hook strips adhere to the underside of the seat cushion. Part No. 1163197 27 Insignia™
-
 1
1 -
2
-
3
-
4
-
5
-
6
-
7
-
8
-
9
-
10
-
11
-
12
-
13
-
14
-
15
-
16
-
17
-
18
-
19
-
20
-
21
-
 22
22 -
 23
23 -
 24
24 -
 25
25 -
 26
26 -
 27
27 -
 28
28 -
 29
29 -
 30
30 -
 31
31 -
 32
32 -
33
-
34
-
35
-
36
-
37
-
38
-
39
-
40
-
41
-
42
-
43
-
44
-
45
-
46
-
47
-
48
-
49
-
50
-
51
-
52
 |
 |
