Invacare IN66AHANFR Owners Manual - Page 43
Removing
 |
View all Invacare IN66AHANFR manuals
Add to My Manuals
Save this manual to your list of manuals |
Page 43 highlights
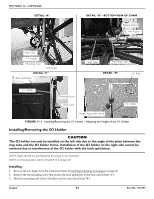
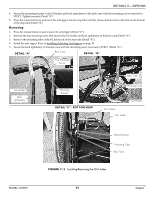
SECTION 11-OPTIONS 4. Secure the mounting bracket of the O2 holder and back upholstery to the back cane with the mounting screw removed in STEP 2. Tighten securely (Detail "A"). 5. Press the release button in and insert the anti‐tipper into the step tube until the release button locks in the hole on the bottom of the step tube (Detail "B"). Removing 1. Press the release button in and remove the anti‐tipper (Detail "C"). 2. Remove the top mounting screw that secures the O2 holder and back upholstery to the back cane (Detail "A"). 3. Remove the mounting tube of the O2 holder off of the step tube (Detail "B"). 4. Install the anti‐ tipper. Refer to Installing/Adjusting Anti‐tippers on page 38 5. Secure the back upholstery to the back cane with the mounting screw removed in STEP 1 (Detail "A"). DETAIL "A" Back Cane DETAIL "B" Top Mounting Screw O2 Holder Back Upholstery Mounting Bracket DETAIL "C" - BOTTOM VIEW Step Tube Mounting Tube O2 Holder Anti-Tipper O2 Holder Part No. 1163197 Release Button Mounting Tube Step Tube FIGURE 11.2 Installing/Removing the O2 Holder 43 Insignia™
-
 1
1 -
2
-
3
-
4
-
5
-
6
-
7
-
8
-
9
-
10
-
11
-
12
-
13
-
14
-
15
-
16
-
17
-
18
-
19
-
20
-
21
-
22
-
23
-
24
-
25
-
26
-
27
-
28
-
29
-
30
-
31
-
32
-
33
-
34
-
35
-
36
-
37
-
 38
38 -
 39
39 -
 40
40 -
 41
41 -
 42
42 -
 43
43 -
 44
44 -
 45
45 -
 46
46 -
 47
47 -
 48
48 -
49
-
50
-
51
-
52
 |
 |
