Invacare IN66AHANFR Owners Manual - Page 48
Installing Crutch and Cane Carrier, Installing/Removing the Seat Positioning Strap
 |
View all Invacare IN66AHANFR manuals
Add to My Manuals
Save this manual to your list of manuals |
Page 48 highlights
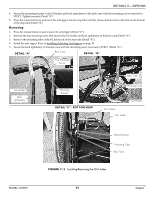
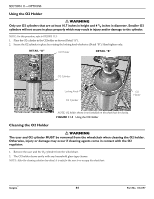
SECTION 11-OPTIONS Installing Crutch and Cane Carrier ƽ WARNING Check base weekly to ensure proper placement. When loading the crutch/cane carrier, ensure items are securely placed into the base. Also ensure that there is no interference with folding the wheelchair, the rear wheels, or the swing-back arms. Strap MUST be securely fastened while carrying items. NEVER insert or remove items while wheelchair is moving. NOTE: For this procedure, refer to FIGURE 11.8. 1. Slide the clamp with the base attached over the end of the step tube of the wheelchair. Ensure the base is towards the inside of the wheelchair. 2. Position the base parallel to the step tube. CAUTION Base should be parallel to step tube to avoid bending spokes when folding the wheelchair. Strap 3. Securely tighten the locknut that secures the base to the step tube of the wheelchair. Base 4. Remove the upper back upholstery screw and washer. 5. Align the strap with the back upholstery screw mounting hole. 6. Reinstall the back upholstery screw and washer and secure the strap to the wheelchair. Clamp 7. The base cleans easily with any chrome or glass cleaner. The strap can be cleaned with mild soap and water. Step Tube FIGURE 11.8 Installing Crutch and Cane Carrier Installing/Removing the Seat Positioning Strap Installing NOTE: For this procedure, refer to FIGURE 11.9 on page 49. NOTE: Right and left is determined by sitting in the wheelchair. 1. Remove the mounting screw and locknut that secure the back angle bracket to the wheelchair. 2. Secure the buckle strap to the back angle bracket on the right side of the wheelchair with mounting screw and locknut. Tighten securely. 3. Secure the tongue strap to the back angle bracket on the left side of the wheelchair with mounting screw and locknut. Tighten securely. Removing 1. Remove the mounting screw and locknut that secures the buckle strap to the back angle bracket. 2. Remove the buckle strap. 3. Secure the back angle bracket to the wheelchair frame with the mounting screw and locknut. Tighten securely. 4. Remove the mounting screw and locknut that secures the tongue strap to the back angle bracket. 5. Remove the tongue strap. 6. Secure the back angle bracket to the wheelchair frame with the mounting screw and locknut. Tighten securely. Insignia™ 48 Part No. 1163197
-
 1
1 -
2
-
3
-
4
-
5
-
6
-
7
-
8
-
9
-
10
-
11
-
12
-
13
-
14
-
15
-
16
-
17
-
18
-
19
-
20
-
21
-
22
-
23
-
24
-
25
-
26
-
27
-
28
-
29
-
30
-
31
-
32
-
33
-
34
-
35
-
36
-
37
-
38
-
39
-
40
-
41
-
42
-
 43
43 -
 44
44 -
 45
45 -
 46
46 -
 47
47 -
 48
48 -
 49
49 -
 50
50 -
 51
51 -
 52
52
 |
 |
