Invacare IN66AHANFR Owners Manual - Page 30
Rear Wheels
 |
View all Invacare IN66AHANFR manuals
Add to My Manuals
Save this manual to your list of manuals |
Page 30 highlights
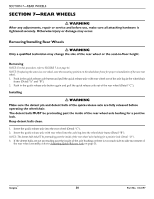
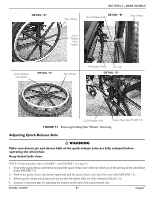
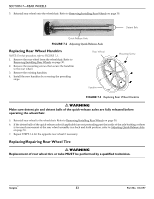
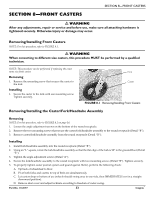
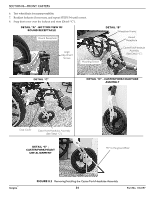
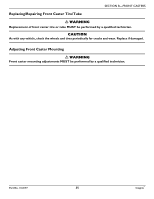
SECTION 7-REAR WHEELS SECTION 7-REAR WHEELS ƽ WARNING After any adjustments, repair or service and before use, make sure all attaching hardware is tightened securely. Otherwise injury or damage may occur. Removing/Installing Rear Wheels ƽ WARNING Only a qualified technician may change the size of the rear wheel or the seat-to-floor height. Removing NOTE: For this procedure, refer to FIGURE 7.1 on page 31. NOTE: If replacing the same size rear wheel, note the mounting position on the wheelchair frame for proper reinstallation of the new rear wheel. 1. Push in the quick release axle button and pull the quick release axle with rear wheel out of the axle lug in the wheelchair frame (Detail "A" and "B"). 2. Push in the quick release axle button again and pull the quick release axle out of the rear wheel (Detail "C"). Installing ƽ WARNING Make sure the detent pin and detent balls of the quick-release axle are fully released before operating the wheelchair. The detent balls MUST be protruding past the inside of the rear wheel axle bushing for a positive lock. Keep detent balls clean. 1. Insert the quick release axle into the rear wheel (Detail "C"). 2. Insert the quick release axle with rear wheel into the axle lug into the wheelchair frame (Detail "B"). NOTE: The detent balls MUST be protruding past the inside of the rear wheel axle bushing for a positive lock (Detail "D"). 3. If the detent balls are not protruding past the inside of the axle bushing or there is too much side‐to‐side movement of the rear wheel assembly, refer to Adjusting Quick‐Release Axle on page 31. Insignia™ 30 Part No. 1163197
-
 1
1 -
2
-
3
-
4
-
5
-
6
-
7
-
8
-
9
-
10
-
11
-
12
-
13
-
14
-
15
-
16
-
17
-
18
-
19
-
20
-
21
-
22
-
23
-
24
-
 25
25 -
 26
26 -
 27
27 -
 28
28 -
 29
29 -
 30
30 -
 31
31 -
 32
32 -
 33
33 -
 34
34 -
 35
35 -
36
-
37
-
38
-
39
-
40
-
41
-
42
-
43
-
44
-
45
-
46
-
47
-
48
-
49
-
50
-
51
-
52
 |
 |