Invacare TDXSP2V Owners Manual 2 - Page 63
Troubleshooting, 9.4 Installing/Removing 70NHD Footrest, Insert footrest mounting pin
 |
View all Invacare TDXSP2V manuals
Add to My Manuals
Save this manual to your list of manuals |
Page 63 highlights
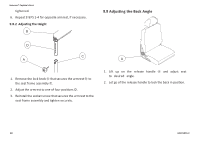
Inspect all fasteners including the back pan, back cane and angle adjustment fasteners, and the arm support, flip back and height adjustment fasteners. Ensure fasteners are securely tightened. Refer to the seating system service manual for torque specifications and tightening instructions. Make sure drive lock-out operates properly. Check limit switch position. 9.3 Troubleshooting For troubleshooting information and explanation of error codes, refer to the wheelchair base user manual and the individual electronics manual supplied with each wheelchair. 9.4 Installing/Removing 70NHD Footrest Illustration reflects right side footrest. 9 Service This illustration is for reference only. It accurately shows how the footrest installs and rotates in place, however, it does not reflect a captain's style seat. Illustration reflects left side footrest. 1. Turn the footrest A to the side (open footplate is perpendicular to the wheelchair. 2. Insert footrest mounting pin B into mounting tube C. 3. Push the footrest towards the inside of the wheelchair until it locks in place. The footplate will be on the inside of the wheelchair when locked in place. 4. Repeat steps 1 - 3 for other footrest assembly. 5. To remove the footrest, push the footrest release lever D inward, rotate footrest outward. 60101876-C 63
-
 1
1 -
2
-
3
-
4
-
5
-
6
-
7
-
8
-
9
-
10
-
11
-
12
-
13
-
14
-
15
-
16
-
17
-
18
-
19
-
20
-
21
-
22
-
23
-
24
-
25
-
26
-
27
-
28
-
29
-
30
-
31
-
32
-
33
-
34
-
35
-
36
-
37
-
38
-
39
-
40
-
41
-
42
-
43
-
44
-
45
-
46
-
47
-
48
-
49
-
50
-
51
-
52
-
53
-
54
-
55
-
56
-
57
-
 58
58 -
 59
59 -
 60
60 -
 61
61 -
 62
62 -
 63
63 -
 64
64 -
 65
65 -
 66
66 -
 67
67 -
 68
68 -
69
-
70
-
71
-
72
-
73
-
74
-
75
-
76
 |
 |
