Invacare TDXSP2V Owners Manual 2 - Page 66
Removing/Installing/Adjusting the Adjustable Heel Loop, 9.7.1 Removing the Adjustable Heel Loop
 |
View all Invacare TDXSP2V manuals
Add to My Manuals
Save this manual to your list of manuals |
Page 66 highlights
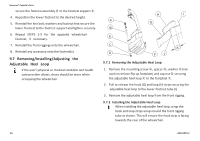
Invacare® Captain's Seat secure the footrest assembly D to the footrest support E. 4. Reposition the lower footrest to the desired height. 5. Reinstall the hex bolt, washers and locknut that secure the lower footrest to the footrest support and tighten securely. 6. Repeat STEPS 1-5 for the opposite wheelchair footrest, if necessary. 7. Reinstall the front riggings onto the wheelchair. 8. Reinstall any accessory onto the footrest(s). 9.7 Removing/Installing/Adjusting the Adjustable Heel Loop If the user's physical or medical condition and health care provider allows, shoes should be worn when occupying the wheelchair. 9.7.1 Removing the Adjustable Heel Loop 1. Remove the mounting screw A, spacer B, washer C(not used on deluxe flip up footplate) and cap nut D securing the adjustable heel loop E to the footplate F. 2. Pull to release the hook (G) and loop (H) strips securing the adjustable heel loop to the lower footrest tube (I). 3. Remove the adjustable heel loop from the front rigging. 9.7.2 Installing the Adjustable Heel Loop When installing the adjustable heel loop, wrap the hook and loop strips wrap around the front rigging tube as shown. This will ensure the hook strip is facing towards the rear of the wheelchair. 66 60101876-C
-
 1
1 -
2
-
3
-
4
-
5
-
6
-
7
-
8
-
9
-
10
-
11
-
12
-
13
-
14
-
15
-
16
-
17
-
18
-
19
-
20
-
21
-
22
-
23
-
24
-
25
-
26
-
27
-
28
-
29
-
30
-
31
-
32
-
33
-
34
-
35
-
36
-
37
-
38
-
39
-
40
-
41
-
42
-
43
-
44
-
45
-
46
-
47
-
48
-
49
-
50
-
51
-
52
-
53
-
54
-
55
-
56
-
57
-
58
-
59
-
60
-
 61
61 -
 62
62 -
 63
63 -
 64
64 -
 65
65 -
 66
66 -
 67
67 -
 68
68 -
 69
69 -
 70
70 -
 71
71 -
72
-
73
-
74
-
75
-
76
 |
 |
