Invacare TDXSP2V Owners Manual 2 - Page 67
Adjusting the Adjustable Heel Loop, 9.8 Adjusting Armrests, 9.8.1 Adjusting the Armrest Angle
 |
View all Invacare TDXSP2V manuals
Add to My Manuals
Save this manual to your list of manuals |
Page 67 highlights
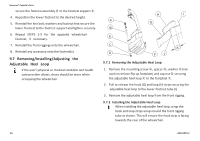
1. Using the mounting screw A, spacer B, washer (not used on deluxe flip up footplate) C and cap nut D secure the adjustable heel loop E to the footplate F. 2. Secure the hook G and loop H strips around the lower footrest tube (I). Refer to Adjusting the Adjustable Heel Loop. 9.7.3 Adjusting the Adjustable Heel Loop 1. If necessary, pull to release the hook G and loop H strips securing the adjustable heel loop E to the lower footrest tube I. 2. Determine the heel loop length and depth appropriate for the wheelchair user. A red line J is included on the hook strip to help indicate when the hook and loop strips overlap by 1-1/2 inches (38 mm) K. 3. Ensuring at least 1-1/2 (38 mm) K inches of the loop strip connects to the hook strip, firmly press the hook and loop strips together to secure the adjustable heel loop around the lower footrest tube. 4. If necessary, repeat STEPS 1-3 to adjust the remaining adjustable heel loop. 9.8 Adjusting Armrests 9 Service WARNING! Risk of Minor to Serious Injury Pinch points can cause minor to serious injury. -Be mindful of potential pinch points and use caution when using this product. 9.8.1 Adjusting the Armrest Angle 1. Lift up the armrest A. 2. Loosen the jam nut B. 3. Adjust the socket screw C up or down to the desired arm angle position. 4. Tighten the jam nut. 5. To determine the same angle for the opposite armrest, count the exposed threads after the jam nut has been 60101876-C 67
-
 1
1 -
2
-
3
-
4
-
5
-
6
-
7
-
8
-
9
-
10
-
11
-
12
-
13
-
14
-
15
-
16
-
17
-
18
-
19
-
20
-
21
-
22
-
23
-
24
-
25
-
26
-
27
-
28
-
29
-
30
-
31
-
32
-
33
-
34
-
35
-
36
-
37
-
38
-
39
-
40
-
41
-
42
-
43
-
44
-
45
-
46
-
47
-
48
-
49
-
50
-
51
-
52
-
53
-
54
-
55
-
56
-
57
-
58
-
59
-
60
-
61
-
 62
62 -
 63
63 -
 64
64 -
 65
65 -
 66
66 -
 67
67 -
 68
68 -
 69
69 -
 70
70 -
 71
71 -
 72
72 -
73
-
74
-
75
-
76
 |
 |
