JVC GR-SXM260 Instruction Manual - Page 24
Advanced Features cont.
 |
View all JVC GR-SXM260 manuals
Add to My Manuals
Save this manual to your list of manuals |
Page 24 highlights
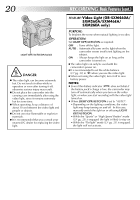
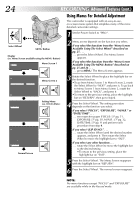
24 EN RECORDING Advanced Features (cont.) Using Menus For Detailed Adjustment This camcorder is equipped with an easy-to-use, on-screen menu system that simplifies many of the more detailed camcorder settings. 1 Set the Power Switch to "PRO.". Select Wheel MENU Button Display (ex. Menu Screen available using the MENU Button) 4NE X T D. ZOOM ON TELE MACRO OF F ON TAPE LENGTH T 3 0 Menu Screen 1 4BACK REC T I ME I NT . T I ME T I T LE LANG. DATE / T I ME J L I P I D NO. DEMO MODE OF F OF F ENGL I SH 06 OF F 4RE T URN Menu Screen 2 T I T LE LANG. ENGL I SH CH I NESE ARAB I C RUSS I AN Setting Menu (ex. TITLE LANG.) EX I T 4BACK REC T I ME I NT . T I ME T I T LE LANG. DATE / T I ME J L I P I D NO. DEMO MODE OF F OF F CH I NESE 06 OF F 4RE T URN Normal Screen 2 Menu access depends on the function you select. If you select the functions from the "Menu Screen Available Using The Select Wheel" described on pg. 25 . . . .... press the Select Wheel. The Menu Screen appears. If you select the functions from the "Menu Screen Available Using The MENU Button" described on pg. 25 and 26 . . . .... press MENU. The Menu Screen appears. 3 Rotate the Select Wheel to place the highlight bar on the desired function. •To go from Menu Screen 1 to Menu Screen 2, rotate the Select Wheel to "NEXT" and press it. To go back to Menu Screen 1 from Menu Screen 2, rotate the Select Wheel to "BACK", and press it. •To return to the previous setting, place the highlight bar on "RETURN", then go to step 6. 4 Press the Select Wheel. The setting procedure depends on the function you select. If you select "FOCUS", "EXPOSURE", "M.W.B." or "DATE/ TIME" . . . .... see respective pages (FOCUS: ੬ pg. 31, EXPOSURE: ੬ pg. 30, M.W.B.: ੬ pg. 32, DATE/TIME: ੬ pg. 9) and perform each procedure from step 4. If you select "JLIP ID NO rotate the Select Wheel until the desired number appears, and press it. Then rotate the Select Wheel to move the highlight bar to "EXIT". If you select any other functions . . . .... rotate the Select Wheel to move the highlight bar to the desired setting. •To return to the previous setting, place the highlight bar on "EXIT". 5 Press the Select Wheel. The Menu Screen reappears with the highlight bar on "RETURN". 6 Press the Select Wheel. The normal screen reappears. NOTE: No menu functions except "FOCUS" and "EXPOSURE" are available while in the Record mode.
-
 1
1 -
2
-
3
-
4
-
5
-
6
-
7
-
8
-
9
-
10
-
11
-
12
-
13
-
14
-
15
-
16
-
17
-
18
-
 19
19 -
 20
20 -
 21
21 -
 22
22 -
 23
23 -
 24
24 -
 25
25 -
 26
26 -
 27
27 -
 28
28 -
 29
29 -
30
-
31
-
32
-
33
-
34
-
35
-
36
-
37
-
38
-
39
-
40
-
41
-
42
-
43
-
44
-
45
-
46
-
47
-
48
-
49
-
50
-
51
-
52
-
53
-
54
-
55
-
56
-
57
-
58
-
59
-
60
 |
 |
