JVC GR-SXM260 Instruction Manual - Page 45
Make Connections
 |
View all JVC GR-SXM260 manuals
Add to My Manuals
Save this manual to your list of manuals |
Page 45 highlights
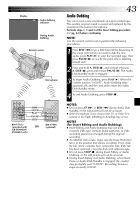
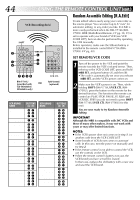
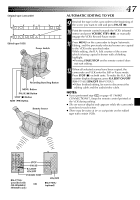
Open the cover. To J terminal (JLIP) To Video output and Audio output connectors Open the cover. To S-Video output connector Audio/Video (A/V) cable (provided) Editing cable* To Remote PAUSE S-Video cable (provided) To AUDIO (L/MONO), VIDEO and S-VIDEO IN connectors VCR To PAUSE-IN TV MAKE CONNECTIONS EN45 1 JVC VCR EQUIPPED WITH REMOTE PAUSE TERMINAL Connect the editing cable to the Remote PAUSE terminal. JVC VCR NOT EQUIPPED WITH REMOTE PAUSE TERMINAL BUT EQUIPPED WITH R.A. EDIT CONNECTOR Connect the editing cable to the R.A.EDIT connector. VCR OTHER THAN TYPE OR Connect the editing cable to the RM-V716U/RMV700U's PAUSE-IN connector. 2 Insert a recorded tape into the camcorder and set the Power Switch to "PLAY". 3 Turn the VCR power on, insert a recordable tape and engage the AUX mode (refer to the VCR's instructions). NOTE: If your VCR has an S-Video input connector or a SCART connector compatible with Y/C signals, connect the camcorder and the VCR using the provided S-Video cable. This can improve the dubbed picture quality. RM-V716U (provided with OR RM-V700U (optional) GR-SXM460A/ SXM46EA only) * Provided with GR-SXM460A/SXM46EA only. CONTINUED ON NEXT PAGE.
-
 1
1 -
2
-
3
-
4
-
5
-
6
-
7
-
8
-
9
-
10
-
11
-
12
-
13
-
14
-
15
-
16
-
17
-
18
-
19
-
20
-
21
-
22
-
23
-
24
-
25
-
26
-
27
-
28
-
29
-
30
-
31
-
32
-
33
-
34
-
35
-
36
-
37
-
38
-
39
-
 40
40 -
 41
41 -
 42
42 -
 43
43 -
 44
44 -
 45
45 -
 46
46 -
 47
47 -
 48
48 -
 49
49 -
 50
50 -
51
-
52
-
53
-
54
-
55
-
56
-
57
-
58
-
59
-
60
 |
 |
