JVC GR-SXM260 Instruction Manual - Page 6
Getting Started - ac adapter
 |
View all JVC GR-SXM260 manuals
Add to My Manuals
Save this manual to your list of manuals |
Page 6 highlights
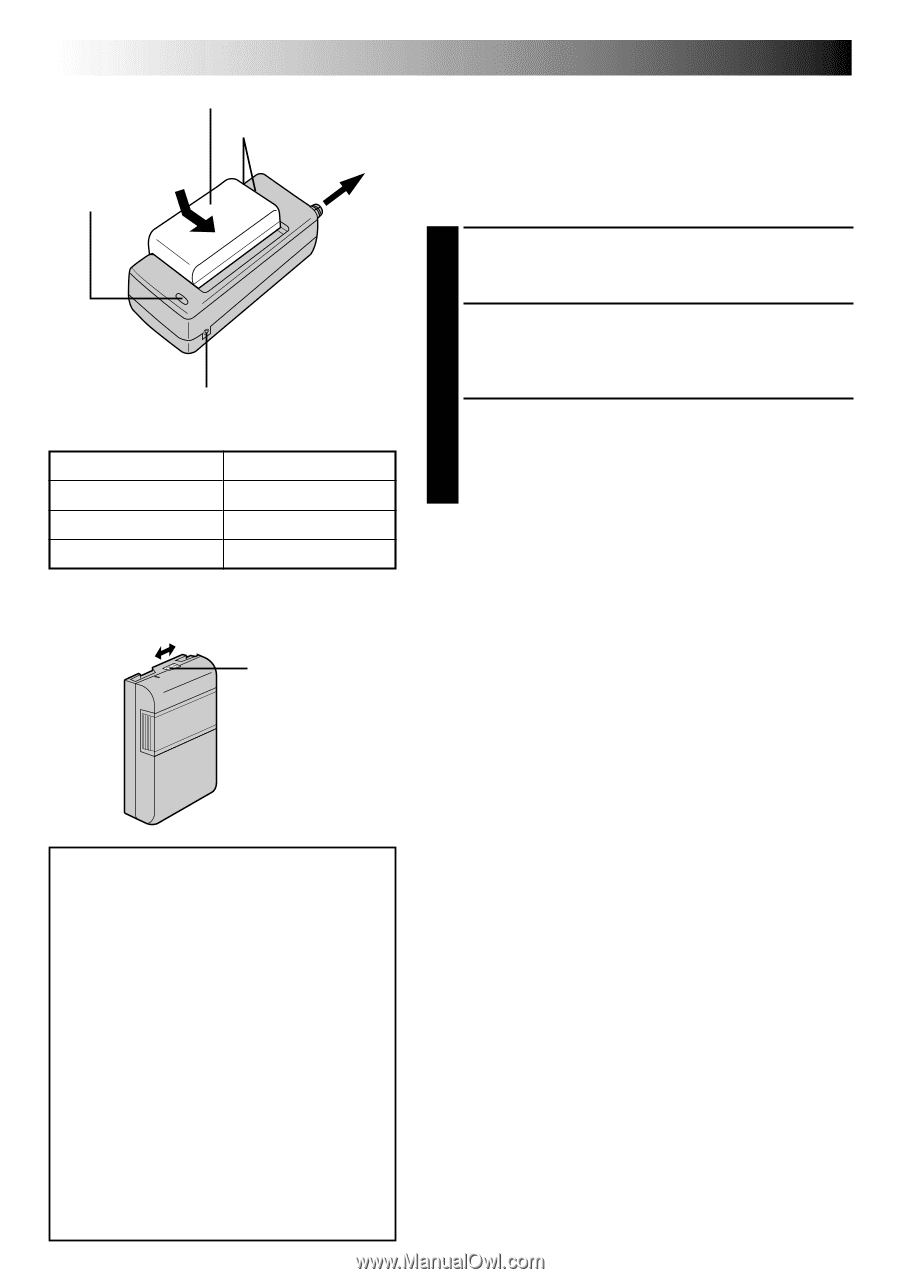
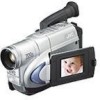
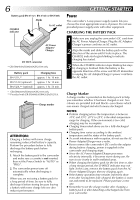
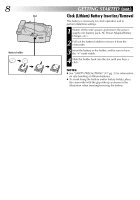
6 EN Battery pack BN-V11U*, BN-V12U or BN-V20U Marks CHARGE indicator To AC outlet AC Power Adapter/ Charger DC OUT connector * GR-SXM460A/SXM260A/SX210A only. Battery pack Charging time BN-V11U* approx. 1 hr. 10 min. BN-V12U (optional) approx. 1 hr. 10 min. BN-V20U** (optional) approx. 1 hr. 50 min. * GR-SXM460A/SXM260A/SX210A only. ** Provided with GR-SXM46EA/SXM26EA/SX21EA. Charge marker ATTENTION: Charging a battery with some charge remaining reduces that battery's capacity. Perform the procedure below to fully discharge the battery pack before recharging. 1. Attach the battery pack to the camcorder and make sure a cassette is not inserted, then set the Power Switch to "AUTO" or "PRO.". 2. The camcorder power turns off automatically when discharging is complete. When you are not using a battery pack for a long period of time, be sure to fully discharge it before storing because leaving a battery with some charge left over also reduces performance. GETTING STARTED Power This camcorder's 3-way power supply system lets you choose the most appropriate source of power. Do not use provided power supply units with other equipment. CHARGING THE BATTERY PACK 1 Make sure you unplug the camcorder's DC cord from the AC Power Adapter/Charger. Plug the AC Adapter/ Charger's power cord into an AC outlet. 2 Align the marks and slide the battery pack in the direction of the arrow until it locks in place. The CHARGE indicator begins blinking to indicate charging has started. 3 When the CHARGE indicator stops blinking but stays lit, charging is finished. Slide the battery in the opposite direction of the arrow and lift off. Remember to unplug the AC Adapter/Charger's power cord from the AC outlet. Charge Marker A charge marker is provided on the battery pack to help you remember whether it has been charged or not. Two colours are provided (red and black)-you choose which one means charged and which means discharged. NOTES: ● Perform charging where the temperature is between 10°C and 35°C. 20°C to 25°C is the ideal temperature range for charging. If the environment is too cold, charging may be incomplete. ● Charging times noted above are for a fully discharged battery pack. ● Charging time varies according to the ambient temperature and the status of the battery pack. ● To avoid interference with reception, do not use the AC Power Adapter/Charger near a radio. ● If you connect the camcorder's DC cord to the adapter during battery charging, power is supplied to the camcorder and charging stops. ● Since the AC Power Adapter/Charger processes electricity internally, it becomes warm during use. Be sure to use it only in well-ventilated areas. ● When charging the battery pack for the first time or after a long storage period, the CHARGE indicator may not light. In this case, remove the battery pack from the AC Power Adapter/Charger, then try charging again. ● If the battery operation time remains extremely short even after having been fully charged, the battery is worn out and needs to be replaced. Please purchase a new one. ● Remember to set the charge marker after charging a battery pack or after detaching a discharged one from your camcorder.
-
 1
1 -
 2
2 -
 3
3 -
 4
4 -
 5
5 -
 6
6 -
 7
7 -
 8
8 -
 9
9 -
 10
10 -
 11
11 -
 12
12 -
13
-
14
-
15
-
16
-
17
-
18
-
19
-
20
-
21
-
22
-
23
-
24
-
25
-
26
-
27
-
28
-
29
-
30
-
31
-
32
-
33
-
34
-
35
-
36
-
37
-
38
-
39
-
40
-
41
-
42
-
43
-
44
-
45
-
46
-
47
-
48
-
49
-
50
-
51
-
52
-
53
-
54
-
55
-
56
-
57
-
58
-
59
-
60
 |
 |