JVC GR-SXM260 Instruction Manual - Page 37
Basic Connections, Tape Dubbing - adapter
 |
View all JVC GR-SXM260 manuals
Add to My Manuals
Save this manual to your list of manuals |
Page 37 highlights
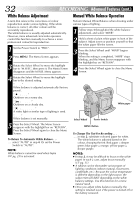
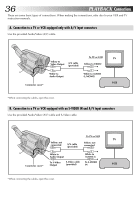
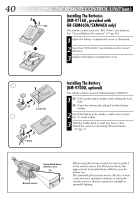
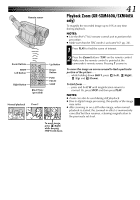
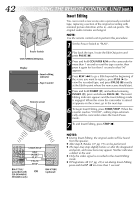
Basic Connections 1 Make sure all units are turned off. 2 Connect the camcorder to a TV or VCR as shown in the illustration (੬ pg. 36). If using a VCR . . . go to step 3. If not . . . go to step 4. 3 Connect the VCR output to the TV input, referring to your VCR's instruction manual. 4 Turn on the camcorder, the VCR and the TV. 5 Set the VCR to its AUX input mode, and set the TV to its VIDEO mode. NOTES: ● It is recommended to use the AC Power Adapter/ Charger as the power supply instead of the battery pack (੬ pg. 7). ● If your VCR has an S-Video input connector, connect the camcorder and the VCR using the provided S-Video cable. This can improve the dubbed picture quality. ● To monitor the picture and sound from the camcorder without inserting a tape, set the camcorder's Power Switch to "CAMERA" ("AUTO" or "PRO."), then set your TV to the appropriate input mode. ● Make sure you adjust the TV sound volume to its minimum level to avoid a sudden burst of sound when the camcorder is turned on. ● If you have a TV or speakers that are not specially shielded, do not place the speakers adjacent to the TV as interference will occur in the camcorder playback picture. Tape Dubbing EN37 1 Following the illustration on pg. 36, connect the camcorder and the VCR. 2 Set the camcorder's Power Switch to "PLAY", turn on the VCR's power, and insert the appropriate cassettes in the camcorder and the VCR. 3 Engage the VCR's AUX and Record-Pause modes. 4 Engage the camcorder's Play mode to find a spot just before the edit-in point. Once it is reached, press 4/6 on the camcorder. 5 Press 4/6 on the camcorder and engage the VCR's Record mode. 6 Engage the VCR's Record-Pause mode and press 4/6 on the camcorder. 7 Repeat steps 4 through 6 for additional editing, then stop the VCR and camcorder when finished.
-
 1
1 -
2
-
3
-
4
-
5
-
6
-
7
-
8
-
9
-
10
-
11
-
12
-
13
-
14
-
15
-
16
-
17
-
18
-
19
-
20
-
21
-
22
-
23
-
24
-
25
-
26
-
27
-
28
-
29
-
30
-
31
-
 32
32 -
 33
33 -
 34
34 -
 35
35 -
 36
36 -
 37
37 -
 38
38 -
 39
39 -
 40
40 -
 41
41 -
 42
42 -
43
-
44
-
45
-
46
-
47
-
48
-
49
-
50
-
51
-
52
-
53
-
54
-
55
-
56
-
57
-
58
-
59
-
60
 |
 |