JVC GR-SXM260 Instruction Manual - Page 9
Date/Time Settings
 |
View all JVC GR-SXM260 manuals
Add to My Manuals
Save this manual to your list of manuals |
Page 9 highlights
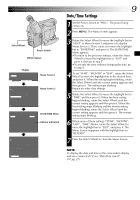
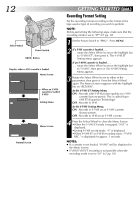
Select Wheel Power Switch MENU Button Display 4NE X T D. ZOOM ON TELE MACRO OF F ON TAPE LENGTH T 3 0 4BACK REC T I ME I NT . T I ME T I T LE LANG. DATE / T I ME J L I P I D NO. DEMO MODE OF F OF F ENGL I SH 06 OF F 4RE T URN Menu Screen 1 Menu Screen 2 DATE / T I ME YEAR MONTH DAY T I ME 2000 6 28 20 : 20 DATE/TIME Menu 24-hour indication EX I T 4BACK REC T I ME I NT . T I ME T I T LE LANG. DATE / T I ME J L I P I D NO. DEMO MODE OF F OF F ENGL I SH 06 OF F 4RE T URN Date/Time Settings 9 EN 1 Set the Power Switch to "PRO.". The power lamp comes on. 2 Press MENU. The Menu Screen appears. 3 Rotate the Select Wheel to move the highlight bar to "NEXT" in Menu Screen 1 and press it to display Menu Screen 2. Then, rotate it to move the highlight bar to "DATE/TIME" and press it. The DATE/TIME Menu appears. •To return to the previous settings, rotate the Select Wheel to move the highlight bar to "EXIT" and press it, then go to step 7. •To set only the time without changing the date, go to step 5. 4 To set "YEAR", "MONTH" or "DAY", rotate the Select Wheel to move the highlight bar to the desired item, and press it. When the setting begins blinking, rotate the Select Wheel until the correct setting appears and then press it. The setting stops blinking. Repeat for other date settings. 5 Rotate the Select Wheel to move the highlight bar to "TIME" and then press it. When the hour setting begins blinking, rotate the Select Wheel until the correct setting appears and then press it. When the hour setting stops blinking and the minute setting begins blinking, rotate the Select Wheel until the correct setting appears and then press it. The minute setting stops blinking. 6 When none of these settings ("YEAR", "MONTH", "DAY", "TIME") blinks, rotate the Select Wheel to move the highlight bar to "EXIT", and press it. The Menu Screen reappears with the highlight bar on "RETURN". 7 Press the Select Wheel to close the Menu Screen. NOTE: To display the date and time in the camcorder's display and on a connected TV, see "Date/Time Insert" (੬ pg. 27).
-
 1
1 -
2
-
3
-
 4
4 -
 5
5 -
 6
6 -
 7
7 -
 8
8 -
 9
9 -
 10
10 -
 11
11 -
 12
12 -
 13
13 -
 14
14 -
15
-
16
-
17
-
18
-
19
-
20
-
21
-
22
-
23
-
24
-
25
-
26
-
27
-
28
-
29
-
30
-
31
-
32
-
33
-
34
-
35
-
36
-
37
-
38
-
39
-
40
-
41
-
42
-
43
-
44
-
45
-
46
-
47
-
48
-
49
-
50
-
51
-
52
-
53
-
54
-
55
-
56
-
57
-
58
-
59
-
60
 |
 |
