JVC GY-DV300REM Instruction Manual - Page 23
Setting, Displaying and Recording the Date and Time, PREPARATIONS FOR OPERA
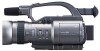 |
View all JVC GY-DV300REM manuals
Add to My Manuals
Save this manual to your list of manuals |
Page 23 highlights
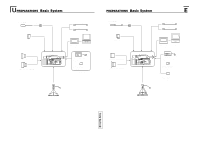
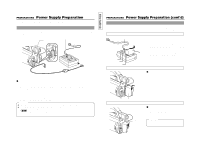
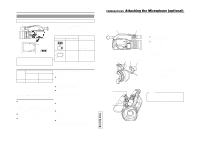
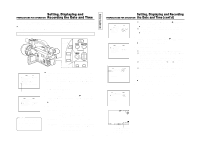
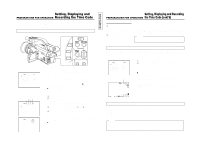
Setting, Displaying and PREPARATIONS FOR OPERATION Recording the Date and Time The date and time of the built-in clock should be set. Powered by the built-in rechargeable backup battery, the set date and time data are retained and continue to count even when the power is switched off. ● Whether to display the set date and time data on the LCD screen or the viewfinder screen or record it on the tape can be specified by settings on the menu screen. Setting the Date and Time MENU button GAIN SHUTTER MENU SELECT dial TOP MENU screen MENU MO D E MANU AL E A R PHON E LEV EL 1 0 S YS T EM S E T . . D I S PLAY SE T . . CAME RA S E T [ C AM - A ] . . OPER AT I ON [ CAM- A ] . . C LOC K / TC . . MENU A L L R ESE T CANCE L EX I T Cursor CLOCK/TC menu screen C LOCK / TC TC PRESET . . CLOCK ADJ US T . . DATE STYLE MM / DD / Y Y T I ME STYLE 2 4 HOUR SEC D I S PL AY ON P AG E BAC K Memo: The TIME STYLE, SEC DISPLAY and DATE STYLE items can also be set or changed after setting of the date and time is completed. ● The date and time and time code are set on the CLOCK/TC menu screen. Make the settings while observing the LCD screen or a monitor connected to the VIDEO OUT connector. When making the settings while observing a monitor connected to the VIDEO OUT connector, set the OUTPUT CHAR. item on the DISPLAY [2/2] screen menu to MIX. 1. Set the POWER switch to "ON". 2. Press the MENU button to display the TOP MENU screen. 3. Rotate the SELECT dial to align the cursor (f) with the CLOCK/ TC item, and then press the SELECT dial in the direction of the camera body. ● The CLOCK/TC menu screen appears. 4. Make settings on the CLOCK/TC menu screen. (This includes display style, etc.) DATE STYLE : Selects the style for displaying the date. YY/MM/DD (Year, month, day) MM/DD/YY (Month, day, year) DD/MM/YY (Day, month, year) TIME STYLE SEC DISPLAY : The time can be set to display as a 12-hour or 24-hour clock system. : To select whether or not the second indication should be displayed on the screen. However, regardless of this setting, the seconds are set when the date and time are set. 41 TENTATIVE Setting, Displaying and Recording PREPARATIONS FOR OPERATION the Date and Time (cont'd) CLOCK/TC menu screen C LOCK / TC TC PRESET . . CLOCK ADJ US T . . DATE STYLE MM / DD / Y Y T I ME STYLE 2 4 HOUR SEC D I S PL AY ON P AG E BAC K CLOCK/TC menu screen C LOCK / TC TC PRESET . . CLOCK ADJ US T . . DATE STYLE MM / DD / Y Y T I ME STYLE 2 4 HOUR SEC D I S PL AY ON P AG E BAC K Date (Month, day, year) CLOCK ADJUST menu screen CL OCK ADJ UST D A T E ( MM / DD / Y Y ) 0 1 / 0 1 / 0 1 T I ME 00 :00 PAGE BACK Time (Hour, min, sec) CLOCK ADJUST CL OCK ADJ UST D A T E ( MM / DD / Y Y ) 1 2 / 3 0 / 0 1 T I ME 10 :30 1 Rotate the SELECT dial to align the cursor (f) with the item to be set, and then press the SELECT dial. ● The setting area of the selected item starts blinking. 2 Rotate the SELECT dial to change the setting, and then press the SELECT dial. ● The setting area stops blinking and the setting is entered. 5. Display the screen for setting the date and time. Rotate the SELECT dial to align the cursor (f) with the CLOCK ADJUST item, and then press the SELECT dial. ● The CLOCK ADJUST screen appears. 6. Set the date and time. The blinking digit is the one to be set. 1 When the SELECT dial is pressed, the blinking digit changes. 2 When the SELECT dial is rotated, the value of the blinking digit changes. When the SELECT dial is rotated upward, the value becomes higher. When rotated downward, the value becomes smaller. 3 Repeat the procedure described in 1 and 2 above to set the month, day, year, hours, minutes. The digits indicating seconds cannot be set. 4 Press the SELECT dial in sync with a time signal to enter the date and time precisely. 7. When all the settings are completed, rotate the SELECT dial to align the cursor with the PAGE BACK item, and then press the SELECT dial. ● The CLOCK/TC menu screen returns. 8. To return to the normal screen, use either of the following methods. Press the MENU button or Return to the TOP MENU screen and then select the EXIT item from the TOP MENU screen before pressing the SELECT dial. PAGE BACK Normal screen A Date time indication (Selected on the DISPLAY [2/2] menu screen) 42
-
 1
1 -
2
-
3
-
4
-
5
-
6
-
7
-
8
-
9
-
10
-
11
-
12
-
13
-
14
-
15
-
16
-
17
-
 18
18 -
 19
19 -
 20
20 -
 21
21 -
 22
22 -
 23
23 -
 24
24 -
 25
25 -
 26
26 -
 27
27 -
 28
28 -
29
-
30
-
31
-
32
-
33
-
34
-
35
-
36
-
37
-
38
-
39
-
40
-
41
-
42
-
43
-
44
-
45
-
46
-
47
-
48
-
49
-
50
-
51
-
52
-
53
-
54
-
55
-
56
-
57
 |
 |
