JVC GY-DV300REM Instruction Manual - Page 5

CONTENTS, INTRODUCTION, Precautions for Proper Use

Page 5 highlights

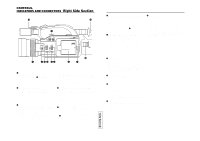
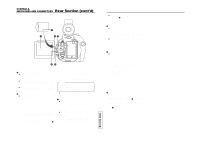
CONTENTS INTRODUCTION Precautions for Proper Use 7 Routine and Periodical Maintenance 9 Precautions for Use of Head Cleaning Tape ... 10 Videocassette to be Used 10 Condensation 11 Characteristic CCD Phenomena 11 CONTROLS, INDICATORS AND CONNECTORS Right Side Section 12 Rear Section 14 Left Side Section 18 Front Section 20 Top Section 21 Indications on LCD Screen and Viewfinder Screen 22 PREPARATIONS Basic System 32 Power Supply Preparation 33 AC Operation 33 Battery Pack Operation 34 Attaching an External Microphone (optional) .. 36 MANUAL ADJUSTMENTS Manual Focus Adjustment 63 Using ND Filter 65 Obtaining Natural Tint (White Balance 66 Manual Iris Adjustment 68 Manual Shutter Speed Adjustment 70 Manual Gain Adjustment 72 Displaying Zebra Patterns for Adjustment ....... 75 Manual Adjustment of the Audio Recording Level 76 Disabling Operation of the Camera-Shake Compensation Function 78 Adjusting the Quality of Camera Image .......... 79 PLAYBACK Playback of Tape 80 Blank Search 81 Adjusting the Playback Sound Volume 82 Outputting CH-3/CH-4 Channel Sound 83 EXTERNAL COMPONENTS Connecting a Video Component with DV Connector 84 PREPARATIONS FOR OPERATION Turning the Power ON 37 Cassette Loading 38 LCD Screen Adjustment 39 Adjustment the Viewfinder 40 Setting, Displaying and Recording the Date and Time 41 Charging the Built-in Battery 44 Setting, Displaying and Recording the Time Code 45 SETTINGS BEFORE SHOOTING Shooting Mode (AUTO/MANUAL) Selection ... 47 Audio Input Signal Selection 49 Audio Monitor Selection 51 Focus Mode Selection 52 Angle of View (Zoom In/Zoom Out 53 Menu Screen Settings 54 SHOOTING Basic Recording Operation 57 Viewing the Recorded Scene (Edit Search) .... 59 If the Unit is Left in Recording-Standby Mode .. 60 Recording the Color Bar 61 Using the AE Function 62 MENU SCREEN MENU Screen Structure 86 Setting Menu Screens 88 Contents of Menu Screens 90 TOP MENU Screen 90 SYSTEM Menu Screen 91 DISPLAY Menu Screen 94 CAMERA Menu Screen 96 OPERATION Menu Screen 98 CLOCK/TC Menu Screen 99 VTR Menu Screen 99 TROUBLESHOOTING Alarm Indications and Actions 100 In case of Difficulty 102 OTHERS Displaying the Hour Meter Display 104 Specifications 105 6 TENTATIVE INTRODUCTION Precautions for Proper Use ● Supply voltage Make sure that the power is between 6 V and 12 V DC. If the power voltage is too low, abnormal colour and increased noise may occur. Do not exceed 12 V DC in any case, or the unit could be damaged. ● Allowable ambient temperature and humidity Be sure to use the unit within the allowable temperature range of 0°C to 40°C and a relative humidity of 30% to 80%. Using the unit at a temperature or humidity outside the allowable ranges could result not only in malfunction but the impact on the CCD elements could be serious as small white spots may be generated. When storing the GY-DV300 for a long time, the storage temperatures should be -20°C to 60°C. ● Strong electromagnetic waves or magnetism Noise may appear in the picture or audio and/or the colours may be incorrect if the camera is used near a radio or television transmitting antenna, in places where strong electromagnetic waves are generated by transformers, motors, etc., or near devices emitting radio waves, such as transceivers or cellular phones. ● If a transceiver or cellular telephone is used closed to the GY-DV300 while the camera-shake compensation function is in use, the camera image may flicker due to the influence of emitted electromagnetic waves. ● Use of wireless microphone near the camera When a wireless microphone or wireless microphone tuner is used near the camera during recording, the tuner could pick up noise. ● Avoid using or placing the unit in places; • subject to extreme heat or cold; • with excessive dirt or dust; • with high humidity or moisture; • subject to smoke or vapour such as near a cooking stove; • subject to strong vibrations or on an unstable surface. • also do not leave the unit for long hours in a parked car under direct sunlight or near room heating equipment. ● Protect the unit from being splashed with water (especially when shooting in the rain). ● Protect the unit from being wet when shooting on a beach. In addition, salt and sand may adhere to the camera body. Be sure to clean the camera after use. ● Protect the unit against penetration of dust when using it in a place subject to sandy dust. ● Setup level (U MODEL) The video signal of the unit's video output is not provided with a setup level when shipped from the factory. If you want to turn ON the setup level, please set the SET UP item on the SYSTEM menu screen to ON. ● Optical performance of lens Due to the optical performance of the lens, color divergence phenomena (magnification chromatic aberration) may occur at the periphery of the image. This is not a camera malfunction. ● Use the unit in an upright position. If placed on its side, heat release efficiency will deteriorate, adversely affecting the tape transport. Depending on the circumstances, the tape may also be damaged. ● Vibrations Colours may fail to appear during VCR playback in locations subjected to vibrations. ● Precautions for transportation Do not drop or hit the unit against a hard object. ● Remove the videocassette before transporting the unit. ● Do not insert other objects than a videocassette in the cassette insertion slot. Be sure to close the cassette cover when the unit is not to be used for a long period. 7

  • 1
  • 2
  • 3
  • 4
  • 5
  • 6
  • 7
  • 8
  • 9
  • 10
  • 11
  • 12
  • 13
  • 14
  • 15
  • 16
  • 17
  • 18
  • 19
  • 20
  • 21
  • 22
  • 23
  • 24
  • 25
  • 26
  • 27
  • 28
  • 29
  • 30
  • 31
  • 32
  • 33
  • 34
  • 35
  • 36
  • 37
  • 38
  • 39
  • 40
  • 41
  • 42
  • 43
  • 44
  • 45
  • 46
  • 47
  • 48
  • 49
  • 50
  • 51
  • 52
  • 53
  • 54
  • 55
  • 56
  • 57

TENTATIVE
7
Precautions for Proper Use
Supply voltage
Make sure that the power is between 6 V and 12 V DC. If the power voltage is too low
, abnormal colour
and increased noise may occur
. Do not exceed 12 V DC in any case, or the unit could be damaged.
Allowable ambient temperature and humidity
Be sure to use the unit within the allowable temperature range of 0
°C to 40
°C and a relative humidity of
30% to 80%. Using the unit at a temperature or humidity outside the allowable ranges could result not
only in malfunction but the impact on the CCD elements could be serious as small white spots may be
generated. When storing the GY
-DV300 for a long time, the storage temperatures should be
–20
°C to
60
°C.
Strong electromagnetic waves or magnetism
Noise may appear in the picture or audio and/or the colours may be incorrect if the camera is used near
a radio or television transmitting antenna, in places where strong electromagnetic waves are generated
by transformers, motors, etc., or near devices emitting radio waves, such as transceivers or cellular
phones.
If a transceiver or cellular telephone is used closed to the GY
-DV300 while the camera-shake
compensation function is in use, the camera image may flicker due to the influence of emitted
electromagnetic waves.
Use of wireless microphone near the camera
When a wireless microphone or wireless microphone tuner is used near the camera during recording,
the tuner could pick up noise.
Avoid using or placing the unit in places;
• subject to extreme heat or cold;
• with excessive dirt or dust;
• with high humidity or moisture;
• subject to smoke or vapour such as near a cooking stove;
• subject to strong vibrations or on an unstable surface.
• also do not leave the unit for long hours in a parked car under direct sunlight or near room heating
equipment.
Protect the unit from being splashed with water (especially when shooting in the rain).
Protect the unit from being wet when shooting on a beach.
In addition, salt and sand may adhere to the camera body
. Be sure to clean the camera after use.
Protect the unit against penetration of dust when using it in a place subject to sandy dust.
Setup level
(U MODEL)
The video signal of the unit
s video output is not provided with a setup level when shipped from the
factory. If you want to turn ON the setup level, please set the SET
UP item on the SYSTEM menu
screen to ON.
Optical performance of lens
Due to the optical performance of the lens, color divergence phenomena (magnification chromatic
aberration) may occur at the periphery of the image.
This is not a camera malfunction.
Use the unit in an upright position.
If placed on its side, heat release ef
ficiency will deteriorate, adversely af
fecting the tape transport.
Depending on the circumstances, the tape may also be damaged.
Vibrations
Colours may fail to appear during VCR playback in locations subjected to vibrations.
Precautions for transportation
Do not drop or hit the unit against a hard object.
Remove the videocassette before transporting the unit.
Do not insert other objects than a videocassette in the cassette insertion slot. Be sure to close the
cassette cover when the unit is not to be used for a long period.
INTRODUCTION
6
CONTENTS
INTRODUCTION
Precautions for Proper Use
..............................
7
Routine and Periodical Maintenance
................
9
Precautions for Use of Head Cleaning
Tape ... 10
Videocassette to be Used
...............................
10
Condensation
..................................................
11
Characteristic CCD Phenomena
.....................
11
CONTROLS, INDICATORS AND CONNECT
ORS
Right Side Section
..........................................
12
Rear Section
...................................................
14
Left Side Section
.............................................
18
Front Section
...................................................
20
Top Section
.....................................................
21
Indications on LCD Screen and
Viewfinder Screen
.......................................
22
PREPARATIONS
Basic System
..................................................
32
Power Supply Preparation
...............................
33
AC Operation
..................................................
33
Battery Pack Operation
...................................
34
Attaching an External Microphone (optional)
.. 36
PREPARATIONS FOR OPERA
TION
Turning the Power ON
.....................................
37
Cassette Loading
............................................
38
LCD Screen Adjustment
.................................
39
Adjustment the Viewfinder
...............................
40
Setting, Displaying and Recording
the Date and Time
.......................................
41
Charging the Built-in Battery
...........................
44
Setting, Displaying and Recording
the Time Code
.............................................
45
SETTINGS BEFORE SHOO
TING
Shooting Mode (AUT
O/MANUAL) Selection
... 47
Audio Input Signal Selection
...........................
49
Audio Monitor Selection
..................................
51
Focus Mode Selection
.....................................
52
Angle of View (Zoom In/Zoom Out)
.................
53
Menu Screen Settings
.....................................
54
SHOOTING
Basic Recording Operation
.............................
57
Viewing the Recorded Scene (Edit Search)
....
59
If the Unit is Left in Recording-Standby Mode
.. 60
Recording the Color Bar
.................................
61
Using the AE Function
....................................
62
MANUAL ADJUSTMENTS
Manual Focus Adjustment
...............................
63
Using ND Filter
................................................
65
Obtaining Natural
Tint (White Balance)
...........
66
Manual Iris Adjustment
...................................
68
Manual Shutter Speed
Adjustment
.................
70
Manual Gain Adjustment
.................................
72
Displaying Zebra Patterns for
Adjustment
.......
75
Manual Adjustment of the
Audio
Recording Level
..........................................
76
Disabling Operation of the Camera-Shake
Compensation Function
..............................
78
Adjusting the Quality of Camera Image
..........
79
PLAYBACK
Playback of Tape
.............................................
80
Blank Search
...................................................
81
Adjusting the Playback Sound V
olume
...........
82
Outputting CH-3/CH-4 Channel Sound
...........
83
EXTERNAL COMPONENTS
Connecting a Video Component with
DV Connector
..............................................
84
MENU SCREEN
MENU Screen Structure
.................................
86
Setting Menu Screens
.....................................
88
Contents of Menu Screens
.............................
90
TOP MENU Screen
.....................................
90
SYSTEM Menu Screen
...............................
91
DISPLAY Menu Screen
...............................
94
CAMERA Menu Screen
...............................
96
OPERATION Menu Screen
.........................
98
CLOCK/TC Menu Screen
............................
99
VTR Menu Screen
.......................................
99
TROUBLESHOOTING
Alarm Indications and
Actions
.......................
100
In case of Difficulty
........................................
102
OTHERS
Displaying the Hour Meter Display
................
104
Specifications
................................................
105