JVC GY-DV300REM Instruction Manual - Page 40
Displaying Zebra Patterns for Adjustment, Manual Adjustment of the Audio Recording Level
 |
View all JVC GY-DV300REM manuals
Add to My Manuals
Save this manual to your list of manuals |
Page 40 highlights
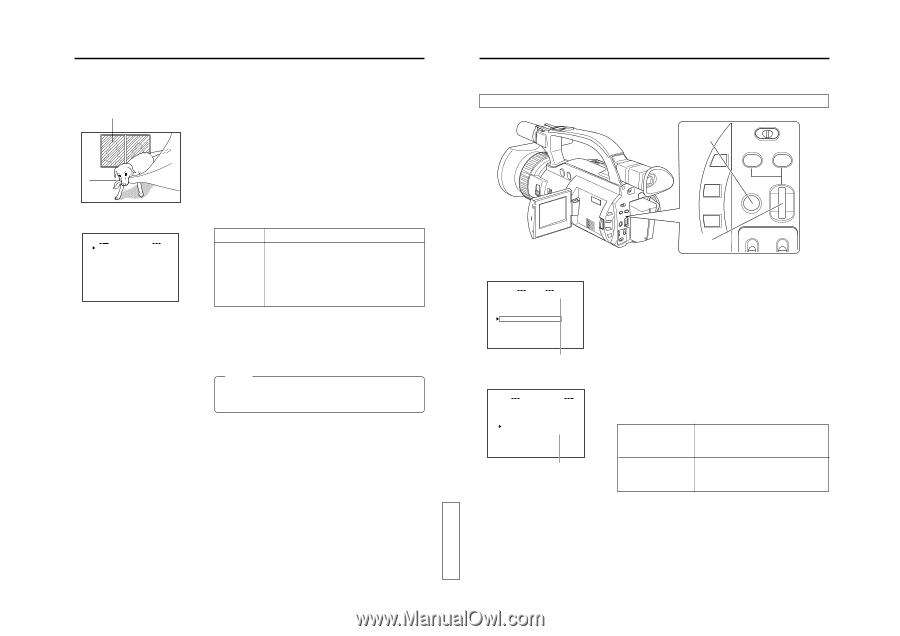
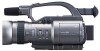
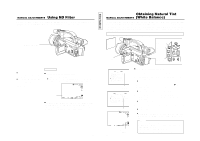
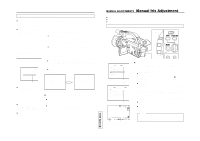
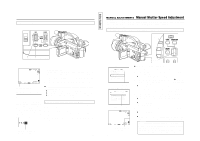
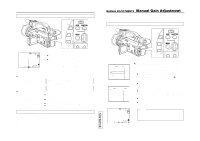
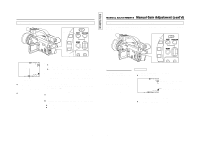
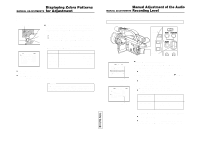
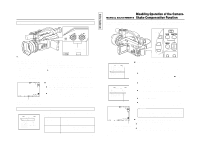
Displaying Zebra Patterns MANUAL ADJUSTMENTS for Adjustment Zebra patterns are oblique stripes than can be displayed to indicate very bright areas of the screen. Areas where zebra patterns are indicated are likely to be blurred with white if left unadjusted. The zebra patterns can be used as a reference for manual adjustment of the brightness to adjust to the optimal level. Zebra patterns Ⅲ Whether or not zebra patterns should be displayed, and the luminance level they should indicate, is selected by the setting of the ZEBRA item on the DISPLAY [1/2] menu screen. 1. Display the DISPLAY [1/2] menu screen. 1 Press the MENU button to display the TOP MENU screen. 2 Rotate the SELECT dial to select the DISPLAY SET item, and then press the dial to display the DISPLAY [1/2] menu screen. DISPLAY [1/2] menu screen D I SPLAY [ 1 / 2 ] Z E BRA 70~ 8 0% L CD BR I GHT NE S S NORMAL LCD CO LOR NORMA L LCD PEAK I NG NORMA L V F BR I GHT NESS NORMAL VF COLOR NORMA L V F PEAK I NG NORMA L NEXT P AGE P AGE B ACK 2. Use the SELECT dial to select the ZEBRA item, and set the item to a value other than OFF. Setting Zebra Display 70 ~ 80% 85 ~ 95% OVER 95% OVER 100% OFF Areas with a luminance level of 70% to 80% Areas with a luminance level of 85% to 95% Areas with a luminance level above 95% Areas with a luminance level above 100% Not displayed ● Zebra patterns are not recorded on the tape. ● Zebra patterns are not output from the VIDEO OUT or Y/C OUT connectors. 3. When you return to the normal screen, zebra patterns will appear in the appropriate areas. 4. Manually adjust iris, gain and shutter speed until the zebra patterns disappear. Memo: In the VTR playback mode/DV input mode (U MODEL)(when the MODE switch is set to VTR), the ZEBRA item is not shown on the DISPLAY [1/2] menu screen. 75 TENTATIVE Manual Adjustment of the Audio MANUAL ADJUSTMENTS Recording Level The audio recording level can be manually adjusted during shooting. The audio recording level can be adjusted separately for the CH-1 and CH-2 channels. 1. Engaging the Manual Audio Recording Level Adjustment Mode MENU button GAIN SHUTTER MENU TOP MENU screen MENU MO D E MANU AL E A R PHON E LEV EL 1 0 S YS T EM S E T . . D I S PLAY SE T . . CAME RA S E T [ C AM - A ] . . OPER AT I ON [ CAM- A ] . . C LOC K / TC . . MENU A L L R ESE T CANCE L EX I T MANUAL OPERATION menu screen OPERA T I ON [ A ] AE OFF IRI S AU TO SHU T T E R STEP WH I T E BA LA NC E AUTO OIS ON CH 1 AU D I O L E VE L MANU AL CH 2 AU D I O L E VE L MANU AL PAGE BACK MANUAL 76 SELECT dial Ⅲ Engage the recording-standby mode. 1. Press the MENU button to display the TOP MENU screen. 2. Using the SELECT dial, set the MODE item on the TOP MENU screen to MANUAL. ● The unit enters the manual shooting mode. 3. Rotate the SELECT dial to align the cursor (f) with the OPERATION SET item on the TOP MENU screen, and then press the SELECT dial. ● The OPERATION menu screen is displayed. 4. Using the SELECT dial, set the CH1 AUDIO LEVEL or CH2 AUDIO LEVEL item on the OPERATION menu screen to MANUAL, and then press the SELECT dial. ● The manual audio recording level adjustment mode is engaged. CH1 AUDIO LEVEL Sets the recording level adjustment mode for CH1 channel sound to manual. CH2 AUDIO LEVEL Sets the recording level adjustment mode for CH2 channel sound to manual. 5. To return to the normal screen, use either of the following methods. ● Press the MENU button or ● Return to the TOP MENU screen and then select the EXIT item from the TOP MENU screen before pressing the SELECT dial.
-
 1
1 -
2
-
3
-
4
-
5
-
6
-
7
-
8
-
9
-
10
-
11
-
12
-
13
-
14
-
15
-
16
-
17
-
18
-
19
-
20
-
21
-
22
-
23
-
24
-
25
-
26
-
27
-
28
-
29
-
30
-
31
-
32
-
33
-
34
-
 35
35 -
 36
36 -
 37
37 -
 38
38 -
 39
39 -
 40
40 -
 41
41 -
 42
42 -
 43
43 -
 44
44 -
 45
45 -
46
-
47
-
48
-
49
-
50
-
51
-
52
-
53
-
54
-
55
-
56
-
57
 |
 |