JVC GZ HD5 Basic User Guide - Page 18
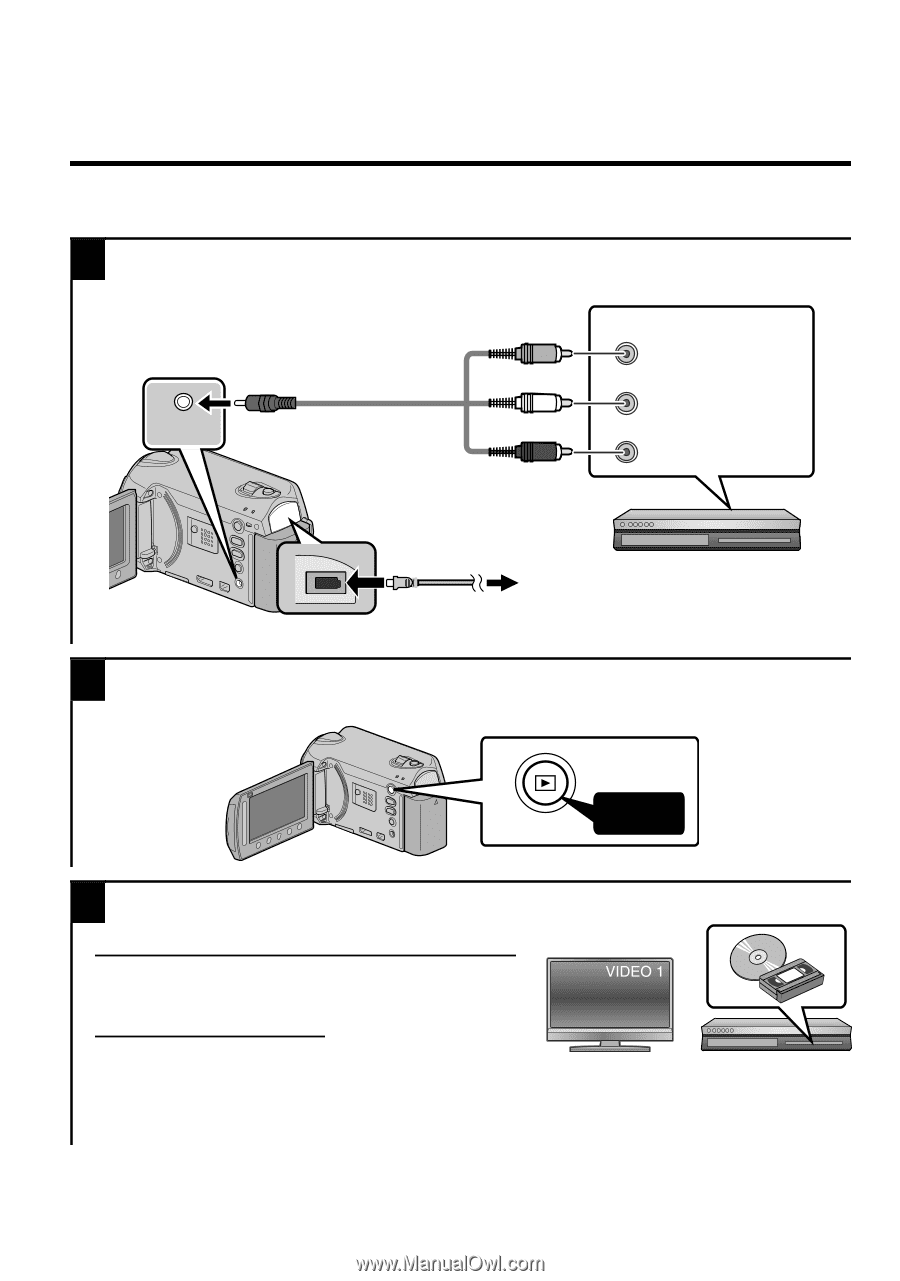
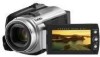
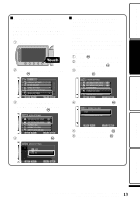
Dubbing Files by Connecting to a DVD Recorder or VCR
 |
UPC - 046838033490
View all JVC GZ HD5 manuals
Add to My Manuals
Save this manual to your list of manuals |
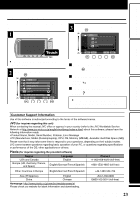
Page 18 highlights
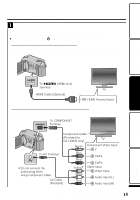
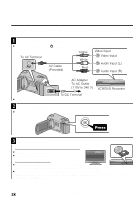
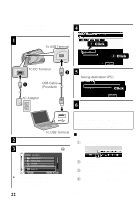
Dubbing Files by Connecting to a DVD Recorder or VCR You can dub videos in standard quality by connecting to a DVD recorder or VCR. Refer also to the instruction manual of the TV, DVD recorder, VCR, etc. 1 Connect to a VCR/DVD recorder. ● Press the Power button (M) for more than 2 seconds to turn off this unit. To AV Terminal AV AV Cable (Provided) Yellow White Red Video Input Video Input Audio Input (L) Audio Input (R) AC Adapter To AC Outlet (110V to 240 V) VCR/DVD Recorder AV To DC Terminal ● This unit powers on automatically when the AC adapter is connected. 2 Select the playback mode. ● Turn on this unit. .. Press AV 3 Prepare to record. Preparation on TV and VCR/DVD recorder ● Switch to a compatible external input. ● Insert compatible blank DVD or VHS to dub. Preparation on this unit ● Set "VIDEO OUTPUT" in the connection settings menu to the aspect ratio ("4:3" or "16:9") of the connecting TV. ● To include the date during dubbing, set "DISPLAY ON TV" in the "CONNECTION SETTINGS" menu to "ON". Set "ON-SCREEN DISPLAY" in the playback menu to "DISPLAY DATE ONLY". 18 For more information, refer to the Detailed User Guide http://manual.jvc.co.jp/index.html/
-
 1
1 -
2
-
3
-
4
-
5
-
6
-
7
-
8
-
9
-
10
-
11
-
12
-
 13
13 -
 14
14 -
 15
15 -
 16
16 -
 17
17 -
 18
18 -
 19
19 -
 20
20 -
 21
21 -
 22
22 -
 23
23 -
24
-
25
-
26
-
27
-
28
-
29
-
30
-
31
-
32
-
33
-
34
-
35
-
36
-
37
-
38
-
39
-
40
-
41
-
42
-
43
-
44
-
45
-
46
-
47
-
48
-
49
-
50
-
51
-
52
-
53
-
54
-
55
-
56
-
57
-
58
-
59
-
60
-
61
-
62
-
63
-
64
-
65
-
66
-
67
-
68
-
69
-
70
-
71
-
72
-
73
-
74
-
75
-
76
-
77
-
78
-
79
-
80
-
81
-
82
-
83
-
84
-
85
-
86
-
87
-
88
-
89
-
90
-
91
-
92
-
93
-
94
-
95
-
96
 |
 |