JVC LX-UH1B Operation Manual - Page 10
Remote control, Select Gamma
 |
View all JVC LX-UH1B manuals
Add to My Manuals
Save this manual to your list of manuals |
Page 10 highlights
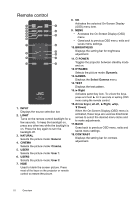
Remote control 8. OK Activates the selected On-Screen Display 1 11 (OSD) menu item. 2 3 12 9. MENU 4 • Accesses the On-Screen Display (OSD) 5 13 menu. 6 • Goes back to previous OSD menu, exits and 7 saves menu settings. 14 10. BRIGHTNESS 15 Displays the setting bar for brightness 8 16 adjustment. 9 17 11. POWER Toggles the projector between standby mode 10 18 and on. 12. DYNAMIC Selects the picture mode: Dynamic. 13. GAMMA Displays the Select Gamma menu. 14. TEST Displays the test pattern. 15. Right Activates panel key lock. To unlock the keys, press and hold for 3 seconds or setting OSD menu using the remote control. 16. Arrow keys ( Left, Right, Up, 1. INPUT Down) Displays the source selection bar. When the On-Screen Display (OSD) menu is 2. LIGHT Turns on the remote control backlight for a few seconds. To keep the backlight on, press any other key while the backlight is on. Press the key again to turn the backlight off. 17. activated, these keys are used as directional arrows to select the desired menu items and to make adjustments. BACK Goes back to previous OSD menu, exits and saves menu settings. 3. NATURAL 18. CONTRAST Selects the picture mode: Natural. 4. CINEMA Displays the setting bar for contrast adjustment. Selects the picture mode: Cinema. 5. USER1 Selects the picture mode: User 1. 6. USER2 Selects the picture mode: User 2. 7. HIDE Used to blank the screen picture. Press most of the keys on the projector or remote control to restore the picture. 10 Overview
-
 1
1 -
2
-
3
-
4
-
 5
5 -
 6
6 -
 7
7 -
 8
8 -
 9
9 -
 10
10 -
 11
11 -
 12
12 -
 13
13 -
 14
14 -
 15
15 -
16
-
17
-
18
-
19
-
20
-
21
-
22
-
23
-
24
-
25
-
26
-
27
-
28
-
29
-
30
-
31
-
32
-
33
-
34
-
35
-
36
-
37
-
38
-
39
-
40
-
41
-
42
-
43
-
44
 |
 |
