Kenwood DMX7018BT Instruction Manual - Page 17
Adjusting the picture, Connecting a USB device
 |
View all Kenwood DMX7018BT manuals
Add to My Manuals
Save this manual to your list of manuals |
Page 17 highlights
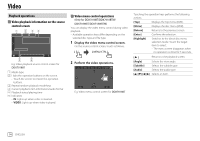
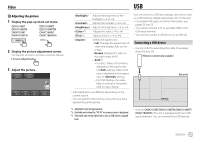
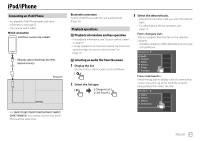
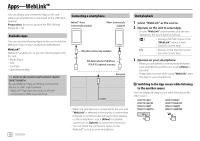
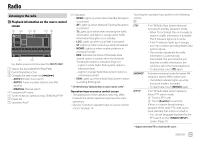
Video Adjusting the picture 1 Display the pop-up short-cut menu. DDX7018BT DDX7018BTM DMX7018BT DMX7018BTM DDX718WBT DDX718WBTM DMX718WBT DMX718WBTM 2 Display the picture adjustment screen. On the pop-up short-cut menu, touch as follows: 3 Adjust the picture. USB Adjusts the brightness of the backlight. (−4 to +4) Adjusts the contrast. (−4 to +4) Adjusts the brightness. (−4 to +4) *1 Adjusts the color. (−4 to +4) *2 Adjusts the tint. (−4 to +4) Selects the aspect ratio. • Full: Changes the aspect ratio of video and displays fully on the screen. • Normal: Displays the video in the aspect ratio of 4:3. • Auto*3: - For discs: Video of 16:9 ratio is displayed in the aspect ratio of setting. Video of 4:3 ratio is displayed in the aspect ratio of setting. - For USB: Displays the video fully on vertical or horizontal with no ratio change. • Adjustable items are different depending on the current source. • You can perform this function only when you have applied the parking brake. You can connect a USB mass storage class device such as a USB memory, digital audio player, etc. to the unit. • For playable file types and other information, see pages 53 and 55. • You cannot connect a PC or portable HDD to the USB input terminal. • You cannot connect a USB device via a USB hub. Connecting a USB device • Use CA-U1EX for extending the cable if necessary. (Max 500 mA, 5V) USB device (commercially available) Rear panel *1 Adjustable only during playback. *2 Available only when the "AV-IN" or camera screen is displayed. *3 Selectable only when video from a disc or USB device is played back. • Only for DMX7018BT/DMX7018BTM/DMX718WBT/ DMX718WBTM: The unit is equipped with two USB input terminals. You can connect two USB devices. ENGLISH 15
-
 1
1 -
2
-
3
-
4
-
5
-
6
-
7
-
8
-
9
-
10
-
11
-
 12
12 -
 13
13 -
 14
14 -
 15
15 -
 16
16 -
 17
17 -
 18
18 -
 19
19 -
 20
20 -
 21
21 -
 22
22 -
23
-
24
-
25
-
26
-
27
-
28
-
29
-
30
-
31
-
32
-
33
-
34
-
35
-
36
-
37
-
38
-
39
-
40
-
41
-
42
-
43
-
44
-
45
-
46
-
47
-
48
-
49
-
50
-
51
-
52
-
53
-
54
-
55
-
56
-
57
-
58
-
59
-
60
-
61
-
62
-
63
-
64
-
65
-
66
-
67
-
68
 |
 |
