Kenwood DNX6190HD Instruction Manual - Page 4
Basic Operations, Functions Of The Buttons On The Front Panel - navigation receiver
 |
View all Kenwood DNX6190HD manuals
Add to My Manuals
Save this manual to your list of manuals |
Page 4 highlights
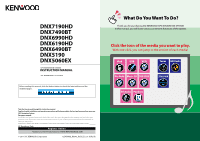
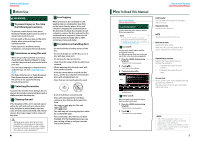
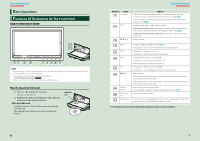
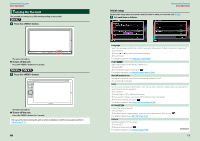
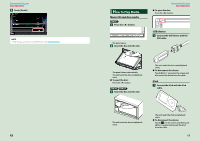
Return to the Top page Basic Operations Basic Operations Functions Of The Buttons On The Front Panel DNX7190HD/DNX7490BT 10 11 12 3 4 5 67 89 NOTE • The panels shown in this guide are examples used to provide clear explanations of the operations. For this reason, they may be different from the actual panels. • In this manual, each model name is abbreviated as follows. DNX7190HD and DNX7490BT: If above icon is showed, read the article applicable to the unit you use. How To Insert An SD Card 1) Press 8 button for 1 second. The panel fully opens. 2) Hold the SD card as the diagram in the right and insert it into the slot until it clicks. ● To eject the card: Push the card until it clicks and then remove your finger from the card. The card pops up so that you can pull it out with your fingers. Labelled side 0 6 Return to the Top page Basic Operations Number Name 1 fi (Reset) 2 ATT 3 ∞, 5 (Vol) 4 AUD 5 NAV 6 MENU 7 TEL 8 0 (Eject) 9 Remote Sensor 10 Disc insert slot 11 SD card slot Motion • If the unit or the connected unit fails to operate properly, the unit returns to factory settings when this button is pressed (P.107). • If the SI function is turned on, this indicator flashes when the vehicle ignition is off (P.80). • Switches attenuation of the volume on/off. • North America Sales area: Pressing for 1 second stores the tag data of the current music from HD Radio broadcast or SIRIUS XM (P.56). • Central and South America sales area: Pressing for 1 second turns the screen off. Adjusts volume. • Displays Graphic Equalizer screen (P.95).* • Pressing for 1 second switches camera view display on/off. • Displays the navigation screen. • Pressing for 1 second switches AV out sources. • Displays the Top Menu screen (P.14). • Pressing for 1 second turns the power off. • When the power off, turns the power on. • Displays the Hands Free screen (P.64). • Pressing for 1 second displays the Screen Control screen. • Ejects the disc. • When the panel is opened, pressing closes the panel and pressing for 1 second ejects the disc forcibly. • When the panel is closed, pressing for 1 second fully opens the panel to the location of the SD card slot. Receives the remote control signal. You can enable or disable this feature by Remote Sensor (P.79). A slot to insert a disc media. An SD card slot for upgrading the map. For how to upgrade the map, refer to the instruction manual of the navigation system. * The display may not switch to the Graphic Equalizer screen in some conditions. 7
-
 1
1 -
 2
2 -
 3
3 -
 4
4 -
 5
5 -
 6
6 -
 7
7 -
 8
8 -
 9
9 -
 10
10 -
11
-
12
-
13
-
14
-
15
-
16
-
17
-
18
-
19
-
20
-
21
-
22
-
23
-
24
-
25
-
26
-
27
-
28
-
29
-
30
-
31
-
32
-
33
-
34
-
35
-
36
-
37
-
38
-
39
-
40
-
41
-
42
-
43
-
44
-
45
-
46
-
47
-
48
-
49
-
50
-
51
-
52
-
53
-
54
-
55
-
56
-
57
-
58
-
59
-
60
-
61
-
62
 |
 |
