Kenwood DPX794BH Instruction Manual - Page 40
Learning Steering Remote Control
 |
View all Kenwood DPX794BH manuals
Add to My Manuals
Save this manual to your list of manuals |
Page 40 highlights
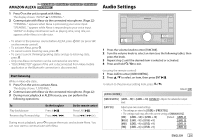
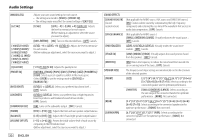
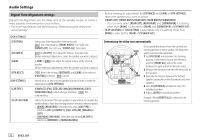
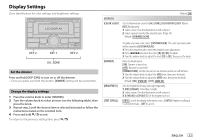
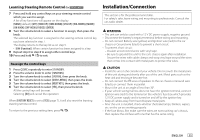
Display Settings [CLOCK] [CLOCK DISPLAY] [ON]: The clock time is shown on the display even when the unit is turned off. ; [OFF]: Cancels. [DEMO MODE] [ON]: Activates the display demonstration automatically if no operation is done for about 15 seconds. ; [OFF]: Deactivates. Preset color: [INITIAL COLOR]/[VARIABLE SCAN]/[CUSTOM R/G/B]/[RED1]/[RED2]/[RED3]/[PURPLE1]/ [PURPLE2]/[PURPLE3]/[PURPLE4]/[BLUE1]/[BLUE2]/[BLUE3]/[SKYBLUE1]/[SKYBLUE2]/ [LIGHTBLUE]/[AQUA1]/[AQUA2]/[GREEN1]/[GREEN2]/[GREEN3]/[YELLOWGREEN1]/ [YELLOWGREEN2]/[YELLOW]/[ORANGE1]/[ORANGE2]/[ORANGERED] Learning Steering Remote Control (for ) You can control the unit with the steering remote control keys on your vehicle. After connection, you can configure the control keys according to your preference. • You can only make this configuration if your vehicle is equipped with the electrical steering remote control. • If the steering remote control in your car is not compatible, configuration may not be completed and an error message may appear. (Page 43) Make the connection Steering remote cable (supplied) Bright green/red Purple/red Rear panel Learning steering remote input terminal Gray/red Connect to your vehicle's steering remote harness. Contact your KENWOOD dealer for details. Configure the control keys 1 Press BSRC repeatedly to enter STANDBY. 2 Press the volume knob to enter [FUNCTION]. 3 Turn the volume knob to select [SYSTEM], then press the knob. 4 Turn the volume knob to select [USER S.REMO], then press the knob. 5 Turn the volume knob to select [SET KEY], then press the knob. A key list of 16 assignable keys appears. • [K## NONE]: No function has been assigned. 6 Turn the volume knob to select any key from the key list to assign the function, then press the knob. "PRESS KEY TO ASSIGN K##" appears. 34 ENGLISH
-
 1
1 -
2
-
3
-
4
-
5
-
6
-
7
-
8
-
9
-
10
-
11
-
12
-
13
-
14
-
15
-
16
-
17
-
18
-
19
-
20
-
21
-
22
-
23
-
24
-
25
-
26
-
27
-
28
-
29
-
30
-
31
-
32
-
33
-
34
-
 35
35 -
 36
36 -
 37
37 -
 38
38 -
 39
39 -
 40
40 -
 41
41 -
 42
42 -
 43
43 -
 44
44 -
 45
45 -
46
-
47
-
48
-
49
-
50
-
51
-
52
-
53
-
54
-
55
-
56
-
57
-
58
-
59
-
60
-
61
-
62
-
63
-
64
-
65
-
66
-
67
-
68
-
69
-
70
-
71
-
72
-
73
-
74
-
75
-
76
-
77
-
78
-
79
-
80
-
81
-
82
-
83
-
84
-
85
-
86
-
87
-
88
-
89
-
90
-
91
-
92
-
93
-
94
-
95
-
96
-
97
-
98
-
99
-
100
-
101
-
102
-
103
-
104
-
105
-
106
-
107
-
108
-
109
-
110
-
111
-
112
-
113
-
114
-
115
-
116
-
117
-
118
-
119
-
120
-
121
-
122
-
123
-
124
-
125
-
126
-
127
-
128
-
129
-
130
-
131
-
132
-
133
-
134
-
135
-
136
-
137
-
138
-
139
-
140
-
141
-
142
-
143
-
144
-
145
-
146
-
147
-
148
-
149
-
150
-
151
-
152
 |
 |
