Kenwood KXF-W6010 User Manual - Page 16
How to record (CT-203/KXF-W4010; Deck B only), Normal recording
 |
View all Kenwood KXF-W6010 manuals
Add to My Manuals
Save this manual to your list of manuals |
Page 16 highlights
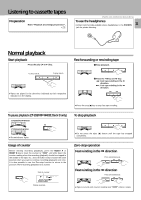
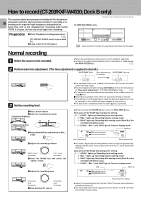
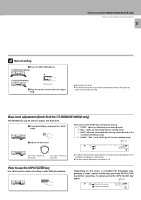
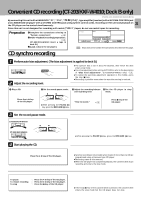
How to record (CT-203/KXF-W4010; Deck B only) The cassette deck incorporates the Dolby HX Pro headroom 16 extension function and auto-bias function to provide a recording with superior high-frequency characteristics. Since this unit is not designed for recording with metal (TYPE ) tapes, do not use metal tapes for recording. CT-2050/203/KXF-W6010/W4010 (En/M) CT-2050/KXF-W6010 only Preparation 1 Make "Playback (recording) preparation". 0 (CT-203/KXF-W4010; Insert a tape in deck B.) 2 (Load a disc in the CD player.) : Keys and control used in the operations described on this page. Normal recording 1 Select the source to be recorded. ÷ Select by operating the input selector of the amplifier (optional). ÷ In case of recording a FM broadcast,refer to discription of "How to use the MPX FILTER key". & 2 Perform auto-bias adjustment. (The bias adjustment is applied to deck B.) "AUTO BIAS"blinks. After approximately "AUTO BIAS" lightsup. 40 seconds AUTO BIAS 3 Set the recording level. 1 Play a music source. 2 Enter the record-pause mode. CT-2050/KXF-W6010 8PAUSE ¶REC/ARM CT-203/KXF-W4010 3 Press the MODE key and select the "BAL." mode. MODE 4 Adjust the recording balance. Right sound ∞ MIN/L decreases. REC LEVEL/BAL. /BIAS ∞ MAX/R Left sound decreases. 5Press the MODE key and select the "LEVEL" mode. MODE 6 Adjust the recording level. Recording ∞ MIN/L level decreases. REC LEVEL/BAL. /BIAS ∞ MAX/R Recording level increases. 7 Stop playing the source. ÷ The optimum bias is set in about 40 seconds, after which the deck enters the stop mode. ÷ For a fine adjustment after setting AUTO BIAS, refer to the description of "Bias level adjustment". (CT-2050/KXF-W6010 only) & ÷ To cancel the auto-bias adjustment operation in the middle, press the stop (7) key. ÷ Recording is possible even when the auto-bias setting is omitted. ÷ If the amount of remaining tape is small, the auto-bias adjustment may be canceled in the middle and tape stopped at that position. ÷ The bias level is canceled when the eject (0) key is pressed. ÷ While pressing the PAUSE (8) key, press the REC/ARM (¶) key. Each press of the MODE key changes the setting. 1 "LEVEL" lights up: Recording level setting mode 2 "BAL." lights up: Recording balance setting mode 3 "BIAS" lights up: Recording bias setting mode (Deck B of the CT-2050/KXF-W6010 only) 4 "LEVEL","BAL.",and "BIAS"go off: Counter display mode lights up Left channel level Right channel level ÷ In counter, adjust the recording balance level so that the left and right displays are the same. You can also check with the Ò and  peak level indicators. Each press of the MODE key changes the setting. 1 "LEVEL" lights up: Recording level setting mode 2 "BAL." lights up: Recording balance setting mode 3 "BIAS" lights up: Recording bias setting mode (Deck B of the CT-2050/KXF-W6010 only) 4 "LEVEL","BAL.",and "BIAS"go off: Counter display mode 0dB. lights up Recording level display. ÷ Adjust the recording level so that the 0 dB of the peak level indicators sometimes lights up. ÷ The recording level can be adjusted on both decks A and B. (CT-203/ KXF-W4010; Deck B only)
-
 1
1 -
2
-
3
-
4
-
5
-
6
-
7
-
8
-
9
-
10
-
 11
11 -
 12
12 -
 13
13 -
 14
14 -
 15
15 -
 16
16 -
 17
17 -
 18
18 -
 19
19 -
 20
20 -
 21
21 -
22
-
23
-
24
-
25
-
26
-
27
-
28
 |
 |
