Kenwood TS-870S User Manual - Page 18
Enter, Tf-set, Tuning, Lsb/usb, Cw/-r, Fsk/-r, Fm/am
 |
View all Kenwood TS-870S manuals
Add to My Manuals
Save this manual to your list of manuals |
Page 18 highlights
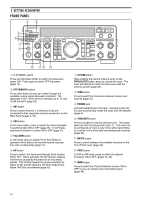
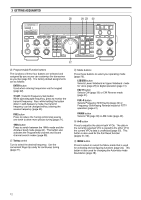
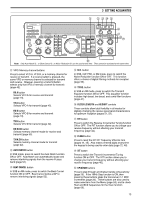
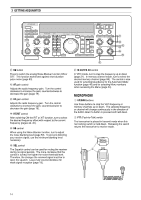
3 GETTING ACQUAINTED @6 @8 @9 #0 ANT ATT DOWN UP VOX FULL/SEMI AIP AT TUNE THRU/AUTO SEND AGC METER HF TRANSCEIVER PROC MONI KEY SPEED PROC 4 MONI 6 TS-870 1 CH 1 6 M.IN ON AIR 2 CH 2 7 M>VFO ENTER PHONES MIC SLOW OFF CAR 4 2 0 2 FAST 0 DELAY MIC 6 4 8 2 10 0 8 3 CH 3 8 SCAN 10 PWR 6 8 10 4 CH 4 9 CLR 5 REC 0 F.LOCK QUICK MEMO M.IN MR FINE DIGITAL SIGNAL PROCESSOR AUTO NOTCH BEAT CANCEL N.R. TX EQ. LO/WIDTH FILTER HI/SHIFT AT TUNE TF-SET 1MHz MODE LSB /USB CW/- R FSK /- R FM/AM DOWN A=B MENU RX TX A B M.CH UP RIT XIT CLEAR NB RIT/XIT AF 4 2 RF 6 8 M.CH/VFO.CH 0 NB 4 2 10 SQL 6 8 0 10 @7 @6 Programmable Function buttons The functions of these four buttons are selected and assigned by you so you can customize the transceiver as you like {page 63}. The factory default assignments are as follows: ENTER button Used when entering frequencies via the keypad {page 22}. TF-SET (Transmit Frequency Set) button While operating split frequency, press to monitor the transmit frequency. Also, while holding this button down in split-frequency mode, the transmit frequency can be changed without altering the receive frequency {page 43}. FINE button Press to reduce the Tuning control step size by one-tenth to allow more precise tuning {page 21}. 1MHz button Press to switch between the 1MHz mode and the Amateur band mode {page 20}. This button also activates the Programmed channel and Vacant channel search modes {page 55}. @7 Tuning control Turn to select the desired frequency. Use the convenient finger-tip cavity for continuous tuning {page 21}. @8 Mode buttons Press these buttons to select your operating mode {page 20}. LSB/USB button Selects Lower Sideband or Upper Sideband mode for voice {page 29} or digital operation {page 41}. CW/-R button Selects CW {page 30} or CW Reverse mode {page 31}. FSK/-R button Selects Frequency Shift Keying {page 40} or Frequency Shift Keying Reverse mode for RTTY operation {page 41}. FM/AM button Selects FM {page 38} or AM mode {page 40}. @9 A=B button Press to equalize the data in both VFOs. The data in the currently selected VFO is copied to the other VFO; the current VFO's data is unaffected {page 20}. This button is also used for the Full Reset function {pages 57, 63}. #0 MENU button Press to select or cancel the Menu mode that is used for activating and configuring functions {page 24}. This button is also used for changing the Automatic mode boundaries {page 48}. 12
-
 1
1 -
2
-
3
-
4
-
5
-
6
-
7
-
8
-
9
-
10
-
11
-
12
-
 13
13 -
 14
14 -
 15
15 -
 16
16 -
 17
17 -
 18
18 -
 19
19 -
 20
20 -
 21
21 -
 22
22 -
 23
23 -
24
-
25
-
26
-
27
-
28
-
29
-
30
-
31
-
32
-
33
-
34
-
35
-
36
-
37
-
38
-
39
-
40
-
41
-
42
-
43
-
44
-
45
-
46
-
47
-
48
-
49
-
50
-
51
-
52
-
53
-
54
-
55
-
56
-
57
-
58
-
59
-
60
-
61
-
62
-
63
-
64
-
65
-
66
-
67
-
68
-
69
-
70
-
71
-
72
-
73
-
74
-
75
-
76
-
77
-
78
-
79
-
80
-
81
-
82
-
83
-
84
-
85
-
86
-
87
-
88
-
89
-
90
-
91
-
92
-
93
-
94
-
95
-
96
-
97
-
98
-
99
-
100
-
101
-
102
-
103
-
104
 |
 |
