Kenwood TS-870S User Manual - Page 19
Rx M.ch, Tx M.ch, Auto Notch, Beat Cancel, Tx Eq., Filter Lo/width, Hi/shift, Clear, Up/down
 |
View all Kenwood TS-870S manuals
Add to My Manuals
Save this manual to your list of manuals |
Page 19 highlights
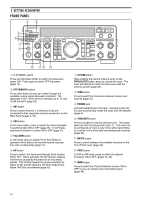
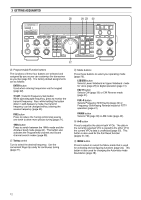
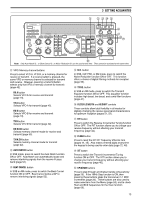
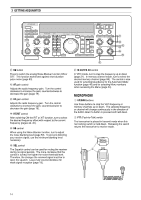
3 GETTING ACQUAINTED #1 #2 #3 #4 #5 ANT ATT DOWN UP VOX FULL/SEMI AIP AT TUNE THRU/AUTO SEND AGC METER HF TRANSCEIVER PROC MONI KEY SPEED PROC 4 MONI 6 TS-870 1 CH 1 6 M.IN ON AIR 2 CH 2 7 M>VFO ENTER PHONES MIC SLOW OFF CAR 4 2 0 2 FAST 0 DELAY MIC 6 4 8 2 10 0 8 3 CH 3 8 SCAN 10 PWR 6 8 10 4 CH 4 9 CLR 5 REC 0 F.LOCK QUICK MEMO M.IN MR FINE AT TUNE TF-SET 1MHz MODE LSB /USB CW/- R FSK /- R FM/AM DOWN A=B MENU RX TX A B M.CH UP DIGITAL SIGNAL PROCESSOR AUTO NOTCH BEAT CANCEL N.R. TX EQ. LO/WIDTH FILTER HI/SHIFT RIT XIT CLEAR NB RIT/XIT AF 4 2 RF 6 8 M.CH/VFO.CH 0 NB 4 2 10 SQL 6 8 0 10 #6 #7 ##8 9 $0 Note: Only Auto Notch #,2 or Beat Cancel #,3 or Noise Reduction #4 can be used at one time. They cannot be activated at the same time. #1 VFO/ Memory channel buttons Press to select VFO A, VFO B, or a memory channel for receive or transmit. If a receive button is pressed, the same VFO or memory channel is selected for transmit and receive. However, pressing a transmit button selects only that VFO or memory channel for transmit {page 42}. RX A button Selects VFO A for receive and transmit {page 19}. TX A button Selects VFO A for transmit {page 42}. RX B button Selects VFO B for receive and transmit {page 19}. TX B button Selects VFO B for transmit {page 42}. RX M.CH button Selects memory channel mode for receive and transmit {page 55}. TX M.CH button Selects memory channel mode for transmit {page 42}. #2 AUTO NOTCH button In SSB mode, press to switch the Auto Notch function ON or OFF. Auto Notch can automatically locate and remove interfering signals from the receive IF pass band {page 52}. #3 BEAT CANCEL button In SSB or AM mode, press to switch the Beat Cancel function ON or OFF. Beat Cancel works at AF to remove interfering signals {page 52}. #4 N.R. button In SSB, CW, FSK, or AM mode, press to switch the Noise Reduction function ON or OFF. This function offers a choice of digital filtering methods for reception {page 53}. #5 TX EQ. button In SSB or AM mode, press to switch the Transmit Equalizer function ON or OFF. This equalizer function includes high boost, low boost, and comb filter functions {page 47}. #6 FILTER LO/WIDTH and HI/SHIFT controls These controls allow total flexibility in all modes for digitally changing the receive pass band characteristics for optimum reception {pages 51, 52}. #7 RIT button Press to switch the Receive Incremental Tuning function ON or OFF. The RIT function allows you to change your receive frequency without affecting your transmit frequency {page 44}. #8 CLEAR button Press to reset the RIT/XIT frequency offset to zero {pages 44, 45}. Also erases entered digits at any time the keypad is being used to enter data {page 22, 48}. #9 XIT button Press to switch the Transmit Incremental Tuning function ON or OFF. The XIT function allows you to change your transmit frequency without affecting your receive frequency {page 45}. $0 UP/DOWN buttons Press to step through all Amateur bands consecutively {page 20}. If the 1MHz Step function is ON, then pressing these buttons steps the transceiver in 1 MHz increments {page 20}. These buttons are also used to make selections from the Menu {page 24}, and to check Start and End frequencies for the Scan function {page 60}. 13
-
 1
1 -
2
-
3
-
4
-
5
-
6
-
7
-
8
-
9
-
10
-
11
-
12
-
13
-
 14
14 -
 15
15 -
 16
16 -
 17
17 -
 18
18 -
 19
19 -
 20
20 -
 21
21 -
 22
22 -
 23
23 -
 24
24 -
25
-
26
-
27
-
28
-
29
-
30
-
31
-
32
-
33
-
34
-
35
-
36
-
37
-
38
-
39
-
40
-
41
-
42
-
43
-
44
-
45
-
46
-
47
-
48
-
49
-
50
-
51
-
52
-
53
-
54
-
55
-
56
-
57
-
58
-
59
-
60
-
61
-
62
-
63
-
64
-
65
-
66
-
67
-
68
-
69
-
70
-
71
-
72
-
73
-
74
-
75
-
76
-
77
-
78
-
79
-
80
-
81
-
82
-
83
-
84
-
85
-
86
-
87
-
88
-
89
-
90
-
91
-
92
-
93
-
94
-
95
-
96
-
97
-
98
-
99
-
100
-
101
-
102
-
103
-
104
 |
 |
