KitchenAid KSIB900ESS Owners Manual - Page 15
Roll-Out Rack
 |
View all KitchenAid KSIB900ESS manuals
Add to My Manuals
Save this manual to your list of manuals |
Page 15 highlights
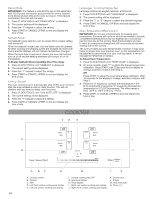
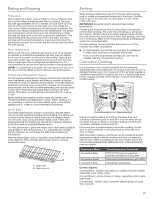
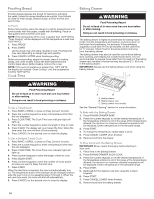
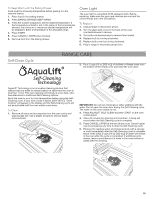
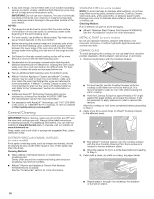
A B A. Ends of rack in position 3 B. Food in position 2 IMPORTANT: These rack positions are for flat racks. If a Max Capacity Oven Rack is used, the rack position must be adjusted as shown in the previous figure. Multiple Rack Cooking 2-rack (non-convection): Use rack positions 2 and 5 or 3 and 6. 2-rack (convection): Use rack positions 2 and 5 or 3 and 6. 3-rack (convection): Use rack positions 2 and 7 and a Max Capacity Oven Rack in rack position 5. Baking Cookies and Layer Cakes on 2 Racks Baking Layer Cakes For best results when baking cakes on 2 racks, use the Bake function, a flat rack in rack position 3, and a roll-out rack in rack position 5. Place the cakes on the racks as shown. Keep at least 3" (7.6 cm) of space between the front of the racks and the front cakes. Roll-Out Rack The roll-out rack allows easy access to position and remove food in the oven. It is not recommended to use the roll-out rack in the top rack, position 7, or the bottom rack, position 1. Open Position A B A. Rack frame B. Sliding rack Closed and Engaged Position A B A. Rack frame B. Sliding rack To Insert Roll-Out Rack 1. Angle the front of the rack assembly up, and then insert the rack frame into the "V" cutout in the rack guides of the oven cavity. Baking Cookies For best results when baking cookies on 2 racks, use the Convection Bake function, a flat rack in rack position 3, and a roll-out rack in rack position 4. A B A. "V" cutout B. Rack guides 2. Keep rack assembly lifted up at an angle, and then push in to bypass the lower "V" cutout. 15
-
 1
1 -
2
-
3
-
4
-
5
-
6
-
7
-
8
-
9
-
 10
10 -
 11
11 -
 12
12 -
 13
13 -
 14
14 -
 15
15 -
 16
16 -
 17
17 -
 18
18 -
 19
19 -
 20
20 -
21
-
22
-
23
-
24
-
25
-
26
-
27
-
28
-
29
-
30
-
31
-
32
-
33
-
34
-
35
-
36
-
37
-
38
-
39
-
40
-
41
-
42
-
43
-
44
-
45
-
46
-
47
-
48
-
49
-
50
-
51
-
52
-
53
-
54
-
55
-
56
 |
 |
