KitchenAid KSIB900ESS Owners Manual - Page 21
Remove/Replace Drawer
 |
View all KitchenAid KSIB900ESS manuals
Add to My Manuals
Save this manual to your list of manuals |
Page 21 highlights
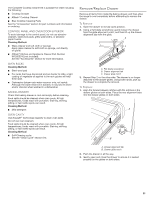
The Complete Cooktop Cleaner Kit is available for order including the following: ■■ Cooktop Scraper ■■ Affresh® Cooktop Cleaner ■■ Blue Cooktop Cleaning Pads See the "Accessories" section for part numbers and information on ordering. CONTROL PANEL AND OVEN DOOR EXTERIOR To avoid damage to the control panel, do not use abrasive cleaners, steel-wool pads, gritty washcloths, or abrasive paper towels. Cleaning Method: ■■ Glass cleaner and soft cloth or sponge: Apply glass cleaner to soft cloth or sponge, not directly on panel. ■■ Affresh® Kitchen and Appliance Cleaner Part Number W10355010 (not included): See the "Accessories" section for more information. OVEN RACKS Cleaning Method: ■■ Steel-wool pad ■■ For racks that have discolored and are harder to slide, a light coating of vegetable oil applied to the rack guides will help them slide. ■■ Dishwasher (steam rack water reservoir only, not racks): Although the water reservoir is durable, it may lose its shine and/or discolor when washed in a dishwasher. BAKING DRAWER Check that baking drawer is cool and empty before cleaning. Food spills should be cleaned when oven cools. At high temperatures, foods react with porcelain. Staining, etching, pitting, or faint white spots can result. Cleaning Method: ■■ Mild detergent OVEN CAVITY Use AquaLift® Technology regularly to clean oven spills. Do not use oven cleaners. Food spills should be cleaned when oven cools. At high temperatures, foods react with porcelain. Staining, etching, pitting, or faint white spots can result. Cleaning Method: ■■ Self-Cleaning cycle: See the "Clean Cycle" section first. Remove/Replace Drawer Remove all items from inside the baking drawer, and then allow the range to cool completely before attempting to remove the drawer. To Remove: 1. Open the drawer to its fully open position. 2. Using a flat-blade screwdriver, gently loosen the drawer from the glide alignment notch, and then lift up the drawer alignment tab from the glide. A B C A. Flat-blade screwdriver B. Drawer alignment tab C. Drawer glide notch 3. Repeat Step 2 on the other side. The drawer is no longer attached to the drawer glides. Using both hands, pick up the drawer to complete the removal. To Replace: 1. Align the forward drawer notches with the notches in the drawer glides on both sides. Place the rear alignment tabs into the drawer glides on both sides. A B A. Drawer alignment tab B. Drawer glide notch 2. Push the drawer in all the way. 3. Gently open and close the drawer to ensure it is seated properly on the glides on both sides. 21
-
 1
1 -
2
-
3
-
4
-
5
-
6
-
7
-
8
-
9
-
10
-
11
-
12
-
13
-
14
-
15
-
 16
16 -
 17
17 -
 18
18 -
 19
19 -
 20
20 -
 21
21 -
 22
22 -
 23
23 -
 24
24 -
 25
25 -
 26
26 -
27
-
28
-
29
-
30
-
31
-
32
-
33
-
34
-
35
-
36
-
37
-
38
-
39
-
40
-
41
-
42
-
43
-
44
-
45
-
46
-
47
-
48
-
49
-
50
-
51
-
52
-
53
-
54
-
55
-
56
 |
 |
