KitchenAid KSIB900ESS Owners Manual - Page 19
Range Care
 |
View all KitchenAid KSIB900ESS manuals
Add to My Manuals
Save this manual to your list of manuals |
Page 19 highlights
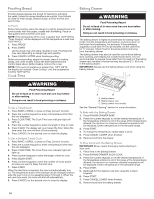
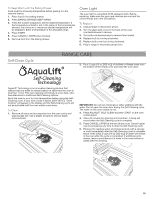
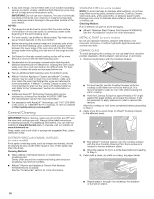
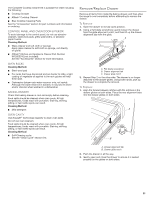
To Keep Warm with the Baking Drawer: Food must be at serving temperature before placing it in the warmed drawer. 1. Place food in the baking drawer. 2. Press BAKING DRAWER KEEP WARM. 3. Press the number keypads to set the desired temperature. If the temperature entered is not in the range of the temperatures allowed, the minimum or maximum allowed temperature will be displayed. Enter a temperature in the allowable range. 4. Press START. 5. Press CANCEL LOWER when finished. 6. Remove food from the baking drawer. Oven Light The oven light is a standard 40 W appliance bulb. Before replacing, make sure the oven and cooktop are cool and the control knobs are in the Off position. To Replace: 1. Unplug range or disconnect power. 2. Turn the glass bulb cover in the back of the oven counterclockwise to remove. 3. Turn bulb counterclockwise to remove from socket. 4. Replace bulb by turning clockwise. 5. Replace bulb cover by turning clockwise. 6. Plug in range or reconnect power.Oven. Self-Clean Cycle RANGE CARE 2. Pour 2 cups (16 oz [500 mL]) of distilled or filtered water onto the bottom of the empty oven and close the oven door. AquaLift® Technology is an innovative cleaning solution that utilizes heat and water to release baked-on spills from the oven in less than 1 hour. This new cleaning technology is a low-heat, odorfree alternative to traditional Self-Cleaning options. Allow the oven to cool to room temperature before using the SelfCleaning cycle. If your oven cavity is above 200°F (93°C), "Oven Cooling" will appear in the display and the Self-Cleaning cycle will not be activated until the oven cavity cools down. To Clean: 1. Remove all racks and accessories from the oven cavity and wipe excess soil. Use a plastic scraper to remove easily removed soils. IMPORTANT: Do not use chemicals or other additives with the water. Do not open the oven door during the Self-Cleaning cycle. The water on the oven bottom is hot. 3. Press AQUALIFT SELF CLEAN and then START on the oven control panel. 4. Allow 40 minutes for cleaning and cooldown. A beep will sound when the Self-Cleaning cycle is complete. 5. Press CANCEL UPPER at the end of the cycle. Cancel Upper may be pressed at any time to stop the Self-Cleaning cycle. 6. Remove the residual water and loosened soils with a sponge or cloth immediately after the Self-Cleaning cycle is complete. Much of the initial 2 cups (16 oz [500 mL]) of water will remain in the oven after the cycle is completed. If additional soils remain, leave a small amount of water in the oven bottom to assist with the cleaning. 19
-
 1
1 -
2
-
3
-
4
-
5
-
6
-
7
-
8
-
9
-
10
-
11
-
12
-
13
-
 14
14 -
 15
15 -
 16
16 -
 17
17 -
 18
18 -
 19
19 -
 20
20 -
 21
21 -
 22
22 -
 23
23 -
 24
24 -
25
-
26
-
27
-
28
-
29
-
30
-
31
-
32
-
33
-
34
-
35
-
36
-
37
-
38
-
39
-
40
-
41
-
42
-
43
-
44
-
45
-
46
-
47
-
48
-
49
-
50
-
51
-
52
-
53
-
54
-
55
-
56
 |
 |
