KitchenAid KSIB900ESS Owners Manual - Page 18
Proofing Bread, Cook Time, Baking Drawer
 |
View all KitchenAid KSIB900ESS manuals
Add to My Manuals
Save this manual to your list of manuals |
Page 18 highlights
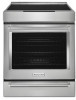
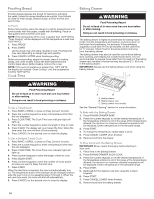
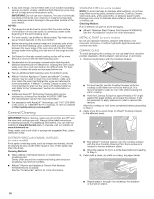
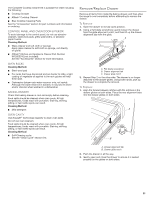
Proofing Bread Proofing bread prepares the dough for baking by activating the yeast. Follow the recipe directions as a guide. Proof should be used for fresh dough, thawed dough, and for the first and second rise. To Proof: Before first proofing, place the dough in a lightly greased bowl and cover loosely with wax paper, coated with shortening. Place on rack guide 2 and close the oven door. NOTE: If the temperature of the oven is greater than 120°F (49°C), "Oven Cooling" will be displayed until the temperature is less than 120°F (49°C). 1. Press PROOF. 2. Press START. Let the dough rise until nearly doubled in size. Proofing time may vary depending on dough type and quantity. 3. Press CANCEL UPPER when finished proofing. Before second proofing, shape the dough, place it in baking pan(s), and cover loosely. Follow the same placement and control steps above. Before baking, remove the cover. NOTE: If the oven temperature is greater than 120°F (49°C), the display will indicate "Oven Cooling" until the temperature is below 120°F (49°C). Cook Time Baking Drawer WARNING Food Poisoning Hazard Do not let food sit in oven more than one hour before or after cooking. Doing so can result in food poisoning or sickness. The baking drawer is highly recommended for baking frozen foods. Use the temperature and medium cook time given on the frozen food packaging. For example, if the packaging suggests a cook time of 15 to 20 minutes, set the cook time for 17 minutes. Check food for doneness before removing from the baking drawer. The baking drawer may also be used for conventional baking, slow cooking, and keeping hot cooked foods warm. It is not recommended to prepare foods taller than the height of the baking drawer rack handles or foods that may rise above 21/2" (6.4 cm) in the baking drawer. IMPORTANT: Always use the baking drawer rack when using the baking drawer. C WARNING Food Poisoning Hazard Do not let food sit in oven more than one hour before or after cooking. Doing so can result in food poisoning or sickness. To Set a Timed Cook: 1. Press BAKE or BROIL or press an Easy Convect function. 2. Press the number keypads to enter a temperature other than the one displayed. 3. Press COOK TIME. The Cook Time oven indicator light will light up. 4. Press the number keypads to enter the length of time to cook. 5. Press START. The display will count down the time. When the time ends, the oven will shut off automatically. 6. Press CANCEL for the desired oven to clear the display. To Set a Delayed Timed Cook: 1. Press BAKE or BROIL or press an Easy Convect function. 2. Press the number keypads to enter a temperature other than the one displayed. 3. Press COOK TIME. The Cook Time oven indicator light will light up. 4. Press number keypads to enter the length of time to cook. 5. Press DELAY START. 6. Press number keypads to enter the number of hours and/or minutes you want to delay the start time. 7. Press START. When the start time is reached, the oven will automatically turn on. The temperature and/or time settings can be changed anytime after the oven turns on by repeating steps 2 through 4. When the set cook time ends, the oven will shut off automatically. 8. Press CANCEL for the desired oven to clear the display. A B A. Baking drawer B. Baking drawer rack C. Baking drawer rack handles See the "General Cleaning" section for more information. To Bake with the Baking Drawer: 1. Press BAKING DRAWER BAKE. 2. Press the number keypads to set the desired temperature. If the temperature entered is not in the range of the temperatures allowed, the minimum or maximum allowed temperature will be displayed. Enter a temperature in the allowable range. 3. Press START. 4. To change the temperature, repeat steps 2 and 3. 5. Press CANCEL LOWER when finished. 6. Remove food from the drawer. To Slow Cook with the Baking Drawer: IMPORTANT: Brown roasts thoroughly before starting to slow cook. 1. Place food in the Baking Drawer. 2. Press BAKING DRAWER SLOW COOK. 3. Press the number keypads to set the desired temperature. If the temperature entered is not in the range of the temperatures allowed, the minimum or maximum allowed temperature will be displayed. Enter a temperature in the allowable range. 4. Press START. 5. (Optional) Set the desired cook time using the number keypads. 6. Press START. 7. Press CANCEL LOWER when finished. 8. Remove food from the baking drawer. 18
-
 1
1 -
2
-
3
-
4
-
5
-
6
-
7
-
8
-
9
-
10
-
11
-
12
-
 13
13 -
 14
14 -
 15
15 -
 16
16 -
 17
17 -
 18
18 -
 19
19 -
 20
20 -
 21
21 -
 22
22 -
 23
23 -
24
-
25
-
26
-
27
-
28
-
29
-
30
-
31
-
32
-
33
-
34
-
35
-
36
-
37
-
38
-
39
-
40
-
41
-
42
-
43
-
44
-
45
-
46
-
47
-
48
-
49
-
50
-
51
-
52
-
53
-
54
-
55
-
56
 |
 |
