Konica Minolta AccurioPrint C2060L AccurioPress C2070/C2070P/C2060/Print C2060 - Page 84
Making the Both Sides Adjustment for each tray, Scan Measurement Adjustment
 |
View all Konica Minolta AccurioPrint C2060L manuals
Add to My Manuals
Save this manual to your list of manuals |
Page 84 highlights
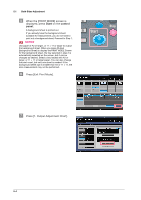
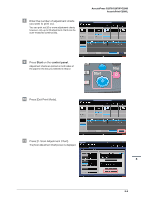
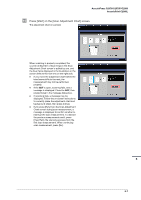
5.1 Both Sides Adjustment - Zoom and Image Shift Adjustment: the method used for fine adjustment after Scan Measurement Adjustment, Gap Adjustment or Chart Adjustment, or the method used when the amount of misalignment between both sides is figured out (page 5-23). Tips - If a rotation or skew is detected on the entire image during printing, you can use [Scan Meas.] adjustment or [Rotate/Skew] to adjust the rotation and skew amount. For details, refer to the HTML User's Guide. - When changing the paper type of the tray or ensuring the accuracy of the print image size (Zoom) and position (Image Shift), first select [Front] - [Zoom]/[Image Shift] Adjustment or [Chart Adjustment] to adjust the front side, then select [Scan Meas.] adjustment or [Back] - [Chart Adjustment] to adjust the back side. - When the reference position on the print side is adjusted or [Both Sides Adjust] is selected, mark is printed out on the front sides of charts to be printed, and you can identify from which paper tray the charts are printed out depending on the number of marks. For details, refer to the HTML User's Guide. - You can change the default screen of the [Both Sides Adjust] screen. For more information, contact your service representative. (In Printer model, you cannot set the [Scan Meas.] adjustment screen to the default.) Making the Both Sides Adjustment for each tray Adjust a misalignment between the front and back sides, which is caused during the duplex printing, for each tray. The following methods are available to carry out the Both Sides Adjustment. - Scan Measurement Adjustment - Gap Adjustment - Chart Adjustment - Zoom and Image Shift Adjustment Tips You can register Both Sides Adjustment values in a paper profile with paper conditions specified. If paper conditions are registered, you can carry out printing under the previous conditions even when you have changed a tray to load paper into. For information about how to edit or register a paper profile, refer to the HTML User's Guide. )Scan Measurement Adjustment Adjust the magnification ratio and printing position of the back side with reference to the printing position of the front side. The magnification ratio and printing position of the back side are automatically adjusted by using the scanner function of this machine to measure the gap amount in printing position of the back side to the front side. You do not need to measure the gap amount with a scale. The adjustment is available for paper of all sizes which can be used with this machine. Print out 1 to 20 sheets of the adjustment chart having both front and back sides printed, and scan them 4 times per sheet. The average value of gap amounts in printing position of the back side to the front side, which can be obtained by scanning up to 20 sheets of the adjustment chart, will be calculated in order to adjust the magnification ratio and printing position of the back side. NOTICE NOTICE Printer model, which is not mounted with a scanner, cannot scan the adjustment charts to perform the [Scan Meas.] adjustment. The [Scan Meas.] adjustment provides the coordination based on the average value of gap amounts, taking into account the gap in printing position between the first and last sheets which can be produced when multiple sheets are output. Performing the [Scan Meas.] adjustment may require readjustment of the "Zoom and Image Shift Adjustment" registered in a paper profile. The [Scan Meas.] adjustment is a simple method to adjust only the magnification ratio and image position of the back side. To adjust both front and back sides, perform the "Chart Adjustment" (page 5-16) or "Zoom and Image Shift Adjustment" (page 5-23). 5-2
-
 1
1 -
2
-
3
-
4
-
5
-
6
-
7
-
8
-
9
-
10
-
11
-
12
-
13
-
14
-
15
-
16
-
17
-
18
-
19
-
20
-
21
-
22
-
23
-
24
-
25
-
26
-
27
-
28
-
29
-
30
-
31
-
32
-
33
-
34
-
35
-
36
-
37
-
38
-
39
-
40
-
41
-
42
-
43
-
44
-
45
-
46
-
47
-
48
-
49
-
50
-
51
-
52
-
53
-
54
-
55
-
56
-
57
-
58
-
59
-
60
-
61
-
62
-
63
-
64
-
65
-
66
-
67
-
68
-
69
-
70
-
71
-
72
-
73
-
74
-
75
-
76
-
77
-
78
-
 79
79 -
 80
80 -
 81
81 -
 82
82 -
 83
83 -
 84
84 -
 85
85 -
 86
86 -
 87
87 -
 88
88 -
 89
89 -
90
-
91
-
92
-
93
-
94
-
95
-
96
-
97
-
98
-
99
-
100
-
101
-
102
-
103
-
104
-
105
-
106
-
107
-
108
-
109
-
110
-
111
-
112
-
113
-
114
-
115
-
116
-
117
-
118
-
119
-
120
-
121
-
122
-
123
-
124
-
125
-
126
-
127
-
128
-
129
-
130
-
131
-
132
-
133
-
134
-
135
-
136
-
137
-
138
-
139
-
140
-
141
-
142
-
143
-
144
-
145
-
146
-
147
-
148
-
149
-
150
-
151
-
152
-
153
-
154
-
155
-
156
-
157
-
158
-
159
-
160
-
161
-
162
-
163
-
164
-
165
-
166
-
167
-
168
-
169
-
170
-
171
-
172
-
173
-
174
-
175
-
176
-
177
-
178
-
179
-
180
-
181
-
182
-
183
-
184
-
185
-
186
-
187
-
188
-
189
-
190
-
191
-
192
-
193
-
194
-
195
-
196
-
197
-
198
-
199
 |
 |
