Konica Minolta KIP 9900 User Guide
Konica Minolta KIP 9900 Manual
 |
View all Konica Minolta KIP 9900 manuals
Add to My Manuals
Save this manual to your list of manuals |
Konica Minolta KIP 9900 manual content summary:
- Konica Minolta KIP 9900 | User Guide - Page 1
KIP 9900 User Guide Version A0 - Konica Minolta KIP 9900 | User Guide - Page 2
and operational explanations for the KIP 9900. Please read this USER'S MANUAL carefully before using the Printer. Please keep this USER'S MANUAL for future reference. When this machine is installed in USA FCC ID : VP8-K115 This equipment satisfies the requirements in Part 15 of FCC Rules for - Konica Minolta KIP 9900 | User Guide - Page 3
system in which business proprietors can participate voluntarily. The targeted products are office equipment such as computers, monitors, printers, Republic of China. NOTE KIP 9900 will not function if no optional device is connected. Please ask the Service Personnel for the optional device. (2) - Konica Minolta KIP 9900 | User Guide - Page 4
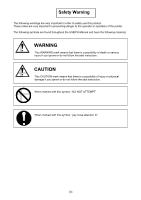
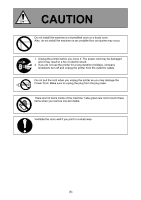
the operator or operation of the printer. The following symbols are found throughout the USER'S Manual and have the following meaning: WARNING This WARNING mark means that there is a possibility of death or serious injury if you ignore or do not follow the said instruction. CAUTION This CAUTION mark - Konica Minolta KIP 9900 | User Guide - Page 5
60Hz 2. Use a circuit with an exclusive breaker. 3. Install the machine as close to the wall outlet as possible. 4. If you wish to move the printer, please contact to your service personnel. 1. Do not remove the screw and do not open the cover if not instructed to do so in this User's Manual. If you - Konica Minolta KIP 9900 | User Guide - Page 6
, do not install the machine on an unstable floor as injuries may occur. 1. Unplug the printer before you move it. The power cord may be damaged and it may result in a fire or electric shock. 2. If you do not use the printer for a long duration (holidays, company shutdown) turn off and unplug the - Konica Minolta KIP 9900 | User Guide - Page 7
POWER CORD INSTRUCTION The installation of (or exchange to) a power plug which fits in the wall outlet of the installation location shall be conducted in accordance with the following: WARNING Select a power plug which meets the following criteria; - The plug has a voltage and current rating - Konica Minolta KIP 9900 | User Guide - Page 8
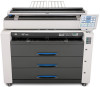
Requirements 1.2 Originals Prohibited from Duplication 1.3 Features 1.4 Specifications 1.5 Appearance 1.5.1 Front view 1.5.2 Right side view 1.5.3 Rear view 1.5.4 Operation Panel 1.5.5 Media Indicators 1.5.6 "in use" Indicators Page 1- 1 1- 2 1- 3 1- 4 1- 6 1- 6 1- 7 1- 8 1-11 1-12 1-13 Chapter - Konica Minolta KIP 9900 | User Guide - Page 9
- 240V (+6% / -10%), 16A, 50/60Hz For use in Europe: Plug of power cord must meet the standard of each country. For PERMANENT use, although the quantity generated is within safe levels. (see certifications) Ventilate the room, if required. (8) Levelling Bolts on the bottom of the KIP 9900 - Konica Minolta KIP 9900 | User Guide - Page 10
ticket, etc.), commutation ticket or book of tickets, excluding that some specific company copies such originals as many as it requires for its own It is prohibited to copy originals such as books, music, paintings, printed copies, maps, drawings, movie posters and pictures which are protected by - Konica Minolta KIP 9900 | User Guide - Page 11
reduce the running cost. (2) Superior printing productivity KIP 9900's fast print speed (240mm/sec) enables to process large volume of prints/copies (11sheets of A0 or E per minute). (3) Long parts life and low frequency of service maintenance Service parts are durable for very long use and self - Konica Minolta KIP 9900 | User Guide - Page 12
method Resolution Print width Print length Warm up time First print time Fusing method Development Charging method Media feeding method Transfer method Separation method Input power Interface Maximum power consumption Acoustic noise Ozone Dimensions Weight Media Specification KIP 9900 Console - Konica Minolta KIP 9900 | User Guide - Page 13
Subject Environmental condition Storage condition of consumables Specification Temperature Humidity Print media Toner 10 - 32.5 degrees centigrade 20 - 80% RH Wrap the media surely to shut out the humidity. Keep the toner cartridge away from the direct sunlight, and store it in the condition of 0 - Konica Minolta KIP 9900 | User Guide - Page 14
Decks User Interface Right Side Door Toner Cover Name of part Power Switch Bypass Feeder Operation Panel Roll Decks Media Indicator Toner Cover Right Side Door Use Interface "in use" Indicators Media Indicator "in use" Indicators Function Turns on/off the KIP 9900. Cut sheet media can be set - Konica Minolta KIP 9900 | User Guide - Page 15
Transportation Unit Lever Name of part Cutter Handle Counter A Counter B Internal Transportation Unit Lever Fuser Handle Toner Cartridge Function Can cut the roll media manually if it has not been cut yet after it was mis-fed. Counts the linear meter / feet of total prints. Counts the square meter - Konica Minolta KIP 9900 | User Guide - Page 16
1.5.3 Rear view Dehumidify Heater Switch Top Rear Cover Exit Cover Folder Port VGA Port Power Cord Interface Connector for Controller PC S. Down Port Diag Port USB Port Outlet for Controller PC 1-8 Chapter 1 Before Use - Konica Minolta KIP 9900 | User Guide - Page 17
unit outside of the KIP 9900, it is possible to supply AC power from the KIP 9900 to the controller unit if you connect the power cord to this outlet. (220 - 240V, 3A maximum) NOTE Specification for Power Cord used in North America Use the following type of Power Cord for a controller PC - Konica Minolta KIP 9900 | User Guide - Page 18
alone. WARNING Plug Specification for Europe / Asia The power cord plug must appropriate outlet must be prepared. (3) The wires in the power cord must be connected to the terminals of the plug AND-YELLOW NOTE The above specifications are subject to change without notice. 1-10 Chapter 1 Before - Konica Minolta KIP 9900 | User Guide - Page 19
green when KIP 9900 is warming up, and lights green when it is ready. Lights orange when any door or unit is open or unlocked. Flashes red when the toner is near empty. (Toner Cartridge has no Toner) Lights red when the toner is completely empty. (Developer Unit has no toner. No more print is - Konica Minolta KIP 9900 | User Guide - Page 20
. It informs you of the size (width) and the material of roll media loaded in each Roll Deck. 1 plain paper vellum / tracing film 2 plain paper vellum / tracing film 3 plain paper vellum / tracing film 4 plain paper vellum / tracing film Example 1 : Metric mode Roll Deck 1 : A0 plain - Konica Minolta KIP 9900 | User Guide - Page 21
respectively, and inform the operator which drawer must not be opened during printing. 1 2 in use 34 One or two "in use" Indicator light orange when the KIP 9900 is on printing. Do not open the drawer if the concerning "in use" Indicator is lighting orange. The drawer can be opened even if the - Konica Minolta KIP 9900 | User Guide - Page 22
from each Roll Deck is integrated into one path in the middle drawer. When the KIP 9900 is printing with the roll media fed from the Roll Deck 1 for example, only the bottom drawer can be opened. ("in use" Indicators for top and middle drawers will light orange in this case.) Top Drawer is - Konica Minolta KIP 9900 | User Guide - Page 23
Turning on the KIP 9900 2. 2 Turning off the KIP 9900 2. 3 Setting the Roll Media into Roll Deck 2. 3. 1 Roll 1 / 2 / 3 2. 3. 2 Roll 4 2. 4 Setting Cut Sheet Media to Bypass Feeder 2. 4. 1 Multi-feeding of cut sheet media 2. 4. 2 Singular feeding of cut sheet media 2. 5 Replacing the Toner Cartridge - Konica Minolta KIP 9900 | User Guide - Page 24
. NOTE Please confirm the outlet satisfies the following condition before plugging the KIP 9900 into. U.S.A. / Europe 220 - 240V (+6% / -10%), 16A, 50/60Hz WARNING Plug Specification for Europe / Asia The power cord plug must meet the followings. (1) Select a plug which meets the following - Konica Minolta KIP 9900 | User Guide - Page 25
2. Press "|" side of Power Switch to turn on the KIP 9900. 3. KIP 9900 starts warming up the Fuser Unit, and the Ready Indicator on the Operation Panel starts flashing. PAPER DECK MF 1234 D1 WIRE CLEAN EXP- CLEAN SELECT CUT D2 D3 EXIT PF D4 COPY DENSITY MENU ENTER ONLINE Ready Indicator - Konica Minolta KIP 9900 | User Guide - Page 26
2. 2 Turning off the KIP 9900 Press " " side of Power Switch to turn off the KIP 9900. NOTE The controller unit starts shutdown process after turning off the KIP 9900, and it will take about 2 minutes until complete shut down. Do not unplug the KIP 9900 from the outlet for about 2 minutes after - Konica Minolta KIP 9900 | User Guide - Page 27
flashes in red when the used roll media is emptied during printing. Install a new roll media. Roll Empty Indicator PAPER DECK MF 1234 D1 WIRE CLEAN EXP- CLEAN SELECT CUT D2 D3 EXIT PF D4 COPY DENSITY MENU ENTER ONLINE Reference (1) Even if the KIP 9900 is printing, it is possible to open - Konica Minolta KIP 9900 | User Guide - Page 28
2. 3. 1 Roll 1 / 2 / 3 Install a new roll media onto Roll 1, 2 and 3 using the following directions. Roll 1 Roll 2 Roll 3 1. Draw out the concerning Roll Deck. 2-6 Chapter 2 Basic Operations - Konica Minolta KIP 9900 | User Guide - Page 29
2. Retrieve the Roll Spool to the arrow direction a little to disengage the gears on the left, and remove the Roll Spool from the deck. Roll Spool NOTE If the Roll Spool is removed without disengaging the gears on the left, these gears will be broken. Gear on Roll Spool Gear on Roll Deck 3. - Konica Minolta KIP 9900 | User Guide - Page 30
4. Insert the Roll Spool into the new roll media. Roll Spool NOTE Please keep the correct direction as the following left photo. Correct Wrong 2-8 Chapter 2 Basic Operations - Konica Minolta KIP 9900 | User Guide - Page 31
5. Pressing down the green lever, insert the Roll Spool fully. Align the edge of roll media with the concerning size marking. Release the green lever. The roll media is firmly fixed to the Roll Spool. Lever Size Marking 2-9 Chapter 2 Basic Operations - Konica Minolta KIP 9900 | User Guide - Page 32
6. Return the Roll Spool to the Roll Deck. NOTE The driving belt inside of the Roll Deck must be flat and evenly contact on the bottom of black small roller on the right of Roll Spool. If it is twisted or not contacting the black small roller properly, correctly it. Black Roller Belt Correct - Konica Minolta KIP 9900 | User Guide - Page 33
7. Using a slit on each drawer, cut off the leading part of roll media with a cutter knife to straighten the leading edge. Slit NOTE Do not feed any media with tape or adhesive remaining on it. - Konica Minolta KIP 9900 | User Guide - Page 34
is up, "ARCHITECTURE": the button is down.) NOTE Correctly set the Media Selector (including Architecture/Engineering selection) to the loaded media type. Wrong setting of Media Selector could cause unexpected defective printing result. 10. Close the Roll Deck. 2-12 Chapter 2 Basic Operations - Konica Minolta KIP 9900 | User Guide - Page 35
to Roll Deck 4 slightly differs from the way for the other Rolls because of the location of Roll 4's feeding rollers. This section instructs only the operation individually required for Roll 4. Refer to [2.3.1 Roll 1 / 2 / 3] on page 2-6 for the rest of common operations. 1. Draw out the bottom - Konica Minolta KIP 9900 | User Guide - Page 36
3. Pressing down the green lever, insert the Roll Spool into the new roll media. Align the edge of roll media with the concerning size marking. Release the green lever. The roll media is firmly fixed to the Roll Spool. Roll Spool Lever NOTE Please keep the correct direction as the following left - Konica Minolta KIP 9900 | User Guide - Page 37
4. Return the Roll Spool to the Roll Deck 4. 5. Insert the leading edge of media under the feeding roller. Feeding roller 6. Rotate the green knob clockwise to pinch the leading edge (about 10-20mm) with the feeding rollers. Roll media 7. Close the bottom Roll Deck. Knob 2-15 Chapter 2 Basic - Konica Minolta KIP 9900 | User Guide - Page 38
2. 4 Setting Cut Sheet Media to Bypass Feeder Cut sheet media can be fed into KIP 9900 from the Bypass Feeder. Orientation, length and availability of multi-feeding are specified for each media width separately as follows. Metric size Width of cut - Konica Minolta KIP 9900 | User Guide - Page 39
it will result in mis-feed or duplicate feeding. The internal mechanism of KIP 9900 may damage in the worst case. (2) Do not leave the cut sheet on the outer device. 2. Slide the Cut Sheet Guides and place at the requested size guides. Cut Sheet Guide 3. Arrange the edges of media, put the media - Konica Minolta KIP 9900 | User Guide - Page 40
cut sheet media than A2 (594mm) or 24" can be fed into KIP 9900 by singular feeding only. NOTE Do not leave the cut sheet media on the mode on the outer device. 2. Slide the Cut Sheet Guides and place at the requested size guides. Cut Sheet Guide 3. Put the media on the Bypass Feeder and move it - Konica Minolta KIP 9900 | User Guide - Page 41
NOTE As curled cut sheet media will cause a mis-feed, straighten the media as far as possible before printing. And also please set the media by "curl down" direction as a mis-feed can be avoided. Setting of media by "curl up" direction tends to - Konica Minolta KIP 9900 | User Guide - Page 42
more be able to continue printing. For avoiding machine down, prepare a new Toner Cartridge before the Toner Empty Indicator starts flashing. NOTE (1) The KIP 9900 Toner Cartridge is embedded with the IC Tag for an exclusive use on KIP 9900. Even if the Toner Cartridge for other models is installed - Konica Minolta KIP 9900 | User Guide - Page 43
in the notch as the following right photo. Catch here Toner Cartridge Toner supply hole NOTE (1) The toner will drop and will dirt the floor if the cartridge is removed without directing its toner supplying hole up. (2) Catch the left end of Toner Cartridge. If you catch its body as the following - Konica Minolta KIP 9900 | User Guide - Page 44
holding its left end. 5. Shake the new Toner Cartridge fully to loosen the toner. 6. Install the new Toner Cartridge with its green seal up. Green seal 7. Rotate the Toner Cartridge quarter revolution, and then strip off the green seal. 2-22 Strip off the seal. Chapter 2 Basic Operations - Konica Minolta KIP 9900 | User Guide - Page 45
to the bottom. NOTE Be sure to place the toner supply bole on the bottom. Otherwise the KIP 9900 will show Toner Empty Error soon as the toner can not be supplied with this state. 9. Close the Cartridge Cover. Cartridge Cover 10. Close the Toner Cover. Toner Cover 2-23 Chapter 2 Basic Operations - Konica Minolta KIP 9900 | User Guide - Page 46
Print If media is humidified ; Image void If the roll media is kept in the Roll Deck for a long time with being exposed to the air, the media tends to be more humidified and results in the above defects with higher frequency. To avoid this situation as far as possible, the KIP 9900 - Konica Minolta KIP 9900 | User Guide - Page 47
use, it may be fixed if the operation mode is changed to other ones. Consult your service personnel in such case. (User can not change the mode.) (2) The KIP 9900 will be no use in turning on the Dehumidify Heater. The user needs to take great care for preventing the printing media from being - Konica Minolta KIP 9900 | User Guide - Page 48
) of roll media can be cut off to have a straight edge. Leading part of roll media Initial Cut can be performed with SELECT Key, CUT Key and Roll Deck Indicator on the Operation Panel. Roll Deck Indicator PAPER DECK MF 1234 D1 WIRE CLEAN EXP- CLEAN SELECT CUT D2 D3 EXIT PF - Konica Minolta KIP 9900 | User Guide - Page 49
2. Press the CUT Key to perform the Initial Cut. The leading part of selected roll is cut and ejected automatically. (The LED flashes during the Initial Cut.) PAPER DECK 1234 SELECT CUT Reference Initial Cut is not available when in warming up or when the Roll Deck is open. All LED of Roll - Konica Minolta KIP 9900 | User Guide - Page 50
Mode timer setting Automatic Initial Cut at power on Transfer Support LED ON/OFF [Film] Alarm ON / OFF Choice of Standard / Special Print Mode [Plain paper] Choice of Standard / Special Print Mode [Tracing paper] Choice of Standard / Special Print Mode [Film] Selection of Image Enhancement Mode - Konica Minolta KIP 9900 | User Guide - Page 51
User Mode F contains sub categories of folding settings. If you use a Bay Folder, contact your service personnel for the detail. Name of User Mode User Mode F0 User Mode F1 User Mode F2 User Mode F3 User Mode F4 User Mode - Konica Minolta KIP 9900 | User Guide - Page 52
[ MENU ] once. MENU ENTER ONLINE 2. The 4th, 5th and 6th digits indicates the status of KIP 9900. - - - (flashing) : Test print is not available. ooo (lighting) : Test print is available. ooo (flashing) : On test printing MENU ENTER ONLINE Status of KIP 9900 2-30 Chapter 2 Basic Operations - Konica Minolta KIP 9900 | User Guide - Page 53
3. Press the [ ENTER ] Key when "ooo" is lighting. Test print is started and "ooo" flashes. MENU ENTER ONLINE MENU ENTER ONLINE 4. When test print is finished, "ooo" stops flashing and lights. Press the [ ONLINE ] Key to cancel the User Mode 1. MENU ENTER ONLINE MENU ENTER ONLINE 2-31 - Konica Minolta KIP 9900 | User Guide - Page 54
purpose. If some error or mis-feed occurs, KIP 9900 records it with the information "when" it occurred based on the calendar setting set in User Mode 2. As such record is very useful for the service personnel to diagnose the trouble, please set the calendar occasionally to the correct date - Konica Minolta KIP 9900 | User Guide - Page 55
3. Select the "Confirmation Mode - Date" first pressing the [ ] Key, and confirm the current setting for year, month and date. MENU ENTER ONLINE Example : May 31, 2002 MENU ENTER ONLINE Year Month Day 4. Select the "Confirmation Mode - Time" next pressing the [ ] Key, and confirm the current - Konica Minolta KIP 9900 | User Guide - Page 56
5. If some item needs to be corrected, select its correction mode pressing [ ] and [ ] Keys. 6 Correction Modes are shown by Correction Mode Code as C1, C2, C3, C4, C5 and C6, and necessary correction mode can be selected by indicating its code. Correction Mode Codes C1 C2 C3 C4 C5 C6 Description - Konica Minolta KIP 9900 | User Guide - Page 57
7. Change the setting value pressing [ ] Key (increment) and [ Example : Minute is to be corrected from 00 to 05. ] Key (decrement). MENU ENTER ONLINE MENU ENTER ONLINE 8. Decide the new setting value pressing the [ ENTER ] Key. The setting value stops flashing when decided. MENU ENTER - Konica Minolta KIP 9900 | User Guide - Page 58
10. When all necessary items are corrected, press the [ ONLINE ] Key to cancel the User Mode 2. MENU ENTER ONLINE MENU ENTER ONLINE 2-36 Chapter 2 Basic Operations - Konica Minolta KIP 9900 | User Guide - Page 59
User Mode 3, it will go into the Warm Sleep Mode to save the power consumption. Reference Warm Sleep Mode is a kind of power saving mode. It works when the KIP 9900 does not print for the time the timer specifies. Power consumption is reduced by maintaining the temperature of fuser at a lower degree - Konica Minolta KIP 9900 | User Guide - Page 60
2. The Status Display indicates either "OFF" or "On" according to the current setting. Press the [ ENTER ] Key. The setting value (OFF/On) flashes and becomes changeable. MENU ENTER ONLINE MENU ENTER ONLINE "OFF" (or "On") flashes. 3. Select either "OFF" or "On" pressing [ ] Key and [ ] Key.. - Konica Minolta KIP 9900 | User Guide - Page 61
4. Press the [ ENTER ] Key to decide the setting. • If "On" is decided, the Status Display indicates the setting value of Warm Sleep timer in flashing. Go to the following procedure 5 for setting the timer. • If "OFF" is decided, go to the procedure 7 as it is unnecessary to set Warm Sleep timer. - Konica Minolta KIP 9900 | User Guide - Page 62
6. Press the [ ENTER ] Key to decide the timer value. The setting value stops flashing when decided. MENU ENTER ONLINE MENU ENTER ONLINE Setting value (timer) stops flashing. 7. Press the [ ONLINE ] Key to cancel the User Mode 3. MENU ENTER ONLINE MENU ENTER ONLINE 2-40 Chapter 2 Basic - Konica Minolta KIP 9900 | User Guide - Page 63
power consumption. Reference Cold Sleep Mode is a power saving mode that can save more power than Warm Sleep Mode. It works when the KIP 9900 has not printed for the time the timer specifies. Power Sleep Mode is set to OFF (inactive). Call the service personnel to set it to ON. (User can not change - Konica Minolta KIP 9900 | User Guide - Page 64
2. Press the [ ENTER ] Key. The timer value for Cold Sleep flashes and becomes changeable. MENU ENTER ONLINE MENU ENTER ONLINE Setting value (timer) flashes. 3. Indicate the necessary Cold Sleep timer value pressing [ ] Key (increment) and [ ] Key (decrement). Setting unit is "minute", and the - Konica Minolta KIP 9900 | User Guide - Page 65
4. Press the [ ENTER ] Key to decide the timer value. The setting value stops flashing when decided. MENU ENTER ONLINE MENU ENTER ONLINE Setting value (timer) stops flashing. 5. Press the [ ONLINE ] Key to cancel the User Mode 4. MENU ENTER ONLINE MENU ENTER ONLINE 2-43 Chapter 2 Basic - Konica Minolta KIP 9900 | User Guide - Page 66
(Automatic Initial Cut at power ON) [Function] It is possible to make Initial Cut for all of 4 roll media whenever KIP 9900 is turned on. Reference (1) This is a function to cut off the leading part of roll media in 240mm long. (2) This will be done when; - you turn on the printer. - the cold sleep - Konica Minolta KIP 9900 | User Guide - Page 67
the setting value pressing [ ] Key (increment) and [ ] Key (decrement). Setting value Description 0 KIP 9900 performs the Initial Cut for all roll media at power ON. 1 KIP 9900 does not perform the Initial Cut at power ON. MENU ENTER ONLINE MENU ENTER ONLINE 4. Press the [ ENTER ] Key to - Konica Minolta KIP 9900 | User Guide - Page 68
5. Press the [ ONLINE ] Key to cancel the User Mode 5. MENU ENTER ONLINE MENU ENTER ONLINE 2-46 Chapter 2 Basic Operations - Konica Minolta KIP 9900 | User Guide - Page 69
and darker image on film media. NOTE The printed image may look not clear or not dark enough when printed with some kind of unsupported type of printing media. In such case the print image may possibly become clearer and darker if the Transfer Support LED is turned on in the User Mode 6. (However - Konica Minolta KIP 9900 | User Guide - Page 70
Setting value flashes. 3. Change the setting value pressing [ ] Key (increment) and [ ] Key (decrement). Setting value 0 1 Description Transfer Support LED does not work. Transfer Support LED works when printed with film. MENU ENTER ONLINE MENU ENTER ONLINE 2-48 Chapter 2 Basic Operations - Konica Minolta KIP 9900 | User Guide - Page 71
4. Press the [ ENTER ] Key to decide the setting value. The setting value stops flashing when decided. MENU ENTER ONLINE MENU ENTER ONLINE Setting value stops flashing. 5. Press the [ ONLINE ] Key to cancel the User Mode 6. MENU ENTER ONLINE MENU ENTER ONLINE 2-49 Chapter 2 Basic - Konica Minolta KIP 9900 | User Guide - Page 72
empty Reference Alarm will continue to sound if unless either of the following operations is done. 1. Remove the cause of error. (Replace the Toner Cartridge or install a new roll media.) 2. Or press the [ ] Key to stop the alarm without removing the cause of error. MENU ENTER ONLINE [Operation - Konica Minolta KIP 9900 | User Guide - Page 73
value flashes. 3. Change the setting value pressing [ ] Key (increment) and [ ] Key (decrement). Setting value 0 1 Description Alarm does not sound. Alarm sounds if "toner empty", "toner near empty" or "roll empty" occurs. MENU ENTER ONLINE MENU ENTER ONLINE 2-51 Chapter 2 Basic Operations - Konica Minolta KIP 9900 | User Guide - Page 74
4. Press the [ ENTER ] Key to decide the setting value. The setting value stops flashing when decided. MENU ENTER ONLINE MENU ENTER ONLINE Setting value stops flashing. 5. Press the [ ONLINE ] Key to cancel the User Mode 7. MENU ENTER ONLINE MENU ENTER ONLINE 2-52 Chapter 2 Basic - Konica Minolta KIP 9900 | User Guide - Page 75
what the machine specification declares, for example some unsupported media is used or the temperature/humidity range is not within specified range, KIP 9900 may not be able to produce a satisfactory print result. In such case the service personnel customize some printer parameters most properly - Konica Minolta KIP 9900 | User Guide - Page 76
[Operation] 1. Press the [ MENU ] Key 8 times to select the User Mode 8. [ MENU ] Key lights green and the Status Display indicates "U8.". MENU ENTER ONLINE Press [ MENU ] 8 times. MENU ENTER ONLINE 2. Press the [ ENTER ] Key. The setting value flashes and becomes changeable. MENU ENTER - Konica Minolta KIP 9900 | User Guide - Page 77
pressing [ ] Key (increment) and [ ] Key (decrement). Setting value Description 0 Standard Print Mode is applied in printing. (When plain paper is used.) 1 Special Print Mode is applied in printing. (When plain paper is used.) MENU ENTER ONLINE MENU ENTER ONLINE 4. Press the [ ENTER ] Key - Konica Minolta KIP 9900 | User Guide - Page 78
5. Press the [ ONLINE ] Key to cancel the User Mode 8. MENU ENTER ONLINE MENU ENTER ONLINE 2-56 Chapter 2 Basic Operations - Konica Minolta KIP 9900 | User Guide - Page 79
Mode 9 (Choice of Standard / Special Print Mode [Tracing paper]) [Function] The operation mode of KIP 9900 can be set to either Standard Print Mode or Special Print Mode according to the situation. This setting become effective when printed with a tracing paper. See [REFERENCE] on page 2-53 for - Konica Minolta KIP 9900 | User Guide - Page 80
[ ] Key (increment) and [ ] Key (decrement). Setting value Description 0 Standard Print Mode is applied in printing. (When tracing paper is used.) 1 Special Print Mode is applied in printing. (When tracing paper is used.) MENU ENTER ONLINE MENU ENTER ONLINE 2-58 Chapter 2 Basic Operations - Konica Minolta KIP 9900 | User Guide - Page 81
4. Press the [ ENTER ] Key to decide the setting value. The setting value stops flashing when decided. MENU ENTER ONLINE MENU ENTER ONLINE Setting value stops flashing. 5. Press the [ ONLINE ] Key to cancel the User Mode 9. MENU ENTER ONLINE MENU ENTER ONLINE 2-59 Chapter 2 Basic - Konica Minolta KIP 9900 | User Guide - Page 82
2. 8.10 User Mode A (Choice of Standard / Special Print Mode [Film]) [Function] The operation mode of KIP 9900 can be set to either Standard Print Mode or Special Print Mode according to the situation. This setting become effective when printed with a film. See [REFERENCE] on page 2-53 for the - Konica Minolta KIP 9900 | User Guide - Page 83
value pressing [ ] Key (increment) and [ ] Key (decrement). Setting value Description 0 Standard Print Mode is applied in printing. (When film is used.) 1 Special Print Mode is applied in printing. (When film is used.) MENU ENTER ONLINE MENU ENTER ONLINE 2-61 Chapter 2 Basic Operations - Konica Minolta KIP 9900 | User Guide - Page 84
4. Press the [ ENTER ] Key to decide the setting value. The setting value stops flashing when decided. MENU ENTER ONLINE MENU ENTER ONLINE Setting value stops flashing. 5. Press the [ ONLINE ] Key to cancel the User Mode A. MENU ENTER ONLINE MENU ENTER ONLINE 2-62 Chapter 2 Basic - Konica Minolta KIP 9900 | User Guide - Page 85
2. 8.11 User Mode B (Selection of Image Enhancement Mode) [Function] The level of Image Enhancement can be selected. The printed image is more enhanced (become darker) when selecting a larger level. Try to select a higher level if the image looks weak. Setting 0 1 2 3 Image Enhancement Mode Mode - Konica Minolta KIP 9900 | User Guide - Page 86
2. Press the [ ENTER ] Key. The setting value flashes and becomes changeable. MENU ENTER ONLINE MENU ENTER ONLINE Setting value flashes. 3. Change the setting value pressing [ ] Key (increment) and [ ] Key (decrement). Setting 0 1 2 3 Image Enhancement Mode Mode 0 Mode 1 Mode 2 Mode 3 - Konica Minolta KIP 9900 | User Guide - Page 87
4. Press the [ ENTER ] Key to decide the setting value. The setting value stops flashing when decided. MENU ENTER ONLINE MENU ENTER ONLINE Setting value stops flashing. 5. Press the [ ONLINE ] Key to cancel the User Mode B. MENU ENTER ONLINE MENU ENTER ONLINE 2-65 Chapter 2 Basic - Konica Minolta KIP 9900 | User Guide - Page 88
easing the error check level, and you will be able to continue printing. When you will clear the error by the User Mode D, note does not remove the real cause of error. Therefore call the service personnel as soon as possible although the KIP 9900 seems to be working fine. 1. Press the [ MENU ] - Konica Minolta KIP 9900 | User Guide - Page 89
value flashes. 3. Change the setting value pressing [ ] Key (increment) and [ ] Key (decrement). Setting value Description 0 KIP 9900 does not make error checking for E-26. (OFF) 1 KIP 9900 makes error checking for E-26. (ON) MENU ENTER ONLINE MENU ENTER ONLINE 2-67 Chapter 2 Basic - Konica Minolta KIP 9900 | User Guide - Page 90
4. Press the [ ENTER ] Key to decide the setting value. The setting value stops flashing when decided. MENU ENTER ONLINE MENU ENTER ONLINE Setting value stops flashing. 5. Press the [ ONLINE ] Key to cancel the User Mode D. MENU ENTER ONLINE MENU ENTER ONLINE 2-68 Chapter 2 Basic - Konica Minolta KIP 9900 | User Guide - Page 91
easing the error check level, and you will be able to continue printing. When you will clear the error by the User Mode E, note does not remove the real cause of error. Therefore call the service personnel as soon as possible although the KIP 9900 seems to be working fine. 1. Press the [ MENU ] - Konica Minolta KIP 9900 | User Guide - Page 92
setting value pressing [ ] Key (increment) and [ ] Key (decrement). Setting value 0 1 2 Description KIP 9900 does not make error checking for E-28. (OFF) KIP 9900 error checking for E-28 with a normal check level. (ON1) KIP 9900 error checking for E-28 with a high check level. (ON2) MENU ENTER - Konica Minolta KIP 9900 | User Guide - Page 93
4. Press the [ ENTER ] Key to decide the setting value. The setting value stops flashing when decided. MENU ENTER ONLINE MENU ENTER ONLINE Setting value stops flashing. 5. Press the [ ONLINE ] Key to cancel the User Mode D. MENU ENTER ONLI NE MENU ENTER ONLINE 2-71 Chapter 2 Basic - Konica Minolta KIP 9900 | User Guide - Page 94
X 7 X X X 2. 8.15 User Mode A2 (Auto Initial Cut: Length) Under a certain usage environment, the first print of a job sometimes would have a wrinkle or an image void if the prints are made with a roll media left in the deck for a long period. "Auto Initial Cut" makes an automatic initial cut - Konica Minolta KIP 9900 | User Guide - Page 95
in Metric Mode) In Metric Mode, the KIP 9900 has the ability to recognize roll media in use "620mm" width instead of A1 standard width. The same way is applied to any other choice of P1/P2/P3/P4 selection. Reference User Mode P1/P2/P3/P4 are not displayed in default. Contact your service - Konica Minolta KIP 9900 | User Guide - Page 96
2. Press the [ ENTER ] Key. The current width choice flashes and becomes changeable. MENU ENTER ONLINE MENU ENTER ONLINE Setting value (width) flashes. 3. Select a desired width choice by pressing [ ] Key and [ ] Key. For User Mode P3 in this example, the displayed order is "A1", "620", "610". - Konica Minolta KIP 9900 | User Guide - Page 97
4. Press the [ ENTER ] Key to decide the width choice. The setting value stops flashing when decided. MENU ENTER ONLINE MENU ENTER ONLINE Setting value (width) stops flashing. 5. Press the [ ONLINE ] Key to cancel the User Mode P3. MENU ENTER ONLINE MENU ENTER ONLINE 2-75 Chapter 2 Basic - Konica Minolta KIP 9900 | User Guide - Page 98
on the Image Scanner if KIP 9900 is connected with a Bay Folder. User Modes F0 to Fb can specify the "fold type", "width of fan folding" and "margin" for each of these 4 fold programs. Reference User Mode F0 to Fb are not displayed in default. Contact your service personnel to enable this function - Konica Minolta KIP 9900 | User Guide - Page 99
(2) Width of fan folding Width of fan folding can be increased or decreased in 1mm increment. The adjustable range is from 180 to 210mm. (3) Margin It is possible to change the margin in 1mm increment, which is provided to the last fold in fan folding. The adjustable range is from 0 to 30mm. 12 - Konica Minolta KIP 9900 | User Guide - Page 100
[Operation] 1. Select your required User Mode Code (F0 to Fb) pressing the [ MENU ] Key. User Mode (Code) F0 F1 F2 F3 F4 F5 F6 F7 F8 F9 FA Fb Setting matter Fold type Width of fan folding Margin Fold type Width of fan folding Margin Fold type Width of fan folding Margin Fold type Width of fan - Konica Minolta KIP 9900 | User Guide - Page 101
2. The Status Display indicates any setting value according to the selected User Mode. Press the [ MENU ] Key. The setting value flashes and becomes changeable. MENU ENTER ONLINE MENU ENTER ONLINE Setting value flashes. 2-79 Chapter 2 Basic Operations - Konica Minolta KIP 9900 | User Guide - Page 102
3. Change the setting value pressing [ ] Key (increment) and [ ] Key (decrement). Selectable setting values depend on the User Mode you selected. (a) In case you change the "fold type" (User Mode Code F0, F3, F6 & F9), select any of "00", "01" and "02". Setting value 00 Fold type Not folded 01 - Konica Minolta KIP 9900 | User Guide - Page 103
(b) In case you change the "width of fan folding" (F1, F4, F7 & FA), change the value depending on the following adjustable range and increment step. Adjustable range Increment step 180 to 210mm 1mm MENU ENTER ONLINE MENU ENTER ONLINE (c) In case you change the "margin" (F2, F5, F8 & Fb), - Konica Minolta KIP 9900 | User Guide - Page 104
4. Press the [ ENTER ] Key to decide the setting value. The setting value stops flashing when decided. MENU ENTER ONLINE MENU ENTER ONLINE Setting value stops flashing. 5. Press the [ ONLINE ] Key to cancel the selected User Mode. MENU ENTER ONLINE MENU ENTER ONLINE Reference The - Konica Minolta KIP 9900 | User Guide - Page 105
Open (U-04) 3. 2. 5 Toner Cover Open (U-06) 3. 2. 6 Bypass Feeder Open (U-11) 3. 2. 7 Right Side Door Open (U-12) 3. 2. 8 Top Rear Cover Open (U-13) 3. 2. 9 Exit Cover Open (U-14) 3. 2.10 Folder Door Open (U-21) 3. 3 Toner Cartridge Error (C-01) 3. 4 Service Call Errors 3. 5 Interruption of Print by - Konica Minolta KIP 9900 | User Guide - Page 106
) PAPER DECK Drum Internal Transportation Unit Fuser Entrance In Fuser Unit Folder (No LED) Auto Stacker (No LED) Refer to page; 3-3 3-3 3-3 3-3 3-6 3-7 3-11 3-11 3-18 3-25 3-25 NOTE Some sheets of media may be mis-fed simultaneously inside of KIP 9900 if mis-feed occurs during continuous printing - Konica Minolta KIP 9900 | User Guide - Page 107
Decks (J-01, J-02, J-03 & J-04) Any of J-01, J-02, J-03 and J-04 is indicated when the media is mis-fed in the media path of Roll Decks. PAPER DECK MF 1234 D1 WIRE CLEAN EXP- CLEAN SELECT CUT D2 D3 EXIT PF D4 COPY DENSITY MENU ENTER ONLINE PAPER DECK MF 1234 D1 WIRE - Konica Minolta KIP 9900 | User Guide - Page 108
1. Draw out the concerning Roll Deck. 2. Rewind the roll media to release the leading edge from feeding rollers. 3. Cut off the leading edge with a cuter knife if it is so damaged. If damaged part is not cut off, it will cause the mis-feed again. 3-4 Chapter 3 Error Correction & Maintenance - Konica Minolta KIP 9900 | User Guide - Page 109
the rollers. Feeding rollers 5. Close the Roll Deck. 6. Select the concerning Roll pressing the SELECT Key, and press the CUT Key to take Initial Cut. PAPER DECK MF 1234 D1 WIRE CLEAN EXP- CLEAN SELECT CUT D2 D3 EXIT PF D4 COPY DENSITY MENU ENTER ONLINE SELECT Key CUT Key 3-5 Chapter - Konica Minolta KIP 9900 | User Guide - Page 110
3. 1. 2 Mis-feed in the Bypass Feeder (J-05) J-05 is indicated when the media is mis-fed in the Bypass Feeder. PAPER DECK MF 1234 D1 WIRE CLEAN EXP- CLEAN SELECT CUT D2 D3 EXIT PF D4 COPY DENSITY MENU ENTER ONLINE Bypass Feeder D4 1. Draw out - Konica Minolta KIP 9900 | User Guide - Page 111
(J-11) J-11 is indicated when the media is mis-fed between Cutter and Drum, PAPER DECK MF 1234 D1 WIRE CLEAN EXP- CLEAN SELECT CUT D2 D3 EXIT PF D4 COPY DENSITY MENU ENTER ONLINE Cutter Drum D4 1. Draw out the Bypass Feeder, Roll Decks 1 and 2. Bypass Feeder Roll Decks 1 & 2 2. The - Konica Minolta KIP 9900 | User Guide - Page 112
cutting the media rotating the Cutter Handle, place the green part inside of the notch. If red part is seen in the notch, the Cutter Blade is not the Cutter Handle more than once. If it is rotated many times, very small paper portion will be left in the cutter unit. This will cause the error. - Konica Minolta KIP 9900 | User Guide - Page 113
the Right Side Door. Then remove the mis-feed media from the front side of KIP 9900. Mis-feed media 6. The leading edge of roll media is still in the Cutter Unit rewound. Draw out the concerning Roll Deck and rewind its roll media. Cutter Drum D4 3-9 Chapter 3 Error Correction & Maintenance - Konica Minolta KIP 9900 | User Guide - Page 114
7. Insert the leading edge of media between feeding rollers, and rotate the upper feeding roller to pinch the leading edge (1-2cm) with the rollers. Feeding rollers 8. Close the Roll Deck finally. 3-10 Chapter 3 Error Correction & Maintenance - Konica Minolta KIP 9900 | User Guide - Page 115
is indicated when the media is mis-fed on the Internal Transportation Unit, PAPER DECK MF 1234 D1 WIRE CLEAN EXP- CLEAN SELECT CUT D2 D3 EXIT D4 J-13 is indicated when the media is mis-fed at Fuser Entrance. PAPER DECK MF 1234 D1 WIRE CLEAN EXP- CLEAN SELECT CUT D2 D3 EXIT PF - Konica Minolta KIP 9900 | User Guide - Page 116
1. Open the Right Side Door. Right Side Door 2. Twist the Green Lever to unlock (A). Move down the Internal Transportation Unit (B), and catch the shaft of Green Lever with Hook (C). Green Lever B A Internal Transportation Unit Hook Internal Transportation Unit Hook C 3-12 Chapter 3 Error - Konica Minolta KIP 9900 | User Guide - Page 117
cutting the media rotating the Cutter Handle, place the green part inside of the notch. If red part is seen in the notch, the Cutter Blade is the Cutter Handle more than once. If it is rotated many times, very small paper portion will be left in the cutter unit. This will cause the error. Correct - Konica Minolta KIP 9900 | User Guide - Page 118
the mis-fed media. NOTE There is a large cylinder called "Photoconductive Drum" inside of KIP 9900. It is the most important part for creating the print image. • Do not touch the Photoconductive Drum! • Do not scratch or damage the Photoconductive Drum! • Do not throw light into the machine as the - Konica Minolta KIP 9900 | User Guide - Page 119
Bring up the Internal Transportation Unit gently. Otherwise the Photoconductive Drum may be damaged. (2) If the Internal Transportation Unit is orange, and the Status Display indicates "U-04". Lock the unit firmly again. Open Indicator PF Status Display PAPER DECK MF 1234 D1 WIRE CLEAN EXP- - Konica Minolta KIP 9900 | User Guide - Page 120
state will result in another mis-feed, the media needs to be rewound. Draw out the concerning Roll Deck and rewind its roll media. Cutter Drum D4 3-16 Chapter 3 Error Correction & Maintenance - Konica Minolta KIP 9900 | User Guide - Page 121
9. Insert the leading edge of media between feeding rollers, and rotate the upper feeding roller to pinch the leading edge (1-2cm) with the rollers. Feeding rollers 10. Close the Roll Deck. 3-17 Chapter 3 Error Correction & Maintenance - Konica Minolta KIP 9900 | User Guide - Page 122
3. 1. 5 Mis-feed in Fuser Unit (J-14) J-14 is indicated when the media is mis-fed in the Fuser Unit, PAPER DECK MF 1234 D1 WIRE CLEAN EXP- CLEAN SELECT CUT D2 D3 EXIT PF D4 COPY DENSITY MENU Fuser Unit ENTER ONLINE 1. Open the Exit - Konica Minolta KIP 9900 | User Guide - Page 123
3. Twist the Green Lever to unlock (A). Move down the Internal Transportation Unit (B), and catch the shaft of Green Lever with Hook (C). Green Lever B A Internal Transportation Unit Hook Internal Transportation Unit Hook C 3-19 Chapter 3 Error Correction & Maintenance - Konica Minolta KIP 9900 | User Guide - Page 124
cutting the media rotating the Cutter Handle, place the green part inside of the notch. If red part is seen in the notch, the Cutter Blade is the Cutter Handle more than once. If it is rotated many times, very small paper portion will be left in the cutter unit. This will cause the error. Correct - Konica Minolta KIP 9900 | User Guide - Page 125
. (Fuser Roller and Pressure Roller are especially hot but other parts are as well.) Do not touch such parts positively when removing the mis-fed media! The mis-fed media is very hot also. Take great care not to be burnt! (2) There are Paper Stripper Fingers inside of the Exit Cover, which have - Konica Minolta KIP 9900 | User Guide - Page 126
Bring up the Internal Transportation Unit gently. Otherwise the Photoconductive Drum may be damaged. (2) If the Internal Transportation Unit is orange, and the Status Display indicates "U-04". Lock the unit firmly again. Open Indicator PF Status Display PAPER DECK MF 1234 D1 WIRE CLEAN EXP- - Konica Minolta KIP 9900 | User Guide - Page 127
mis-feed, the media needs to be rewound. Draw out the concerning Roll Deck and rewind its roll media. Exit Cover Right Side Door Cutter Drum D4 3-23 Chapter 3 Error Correction & Maintenance - Konica Minolta KIP 9900 | User Guide - Page 128
11. Insert the leading edge of media between feeding rollers, and rotate the upper feeding roller to pinch the leading edge (1-2cm) with the rollers. Feeding rollers 12. Close the Roll Deck . 3-24 Chapter 3 Error Correction & Maintenance - Konica Minolta KIP 9900 | User Guide - Page 129
(J-22) When the media is mis-fed in the optional Auto Stacker, J-22 is indicated. See the user guide of Auto Stacker and remove the mis-fed media. NOTE The KIP 9900 has an infrared communication system with the Auto Stacker. An improper J-22 indication might be caused by sunlight or any other - Konica Minolta KIP 9900 | User Guide - Page 130
open error code as "U-XX". "PF" in the Mis-feed Location Indicator lights orange when "U-04" is indicated. "EXIT" in the Mis-feed Location Indicator lights orange when "U-14" is indicated. Open Indicator PAPER DECK MF 1234 D1 WIRE CLEAN EXP- CLEAN SELECT CUT D2 D3 PF EXIT Status Display - Konica Minolta KIP 9900 | User Guide - Page 131
it firmly. Bottom Drawer 3. 2. 4 Internal Transportation Unit Open (U-04) Internal Transportation Unit is open or not locked firmly. Close it firmly. MF EXIT D1 D2 PF D3 D4 Internal Transportation Unit 3. 2. 5 Toner Cover Open (U-06) Toner Cover (right - front) is open. Close it firmly - Konica Minolta KIP 9900 | User Guide - Page 132
3. 2. 6 Bypass Feeder Open (U-11) Bypass Feeder is open. Close it firmly. Bypass Feeder 3. 2. 7 Right Side Door Open (U-12) Right Side Door (right - rear) is open. Close it firmly. Right Side Door 3. 2. 8 Top Rear Cover Open (U-13) Top Rear Cover is open. Close it firmly. Top Rear Cover 3-28 Chapter - Konica Minolta KIP 9900 | User Guide - Page 133
. MF EXIT D1 D2 PF D3 D4 3. 2.10 Folder Door Open (U-21) The door of optionally connected Folder is open. Close it firmly. (See the manual of Folder for the detail.) Exit Cover 3-29 Chapter 3 Error Correction & Maintenance - Konica Minolta KIP 9900 | User Guide - Page 134
in this user manual or try another cartridge. If the error persists, please contact the service person. NOTE (1) The KIP 9900 Toner Cartridge is embedded with the IC Tag for an exclusive use on the KIP 9900. Even if the Toner Cartridge for other models is installed, the KIP 9900 does not operate - Konica Minolta KIP 9900 | User Guide - Page 135
Service Call Errors as "E-XX". As KIP 9900 can make no more printing unless the error is cleared, call the service personnel immediately. Status Display (E-XX) PAPER error Abnormal fuser temperature Drum motor error Counter A / B error Cutter motor error Web End Error Paper feed motor error Fuser - Konica Minolta KIP 9900 | User Guide - Page 136
type is changed • When making a large volume of continuous printing • When in a very cold environment Just wait until the KIP 9900 finishes adjusting the temperature to proper level. It automatically starts printing when adjustment is finished. PAPER DECK MF 1234 D1 WIRE CLEAN EXP- CLEAN SELECT - Konica Minolta KIP 9900 | User Guide - Page 137
3. 6 Maintenance KIP 9900 has self-cleaning functions for avoiding defective image. Please take cleaning when defective image is printed out. 3. 6. minutes for cleaning. The Ready Indicator stops flashing when cleaning is finished. PAPER DECK MF 1234 D1 WIRE CLEAN EXP- CLEAN SELECT CUT D2 D3 - Konica Minolta KIP 9900 | User Guide - Page 138
if cleaning is performed. Correct print When the LED Head is dirty ; 1. Press the EXP-CLEAN Key on the Operation Panel. PAPER DECK MF 1234 D1 WIRE CLEAN the cleaning. The Ready Indicator stops flashing when cleaning is finished. PAPER DECK MF 1234 D1 WIRE CLEAN EXP- CLEAN SELECT CUT D2 D3 - Konica Minolta KIP 9900 | User Guide - Page 139
Digital Printer KIP 9900 Hardware Operation Guide Version A.0 (Issued on November 27, 2009) Published by Katsuragawa Electric Co., Ltd. 21-1 Shimomaruko 4-Chome, Ohta-ku, Tokyo 146-8585, Japan © 2009 Katsuragawa Electric Co., Ltd. No part of this publication may be copied, reproduced or distributed
-
 1
1 -
 2
2 -
 3
3 -
 4
4 -
 5
5 -
 6
6 -
 7
7 -
8
-
9
-
10
-
11
-
12
-
13
-
14
-
15
-
16
-
17
-
18
-
19
-
20
-
21
-
22
-
23
-
24
-
25
-
26
-
27
-
28
-
29
-
30
-
31
-
32
-
33
-
34
-
35
-
36
-
37
-
38
-
39
-
40
-
41
-
42
-
43
-
44
-
45
-
46
-
47
-
48
-
49
-
50
-
51
-
52
-
53
-
54
-
55
-
56
-
57
-
58
-
59
-
60
-
61
-
62
-
63
-
64
-
65
-
66
-
67
-
68
-
69
-
70
-
71
-
72
-
73
-
74
-
75
-
76
-
77
-
78
-
79
-
80
-
81
-
82
-
83
-
84
-
85
-
86
-
87
-
88
-
89
-
90
-
91
-
92
-
93
-
94
-
95
-
96
-
97
-
98
-
99
-
100
-
101
-
102
-
103
-
104
-
105
-
106
-
107
-
108
-
109
-
110
-
111
-
112
-
113
-
114
-
115
-
116
-
117
-
118
-
119
-
120
-
121
-
122
-
123
-
124
-
125
-
126
-
127
-
128
-
129
-
130
-
131
-
132
-
133
-
134
-
135
-
136
-
137
-
138
-
139
 |
 |
Version A0
KIP 9900 User Guide