Konica Minolta bizhub 4750 bizhub 4750/4050 Quick Start Guide - Page 13
Option configuration
 |
View all Konica Minolta bizhub 4750 manuals
Add to My Manuals
Save this manual to your list of manuals |
Page 13 highlights
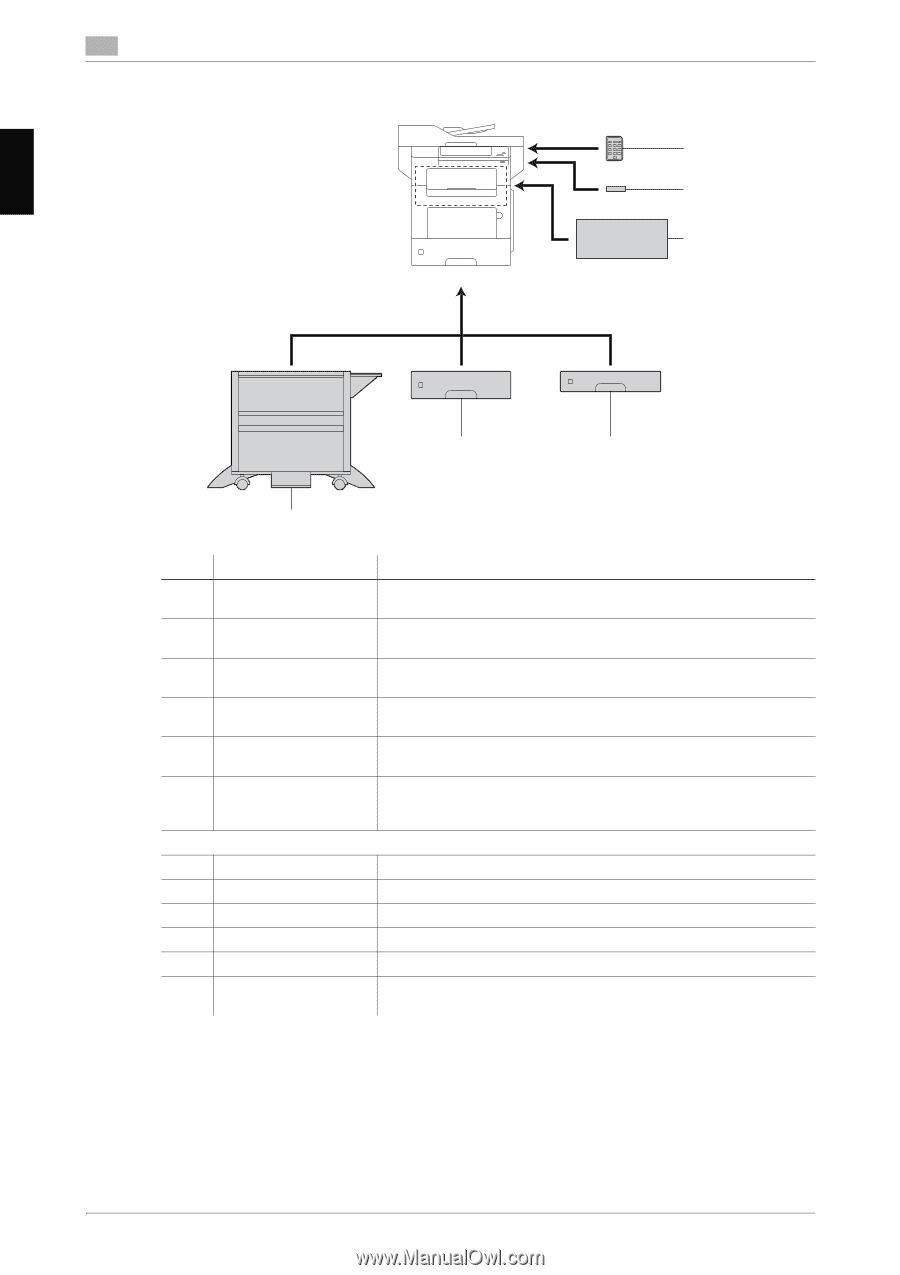
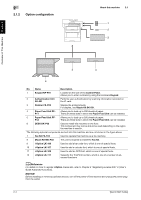
Overview of This Machine Chapter 2 2 2.1.2 Option configuration About this machine 2.1 1 2 3 5 4 6 No. Name Description 1 Keypad KP-P01 Located on the side of the Control Panel. Allows you to enter numbers by using the Hardware Keypad. 2 Authentication Unit Performs user authentication by scanning information recorded on AU-201 the IC card. 3 Finisher FS-P02 Staples the printed sheets. For staples, use Staple Kit SK-501. 4 Paper Feed Unit PF- Allows you to load up to 250 sheets of paper. P11 There are three slots in which the Paper Feed Unit can be installed. 5 Paper Feed Unit PF- Allows you to load up to 550 sheets of paper. P12 There are three slots in which the Paper Feed Unit can be installed. 6 DESK DK-P02 Used to install this machine on the floor. This component may not be able to be used depending on the region the machine is used in. The following optional components are built into this machine and are not shown in the figure above. 7 Fax Kit FK-512 Used to operate this machine as a fax machine. 8 Mount Kit MK-P03 This unit is required to install the Fax Kit. 9 i-Option LK-106 Used to add a bar code font, which is one of special fonts. 10 i-Option LK-107 Used to add a unicode font, which is one of special fonts. 11 i-Option LK-108 Used to add an OCR font, which is one of special fonts. 12 i-Option LK-111 Supports the ThinPrint function, which is one of a number of advanced functions. dReference For details on how to register i-Option license kits, refer to Chapter 2 "Registering License Kits" in [User's Guide Advanced Functions]. NOTICE Before installing or removing optional devices, turn off the power of this machine and unplug the power plug from the outlet. 2-4 [Quick Start Guide]
-
 1
1 -
2
-
3
-
4
-
5
-
6
-
7
-
 8
8 -
 9
9 -
 10
10 -
 11
11 -
 12
12 -
 13
13 -
 14
14 -
 15
15 -
 16
16 -
 17
17 -
 18
18 -
19
-
20
-
21
-
22
-
23
-
24
-
25
-
26
-
27
-
28
-
29
-
30
-
31
-
32
-
33
-
34
-
35
-
36
-
37
-
38
-
39
-
40
-
41
-
42
-
43
-
44
-
45
-
46
-
47
-
48
-
49
-
50
-
51
-
52
-
53
-
54
-
55
-
56
-
57
-
58
-
59
-
60
 |
 |