Konica Minolta bizhub C754 bizhub C654/C754 Copy Operations User Guide - Page 125
[Registered Overlay], Hard Disk, Settings, Description, Start
 |
View all Konica Minolta bizhub C754 manuals
Add to My Manuals
Save this manual to your list of manuals |
Page 125 highlights
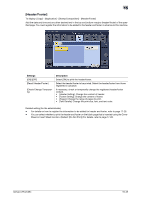
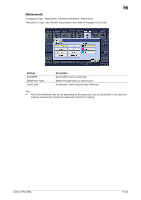
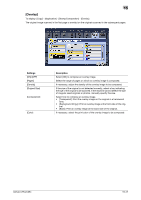
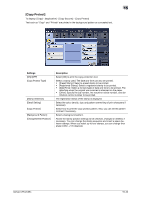
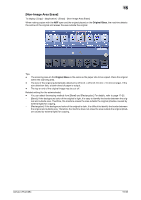
15 [Registered Overlay] To display: [Copy] - [Application] - [Stamp/Composition] - [Registered Overlay] In [Register Overlay], register original images on the Hard Disk of this machine as overlay image. You can call a registered overlay image and compose it on an original scanned later. Settings [ON]/[OFF] [Recall Overlay Image] [Pages] [Original Size] [Register Overlay] Description Select [ON] to register a new overlay image or compose a registered overlay image on the original. Specify which side of the paper to compose the overlay image, and select an overlay image to be composed. Check the density, composition method, color change, and preview of overlay image if necessary. If you set [Apply on Back], the image on the front side is composed on the back side of paper. Select the range of pages on which an overlay image is composed. Specify the size of the original. If the original is of a standard size, selecting [Auto] causes the machine to automatically detect the size. If the machine cannot detect the size of irregular sized originals or photos, manually specify the size. Register a new overlay image. If necessary, select the density and color of the overlay image when it is registered. • When registering a new overlay image, tap [New], and enter the name of the overlay image. Load the original to the machine, then press Start to register the image. If multiple pages of original is loaded into the ADF, only the first page is registered. • You can overwrite or delete registered overlay images. Related setting (for the administrator) - You can select whether to allow the user to overwrite or delete a registered overlay image. (Default: [Al- low]). For details, refer to page 17-7([Change Registered Overlay]). bizhub C754/C654 15-48
-
 1
1 -
2
-
3
-
4
-
5
-
6
-
7
-
8
-
9
-
10
-
11
-
12
-
13
-
14
-
15
-
16
-
17
-
18
-
19
-
20
-
21
-
22
-
23
-
24
-
25
-
26
-
27
-
28
-
29
-
30
-
31
-
32
-
33
-
34
-
35
-
36
-
37
-
38
-
39
-
40
-
41
-
42
-
43
-
44
-
45
-
46
-
47
-
48
-
49
-
50
-
51
-
52
-
53
-
54
-
55
-
56
-
57
-
58
-
59
-
60
-
61
-
62
-
63
-
64
-
65
-
66
-
67
-
68
-
69
-
70
-
71
-
72
-
73
-
74
-
75
-
76
-
77
-
78
-
79
-
80
-
81
-
82
-
83
-
84
-
85
-
86
-
87
-
88
-
89
-
90
-
91
-
92
-
93
-
94
-
95
-
96
-
97
-
98
-
99
-
100
-
101
-
102
-
103
-
104
-
105
-
106
-
107
-
108
-
109
-
110
-
111
-
112
-
113
-
114
-
115
-
116
-
117
-
118
-
119
-
 120
120 -
 121
121 -
 122
122 -
 123
123 -
 124
124 -
 125
125 -
 126
126 -
 127
127 -
 128
128 -
 129
129 -
 130
130 -
131
-
132
-
133
-
134
-
135
-
136
-
137
-
138
-
139
-
140
-
141
-
142
-
143
-
144
-
145
-
146
-
147
-
148
-
149
-
150
-
151
-
152
-
153
-
154
-
155
-
156
-
157
-
158
-
159
-
160
-
161
-
162
-
163
-
164
-
165
-
166
-
167
-
168
-
169
-
170
-
171
-
172
-
173
-
174
-
175
-
176
-
177
-
178
-
179
-
180
-
181
-
182
-
183
-
184
-
185
-
186
-
187
-
188
-
189
-
190
-
191
-
192
-
193
-
194
-
195
-
196
-
197
-
198
-
199
-
200
-
201
-
202
-
203
-
204
-
205
-
206
-
207
-
208
-
209
-
210
-
211
-
212
-
213
-
214
-
215
-
216
-
217
-
218
-
219
-
220
-
221
-
222
 |
 |
