Kyocera KM-C830D Printing System (P) Operation Guide (Setup Edition) - Page 9
Set-up
 |
View all Kyocera KM-C830D manuals
Add to My Manuals
Save this manual to your list of manuals |
Page 9 highlights
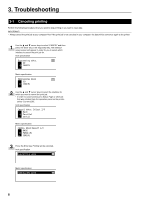
2. Set-up 2-1 Connecting the printer cable CAUTION: ALWAYS turn the main switch to the printer OFF (O) BEFORE connecting the printer cable. 1 Turn the main switch located on the left side of the printer OFF (O). If you are connecting the printer to your computer with a parallel or serial cable, turn the power off to your computer as well. 3 If you are connecting the printer to your computer with a parallel or serial cable, connect the other end of the printer cable to the connector on your computer. If you are connecting the printer to a network, connect the other end of the printer cable to an appropriate hub. 4 Turn the main switch to the printer back ON ( | ). 2 Connect the printer cable to the interface connector located at the back of the right side of the printer. The following types of interface come standard with the printer. Be sure to connect the printer cable to the interface connector that is appropriate to your situation. A Parallel interface connector B Serial interface connector C Network interface connector (100BASE-TX or 10BASE-T) * If you are going to use this machine as a network printer, perform the appropriate network settings. (Refer to "2-3 Network (TCP/IP) settings" on page 5.) 2-2 Installing the software Perform the following procedure to install into your computer the printer driver and other software that is appropriate to the operating system in use in that computer. For information on installing the required software, refer to the On-Line Manual that is located on the CD-ROM that is included with this product. A B C 4
-
 1
1 -
2
-
3
-
 4
4 -
 5
5 -
 6
6 -
 7
7 -
 8
8 -
 9
9 -
 10
10 -
 11
11 -
 12
12 -
 13
13 -
 14
14 -
15
-
16
-
17
-
18
-
19
-
20
-
21
-
22
-
23
-
24
-
25
-
26
-
27
-
28
-
29
-
30
-
31
-
32
-
33
-
34
-
35
-
36
-
37
-
38
-
39
-
40
-
41
-
42
-
43
-
44
-
45
-
46
-
47
-
48
-
49
-
50
-
51
-
52
-
53
-
54
-
55
-
56
-
57
-
58
-
59
-
60
-
61
 |
 |
