LG LSB5682SW Owner's Manual - Page 16
Operation
 |
View all LG LSB5682SW manuals
Add to My Manuals
Save this manual to your list of manuals |
Page 16 highlights
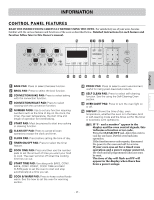
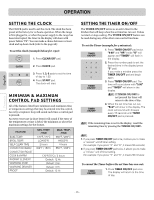
English OPERATION SETTING THE CLOCK The CLOCK pad is used to set the clock. The clock has been preset at the factory for 12 hours operation. When the range is first plugged in, or when the power supply to the range has been interrupted, the timer in the display will show with power failure "PF". You can make a choice between 12-hour clock and 24-hour clock (refer to the page 28): To set the clock (example below for 1:30): 1. Press CLEAR/OFF pad. 2. Press CLOCK pad. 3. Press 1, 3, 0 pads to set the time of day to 1:30. 4. Press START pad. The clock will start. MINIMUM & MAXIMUM CONTROL PAD SETTINGS All of the features listed have minimum and maximum time or temperature settings that may be entered into the control. An entry acceptance beep will sound each time a control pad is pressed. An entry error tone (3 short beeps) will sound if the entry of the temperature or time is below the minimum or above the maximum settings for the feature. FEATURE BAKE TEMP. BROIL TEMP. SELF CLEAN TIME CONVECTION BAKE/ CONVECTION ROAST COOK & WARM RADIANT ELEMENT WARMING ZONE WARMING DRAWER PROOF MIN. TEMP. /TIME 170°F / 75°C LO(400°F) 2 hours 300°F / 150°C MAX. TEMP. /TIME 550°F / 285°C HI(550°F) 4 hours 550°F / 285°C 170°F(75°C) / 3 hours Default: 12 Hr. Default: 2 Hr. Default: 3 Hr. Default: 12 Hr. SETTING THE TIMER ON/OFF The TIMER ON/OFF serves as an extra timer in the kitchen that will beep when the set time has run out. It does not start or stop cooking. The TIMER ON/OFF feature can be used during any of the other oven control functions. To set the Timer (example for 5 minutes): 1. Press TIMER ON/OFF pad twice. "0:00" and "HR" inside "O" will appear and "TIMER" will flash in the display. 2. Press the number pads to set the desired time in the display (press "5" pad). If you make a mistake press the TIMER ON/OFF pad and begin again. 3. Press TIMER ON/OFF pad. The time will count down with "5:00" and "TIMER" will show in the display. Note: If TIMER ON/OFF is not pressed the timer will return to the time of day. 4. When the set time has run out, "End" will show in the display. The clock will sound with 3 beeps every 15 seconds until TIMER ON/OFF pad is pressed. Note: If the remaining time is not in the display, recall the remaining time by pressing the TIMER ON/OFF. Note: 1. If you press TIMER ON/OFF pad once, it allows you to make a "second" unit of timer setting. (for example: if you press "5" and "6", it means 56 seconds) 2. If you press TIMER ON/OFF pad twice, it allows you to make a "minute" unit of timer setting. (for example: if you press "5" and "6", it means 56 minutes) To cancel the Timer before the set time has run out: 1. Press TIMER ON/OFF pad once. The display will return to the time of day. Français - 16 -
-
 1
1 -
2
-
3
-
4
-
5
-
6
-
7
-
8
-
9
-
10
-
 11
11 -
 12
12 -
 13
13 -
 14
14 -
 15
15 -
 16
16 -
 17
17 -
 18
18 -
 19
19 -
 20
20 -
 21
21 -
22
-
23
-
24
-
25
-
26
-
27
-
28
-
29
-
30
-
31
-
32
-
33
-
34
-
35
-
36
-
37
-
38
-
39
-
40
-
41
-
42
-
43
-
44
-
45
-
46
-
47
-
48
-
49
-
50
-
51
-
52
-
53
-
54
-
55
-
56
-
57
-
58
-
59
-
60
-
61
-
62
-
63
-
64
-
65
-
66
-
67
-
68
-
69
-
70
-
71
-
72
-
73
-
74
-
75
-
76
-
77
-
78
-
79
-
80
 |
 |
