LG LX-350 User Guide - Page 138
Accessing Online Picture Options From Your Phone
 |
View all LG LX-350 manuals
Add to My Manuals
Save this manual to your list of manuals |
Page 138 highlights
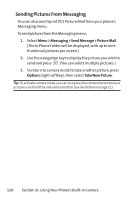
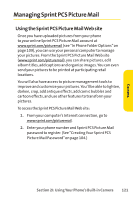
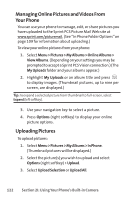
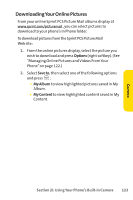
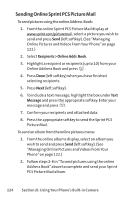
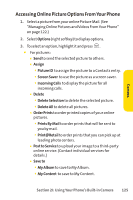
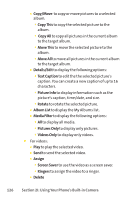
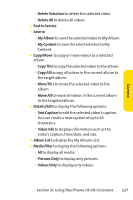
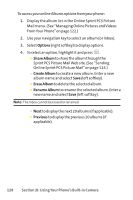
Camera Accessing Online Picture Options From Your Phone 1. Select a picture from your online Picture Mail. (See "Managing Online Pictures and Videos From Your Phone" on page 122.) 2. Select Options (right softkey) to display options. 3. To select an option, highlight it and press . ⅷ For pictures: Ⅲ Send to send the selected picture to others. Ⅲ Assign ࡗ Picture ID to assign the picture to a Contacts entry. ࡗ Screen Saver to use the picture as a screen saver. ࡗ Incoming Calls to display the picture for all incoming calls. Ⅲ Delete ࡗ Delete Selection to delete the selected picture. ࡗ Delete All to delete all pictures. Ⅲ Order Prints to order printed copies of your online pictures. ࡗ Prints By Mail to order prints that will be sent to you by mail. ࡗ Print@Retail to order prints that you can pick up at leading photo centers. Ⅲ Post to Service to upload your image to a third-party online service. (Contact individual services for details.) Ⅲ Save to ࡗ My Album to save to My Album. ࡗ My Content to save to My Content. Section 2I: Using Your Phone's Built-in Camera 125
-
 1
1 -
2
-
3
-
4
-
5
-
6
-
7
-
8
-
9
-
10
-
11
-
12
-
13
-
14
-
15
-
16
-
17
-
18
-
19
-
20
-
21
-
22
-
23
-
24
-
25
-
26
-
27
-
28
-
29
-
30
-
31
-
32
-
33
-
34
-
35
-
36
-
37
-
38
-
39
-
40
-
41
-
42
-
43
-
44
-
45
-
46
-
47
-
48
-
49
-
50
-
51
-
52
-
53
-
54
-
55
-
56
-
57
-
58
-
59
-
60
-
61
-
62
-
63
-
64
-
65
-
66
-
67
-
68
-
69
-
70
-
71
-
72
-
73
-
74
-
75
-
76
-
77
-
78
-
79
-
80
-
81
-
82
-
83
-
84
-
85
-
86
-
87
-
88
-
89
-
90
-
91
-
92
-
93
-
94
-
95
-
96
-
97
-
98
-
99
-
100
-
101
-
102
-
103
-
104
-
105
-
106
-
107
-
108
-
109
-
110
-
111
-
112
-
113
-
114
-
115
-
116
-
117
-
118
-
119
-
120
-
121
-
122
-
123
-
124
-
125
-
126
-
127
-
128
-
129
-
130
-
131
-
132
-
 133
133 -
 134
134 -
 135
135 -
 136
136 -
 137
137 -
 138
138 -
 139
139 -
 140
140 -
 141
141 -
 142
142 -
 143
143 -
144
-
145
-
146
-
147
-
148
-
149
-
150
-
151
-
152
-
153
-
154
-
155
-
156
-
157
-
158
-
159
-
160
-
161
-
162
-
163
-
164
-
165
-
166
-
167
-
168
-
169
-
170
-
171
-
172
-
173
-
174
-
175
-
176
-
177
-
178
-
179
-
180
-
181
-
182
-
183
-
184
-
185
-
186
-
187
-
188
-
189
-
190
-
191
-
192
-
193
-
194
-
195
-
196
-
197
-
198
-
199
-
200
-
201
-
202
-
203
-
204
-
205
-
206
-
207
-
208
-
209
-
210
-
211
-
212
-
213
-
214
-
215
-
216
-
217
 |
 |