Lantronix EDS1100 EDS1100 / EDS2100 - User Guide - Page 28
Back Panel, Reset Button, Top LEDs, Left LED, Right LED - factory reset
 |
View all Lantronix EDS1100 manuals
Add to My Manuals
Save this manual to your list of manuals |
Page 28 highlights
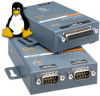
4: Installation of EDS2100 Back Panel On the EDS2100 back panel, there is a power plug, reset button, and an RJ45 (10/100) Ethernet port as shown in Figure 4-5. Figure 4-5 EDS2100 Ethernet RJ45 Port, Reset Button, and Power Plug The Ethernet port has two LEDs that indicate the status of the connection as follows: Left LED - Green ON 100Mbps Link - Green Blink 100Mbps Activity - Orange ON 10Mbps Link - Orange Blink 10Mbps Activity. Right LED - Green ON Full Duplex. - OFF Half Duplex The Ethernet port can connect to an Ethernet (10 Mbps) or Fast Ethernet (100 Mbps) network. Reset Button You can reset the EDS2100 to factory defaults, including clearing the network settings. The IP address, gateway, and netmask are set to 00s. To reset the unit to factory defaults, perform the following steps. 1. Place the end of a paper clip or similar object into the reset opening and press for a minimum of 3 seconds. 2. Remove the paper clip to release the button. The firmware restores factory default settings to the configuration and reboots the unit. Top LEDs Figure 4-6 shows the top of the EDS2100. Table 4-7 lists and describes the LEDs. EDS1100/2100 User Guide 28
-
 1
1 -
2
-
3
-
4
-
5
-
6
-
7
-
8
-
9
-
10
-
11
-
12
-
13
-
14
-
15
-
16
-
17
-
18
-
19
-
20
-
21
-
22
-
 23
23 -
 24
24 -
 25
25 -
 26
26 -
 27
27 -
 28
28 -
 29
29 -
 30
30 -
 31
31 -
 32
32 -
 33
33 -
34
-
35
-
36
-
37
-
38
-
39
-
40
-
41
-
42
-
43
-
44
-
45
-
46
-
47
-
48
-
49
-
50
-
51
-
52
-
53
-
54
-
55
-
56
-
57
-
58
-
59
-
60
-
61
-
62
-
63
-
64
-
65
-
66
-
67
-
68
-
69
-
70
-
71
-
72
-
73
-
74
-
75
-
76
-
77
-
78
-
79
-
80
-
81
-
82
-
83
-
84
-
85
-
86
-
87
-
88
-
89
-
90
-
91
-
92
-
93
-
94
-
95
-
96
-
97
-
98
-
99
-
100
-
101
-
102
-
103
-
104
-
105
-
106
-
107
-
108
-
109
-
110
-
111
-
112
-
113
-
114
-
115
-
116
-
117
-
118
-
119
-
120
-
121
-
122
-
123
-
124
-
125
-
126
-
127
-
128
-
129
-
130
-
131
-
132
-
133
-
134
-
135
-
136
-
137
-
138
-
139
-
140
-
141
-
142
-
143
-
144
-
145
-
146
-
147
-
148
-
149
-
150
-
151
-
152
 |
 |
