Lenovo 41U5008 User Guide - Page 9
Troubleshooting - download
 |
UPC - 883609648305
View all Lenovo 41U5008 manuals
Add to My Manuals
Save this manual to your list of manuals |
Page 9 highlights
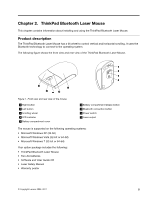
Troubleshooting This topic contains troubleshooting information for the mice. If you encounter any of the following problems when using the mice, refer to the corresponding answers. Problem: The mouse is not recognized by the operating system. Solution: To solve the problem, perform one of the following procedures: Procedure A: Check the following: • Install the mouse again. • Access your computer Basic Input/Output System (BIOS) Setup Utility program during the startup process and make sure that all the USB connectors on your computer are enabled. Notes: - For information about how to access or use the BIOS Setup Utility program on your computer, see the documentation that came with your computer. - If all USB connectors on your computer do not work, probably the computer BIOS does not support them. To solve this problem, go to http://www.lenovo.com/support to download the latest BIOS updates, or go to http://www.lenovo.com/support/phone to find the Lenovo technical support for your country or region. Procedure B: 1. Click Start ➙ Control Panel. 2. Depending on your Control Panel mode, double-click System or click Performance and Maintenance ➙ System. 3. Click the Hardware tab. 4. Click Device Manager. 5. Scroll down until you find Mice and other pointing devices. Then, expand the Mice and other pointing devices category. 6. Right-click HID-compliant mouse, and then select Uninstall. A warning will be displayed, prompting you that you are going to remove a device from the operating system. 7. Click OK. 8. Right-click Mice and other pointing devices, and then select Scan for hardware changes to re-detect the hardware. Note: You might be asked to insert the Windows installation CD. Problem: The mouse pointer cannot move. Solution: To solve the problem, do the following: • Ensure that you have followed all installation procedures. • Reinstall the Lenovo Mouse Suite software. • Clean the mouse lens with a soft cotton swab. Do not use any other liquid or solvent to clean the mouse lens as this might cause damage to the lens. • Put a mouse pad under the mouse. If the mouse is moving on a highly reflective surface, especially a glass or mirror surface, the mouse might not be able to work. Chapter 1. Lenovo and ThinkPad mice 3
-
 1
1 -
2
-
3
-
 4
4 -
 5
5 -
 6
6 -
 7
7 -
 8
8 -
 9
9 -
 10
10 -
 11
11 -
 12
12 -
 13
13 -
 14
14 -
15
-
16
-
17
-
18
-
19
-
20
-
21
-
22
-
23
-
24
-
25
-
26
-
27
-
28
-
29
-
30
-
31
-
32
-
33
-
34
-
35
-
36
-
37
-
38
-
39
-
40
-
41
-
42
-
43
-
44
-
45
-
46
-
47
-
48
-
49
-
50
-
51
-
52
-
53
-
54
 |
 |