Lenovo ThinkCentre Chromebox Hardware Maintenance Manual (HMM) - ThinkCentre C - Page 73
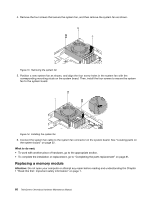
Position a new memory module over the memory slot. Ensure that the notch
 |
View all Lenovo ThinkCentre Chromebox manuals
Add to My Manuals
Save this manual to your list of manuals |
Page 73 highlights
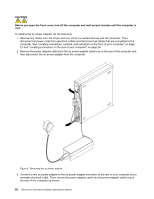
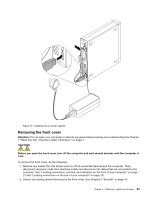
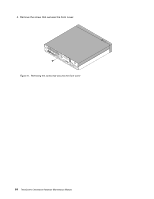
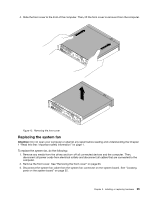
Your computer has two slots for installing or replacing DDR3 SODIMMs that provide up to a maximum of 8 GB system memory. When installing or replacing a memory module, use 2 GB or 4 GB DDR3 SODIMMs in any combination up to a maximum of 8 GB. Note: When there is only one memory module on you computer, ensure that the memory module is installed in the memory slot 1. To replace a memory module, do the following: 1. Remove any media from the drives and turn off all connected devices and the computer. Then, disconnect all power cords from electrical outlets and disconnect all cables that are connected to the computer. 2. Remove the front cover. See "Removing the front cover" on page 63. 3. Lay the computer on its side for easier access to the system board. 4. Locate the memory slot. See "Locating parts on the system board" on page 32. 5. Open the retaining clips and gently pull the memory module out of the memory slot. Figure 15. Removing a memory module 6. Position a new memory module over the memory slot. Ensure that the notch 1 on the memory module aligns correctly with the slot key 2 on the system board. Push the memory module straight down into the slot until the retaining clips close. Figure 16. Installing a memory module What to do next: • To work with another piece of hardware, go to the appropriate section. • To complete the installation or replacement, go to "Completing the parts replacement" on page 81. Chapter 9. Installing or replacing hardware 67
-
 1
1 -
2
-
3
-
4
-
5
-
6
-
7
-
8
-
9
-
10
-
11
-
12
-
13
-
14
-
15
-
16
-
17
-
18
-
19
-
20
-
21
-
22
-
23
-
24
-
25
-
26
-
27
-
28
-
29
-
30
-
31
-
32
-
33
-
34
-
35
-
36
-
37
-
38
-
39
-
40
-
41
-
42
-
43
-
44
-
45
-
46
-
47
-
48
-
49
-
50
-
51
-
52
-
53
-
54
-
55
-
56
-
57
-
58
-
59
-
60
-
61
-
62
-
63
-
64
-
65
-
66
-
67
-
 68
68 -
 69
69 -
 70
70 -
 71
71 -
 72
72 -
 73
73 -
 74
74 -
 75
75 -
 76
76 -
 77
77 -
 78
78 -
79
-
80
-
81
-
82
-
83
-
84
-
85
-
86
-
87
-
88
-
89
-
90
-
91
-
92
-
93
-
94
-
95
-
96
-
97
-
98
-
99
-
100
-
101
-
102
-
103
-
104
-
105
-
106
-
107
-
108
-
109
-
110
-
111
-
112
 |
 |
