Lenovo ThinkCentre Chromebox Hardware Maintenance Manual (HMM) - ThinkCentre C - Page 76
power button board in the computer. Then, install the screw to secure the new power button board
 |
View all Lenovo ThinkCentre Chromebox manuals
Add to My Manuals
Save this manual to your list of manuals |
Page 76 highlights
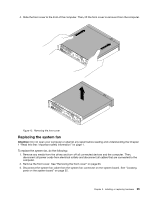
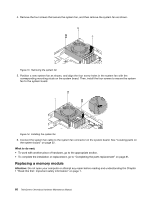
1. Remove any media from the drives and turn off all connected devices and the computer. Then, disconnect all power cords from electrical outlets and disconnect all cables that are connected to the computer. 2. Remove the front cover. See "Removing the front cover" on page 63. 3. Remove the system board frame. See "Replacing the system board frame" on page 68. 4. Disconnect the power button board cable from the power button board connector on the system board. See "Locating parts on the system board" on page 32. 5. Remove the screw that secures the power button board to the computer, and then pull the power button board to remove it from the computer. Figure 20. Removing the power button board 6. Align the screw hole in the new power button board with the tab on the computer and position the new power button board in the computer. Then, install the screw to secure the new power button board on the rear cover. Figure 21. Installing the power button board 7. Connect the power button board cable to the power button board connector on the system board. See "Locating parts on the system board" on page 32. 8. Reinstall the system board frame. See "Replacing the system board frame" on page 68. 70 ThinkCentre Chromebox Hardware Maintenance Manual
-
 1
1 -
2
-
3
-
4
-
5
-
6
-
7
-
8
-
9
-
10
-
11
-
12
-
13
-
14
-
15
-
16
-
17
-
18
-
19
-
20
-
21
-
22
-
23
-
24
-
25
-
26
-
27
-
28
-
29
-
30
-
31
-
32
-
33
-
34
-
35
-
36
-
37
-
38
-
39
-
40
-
41
-
42
-
43
-
44
-
45
-
46
-
47
-
48
-
49
-
50
-
51
-
52
-
53
-
54
-
55
-
56
-
57
-
58
-
59
-
60
-
61
-
62
-
63
-
64
-
65
-
66
-
67
-
68
-
69
-
70
-
 71
71 -
 72
72 -
 73
73 -
 74
74 -
 75
75 -
 76
76 -
 77
77 -
 78
78 -
 79
79 -
 80
80 -
 81
81 -
82
-
83
-
84
-
85
-
86
-
87
-
88
-
89
-
90
-
91
-
92
-
93
-
94
-
95
-
96
-
97
-
98
-
99
-
100
-
101
-
102
-
103
-
104
-
105
-
106
-
107
-
108
-
109
-
110
-
111
-
112
 |
 |
