Lenovo ThinkCentre Chromebox Hardware Maintenance Manual (HMM) - ThinkCentre C - Page 86
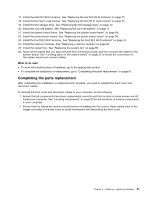
Remove the five screws that secure the system board, and then carefully lift the system board
 |
View all Lenovo ThinkCentre Chromebox manuals
Add to My Manuals
Save this manual to your list of manuals |
Page 86 highlights
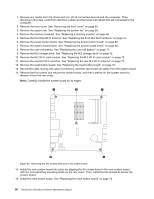
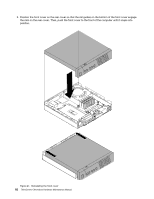
1. Remove any media from the drives and turn off all connected devices and the computer. Then, disconnect all power cords from electrical outlets and disconnect all cables that are connected to the computer. 2. Remove the front cover. See "Removing the front cover" on page 63. 3. Remove the system fan. See "Replacing the system fan" on page 65. 4. Remove the memory modules. See "Replacing a memory module" on page 66. 5. Remove the front M.2 Wi-Fi antenna. See "Replacing the front M.2 Wi-Fi antenna" on page 75. 6. Remove the power button board. See "Replacing the power button board" on page 69. 7. Remove the system board frame. See "Replacing the system board frame" on page 68. 8. Remove the coin-cell battery. See "Replacing the coin-cell battery" on page 71. 9. Remove the M.2 storage drive. See "Replacing the M.2 storage drive" on page 72. 10. Remove the M.2 Wi-Fi card module. See "Replacing the M.2 Wi-Fi card module" on page 73. 11. Remove the rear M.2 Wi-Fi antenna. See "Replacing the rear M.2 Wi-Fi antenna" on page 77. 12. Remove the reset button board. See "Replacing the reset button board" on page 78. 13. Record the cable routing and cable connections, and then disconnect all cables from the system board. 14. Remove the five screws that secure the system board, and then carefully lift the system board to remove it from the rear cover. Note: Carefully handle the system board by its edges. Figure 40. Removing the five screws that secure the system board 15. Install the new system board into place by aligning the five screw holes in the new system board with the corresponding mounting studs on the rear cover. Then, install the five screws to secure the system board. 16. Install the reset button board. See "Replacing the reset button board" on page 78. 80 ThinkCentre Chromebox Hardware Maintenance Manual
-
 1
1 -
2
-
3
-
4
-
5
-
6
-
7
-
8
-
9
-
10
-
11
-
12
-
13
-
14
-
15
-
16
-
17
-
18
-
19
-
20
-
21
-
22
-
23
-
24
-
25
-
26
-
27
-
28
-
29
-
30
-
31
-
32
-
33
-
34
-
35
-
36
-
37
-
38
-
39
-
40
-
41
-
42
-
43
-
44
-
45
-
46
-
47
-
48
-
49
-
50
-
51
-
52
-
53
-
54
-
55
-
56
-
57
-
58
-
59
-
60
-
61
-
62
-
63
-
64
-
65
-
66
-
67
-
68
-
69
-
70
-
71
-
72
-
73
-
74
-
75
-
76
-
77
-
78
-
79
-
80
-
 81
81 -
 82
82 -
 83
83 -
 84
84 -
 85
85 -
 86
86 -
 87
87 -
 88
88 -
 89
89 -
 90
90 -
 91
91 -
92
-
93
-
94
-
95
-
96
-
97
-
98
-
99
-
100
-
101
-
102
-
103
-
104
-
105
-
106
-
107
-
108
-
109
-
110
-
111
-
112
 |
 |
