Lexmark 2050 Color Jetprinter Service Manual - Page 35
Base Assembly Removal, Carrier Belt Removal, Repair Information 4-3
 |
View all Lexmark 2050 Color Jetprinter manuals
Add to My Manuals
Save this manual to your list of manuals |
Page 35 highlights
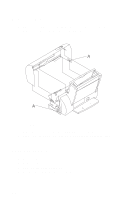
Base Assembly Removal 1. Remove the front cover. 2. Remove the rear cover. 3. Disconnect the power supply connector at the system board. 4. Remove the screw from the maintenance station assembly. Pull up the right side of the mid frame assembly and pull forward and remove the maintenance station assembly. 5. Remove the two screws securing the carrier frame to the base cover. 6. Slide the printer off the base cover. Carrier Belt Removal 1. Remove the front cover. 2. Remove the carrier assembly. 3. Push the idler pulley to the right to release the tension on the belt and remove the belt. Repair Information 4-3
-
 1
1 -
2
-
3
-
4
-
5
-
6
-
7
-
8
-
9
-
10
-
11
-
12
-
13
-
14
-
15
-
16
-
17
-
18
-
19
-
20
-
21
-
22
-
23
-
24
-
25
-
26
-
27
-
28
-
29
-
 30
30 -
 31
31 -
 32
32 -
 33
33 -
 34
34 -
 35
35 -
 36
36 -
 37
37 -
 38
38 -
 39
39 -
 40
40 -
41
-
42
-
43
-
44
-
45
-
46
-
47
-
48
-
49
-
50
-
51
-
52
-
53
-
54
-
55
-
56
-
57
-
58
-
59
-
60
-
61
-
62
-
63
-
64
-
65
-
66
-
67
-
68
-
69
-
70
-
71
-
72
-
73
-
74
-
75
-
76
-
77
-
78
-
79
-
80
-
81
-
82
-
83
-
84
 |
 |

Repair Information 4-3
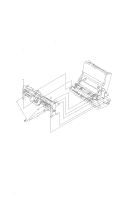
Base Assembly Removal
1. Remove the front cover.
2. Remove the rear cover.
3. Disconnect the power supply connector at the system board.
4. Remove the screw from the maintenance station assembly. Pull
up the right side of the mid frame assembly and pull forward and
remove the maintenance station assembly.
5. Remove the two screws securing the carrier frame to the base
cover.
6. Slide the printer off the base cover.
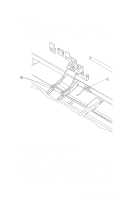
Carrier Belt Removal
1. Remove the front cover.
2. Remove the carrier assembly.
3. Push the idler pulley to the right to release the tension on the
belt and remove the belt.