Lexmark 7000 Color Jetprinter Service Manual - Page 51
Paper Load Door Removal, Pick Roll Shaft, Hub and Envelope Bucklers Removal..., Power Supply Removal
 |
View all Lexmark 7000 Color Jetprinter manuals
Add to My Manuals
Save this manual to your list of manuals |
Page 51 highlights
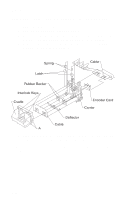
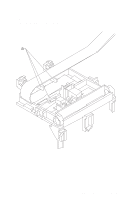
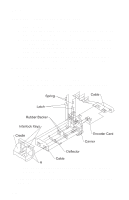
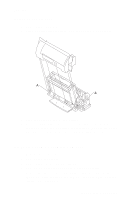
4092-001 Paper Load Door Removal Spread the left side frame where it joins the paper load door and remove the door. Pick Roll Shaft, Hub and Envelope Bucklers Removal 1. Remove the front cover. 2. Remove the rear cover. 3. Remove the paper load door and manual insert tray. 4. Slide the left paper guide to the right. 5. Remove the C-clip from the left side of the pick roll shaft. 6. Pull the pick roll shaft out to the left and remove the pick roll shaft, hubs and envelope bucklers. Note: During reassembly, be sure the pick roll hubs are in the slots at the bottom of the paper guides and the rolls are centered on the pick pads. Power Supply Removal Note: When working on the printer, always unplug the printer from the wall outlet. High voltage is present in the power supply as long as it is plugged into the wall outlet. 1. Remove the front cover. 2. Remove the rear cover. 3. Remove the base assembly. 4. Turn the base over, pull out on the latches, slide the power sup- ply forward and off the base assembly. Repair Information 4-16
-
 1
1 -
2
-
3
-
4
-
5
-
6
-
7
-
8
-
9
-
10
-
11
-
12
-
13
-
14
-
15
-
16
-
17
-
18
-
19
-
20
-
21
-
22
-
23
-
24
-
25
-
26
-
27
-
28
-
29
-
30
-
31
-
32
-
33
-
34
-
35
-
36
-
37
-
38
-
39
-
40
-
41
-
42
-
43
-
44
-
45
-
 46
46 -
 47
47 -
 48
48 -
 49
49 -
 50
50 -
 51
51 -
 52
52 -
 53
53 -
 54
54 -
 55
55 -
 56
56 -
57
-
58
-
59
-
60
-
61
-
62
-
63
-
64
-
65
-
66
-
67
-
68
-
69
-
70
-
71
-
72
-
73
-
74
-
75
-
76
-
77
-
78
-
79
-
80
-
81
 |
 |
